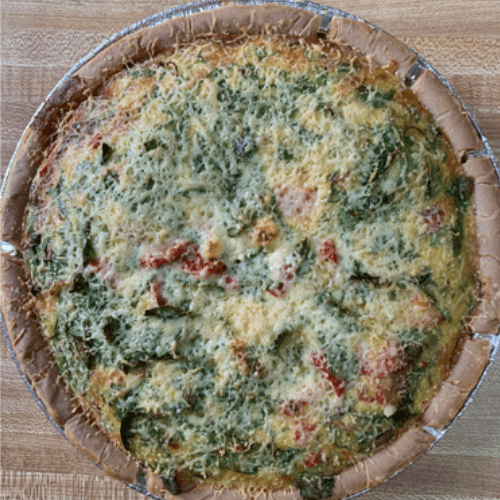
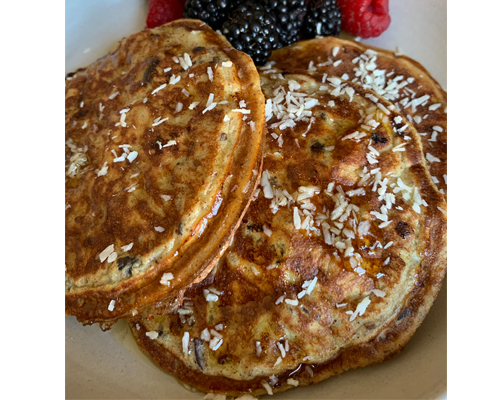
This is one of my favorite recipes and a go-to when I meal prep for my clients. It is so simple and quick and makes for several servings and a great dinner party dish. The crab meat gives it a bit more texture and flavor but you can always skip it for a vegetarian option or add turkey or regular bacon for meat lovers. Option to also remove manchego cheese to make this a dairy free quiche.
3/4 cup unsweetened non dairy milk (my fave is almond or oat milk)
3 Tbsp coconut, almond, or brown rice flour
1 small bunch of asparagus spears (cut approx 1 inches long)
1 small packet shiitake mushrooms
1 small shallot, finely chopped
1 handful of fresh baby spinach, chopped
1 small red bell pepper, diced
2 cloves garlic, finely chopped
1Tbsp avocado or olive oil
2 Tbsp manchego cheese, shaved
1/4 cup cilantro, finely chopped
1/4 cup basil, finely chopped
1/2 tsp sea salt
1/2 tsp old bay
1/2 tsp black pepper
1/2 tsp turmeric powder
INSTRUCTIONS:
Pre-heat oven to 375 degrees.
Poke a few holes in pie crust then place in the oven for approx 5 min. Remove and set aside.
Heat oil in large pan and saute garlic, shallot, red pepper, mushrooms, and asparagus for approximately 5 minutes. Then add crab meat for another 2 minutes.
In mixing bowl, whisk eggs, flour, non-dairy milk, sea salt, pepper, old bay, turmeric powder. Then stir in cooked veggies, crab, spinach, cilantro and basil.
Pour egg and crab-veggie mixture in the pie crust and bake for 45 minutes. Sprinkle manchego cheese and bake for another 2 minutes.
Quiche will rise up and out of crust pan but once removed to cool, it will settle back down. Cool for 5 minutes before enjoying.
We are inundated with so much information in the midst of the COVID-19 pandemic, it’s natural to fall into a state of fear and panic. As we are still in this state of flux, I want to remind you of the key pillars of healthy living as this is our line of defense to stay strong and protect ourselves, those we love, and our community.
#1 HAVE A STRONG MINDSET + DO NOT STRESS
When we are faced with a situation that is out of our control, how we respond is where the true power lies. Have a strong mindset, think positive and behave within reason to gain a sense of control and balance. Taking the CDC precautions of washing hands, wiping areas down, not touching face, and social distancing, we can put matters into our own hands and be socially responsible.
Stressing out during these times do not help. When we stress, our bodies release cortisol which breaks down our immune system. Now more than ever, our immune system needs to be strong and resilient.
#2 FUEL UP ON NUTRIENT DENSE FOODS + HYDRATE
Nutrition is medicine! When we nourish our bodies with nutrient dense foods, we amp up our immune system. Avoid alcohol, sugar, and dairy. It helps to reduce inflammation and mucus so our cells can do their job. Make sure to drink lots of water. Avoid drinking cold water, warm water is best to aid in release of toxins and purification of the bloodstream.
#3 GET ENOUGH ZZZZZ’S
Sleep deprivation doesn’t provide ample time for our bodies to recover therefore weakens our immune system. Make sure to get at least 7 – 8 hours of sleep. Recovery is crucial to help fight off infections.
#4 (LAST BUT DEF NOT LEAST) EXERCISE!
It is so important to maintain physical activity during this time. Not only will it relieve stress but helps to build up antibodies and promotes cellular turnover to ramp up the immune system. One of the main reasons to exercise is to be and feel stronger so when we get hit with these infections, our bodies can tolerate the blow and recover! With technology, we are now able to stream classes and work out at home or opt for an outdoor workout. If you do train at a gym, make sure to keep your distance from other members, be cautious and wipe down all surfaces, avoid touching your face and wash your hands before and immediately after your workout.
Our mind and body is stronger than we think. So let’s tap into our natural super powers, love and laugh and we will all come out on the bright side soon enough. Stay healthy and strong NOW + ALWAYS!
Can you imagine life without movement? – the most basic human movements such as getting out of bed, brushing your teeth, walking your dog, going to your favorite coffee shop, commuting to work, sitting down to a dinner, taking a walk around the block, playing with your kids. These simple movements are done every day without thinking twice: completely patterned, involuntary, and programmed. Once we think about every single moment we make daily, each one is tied to the 7 Human Fundamental Movement Patterns.
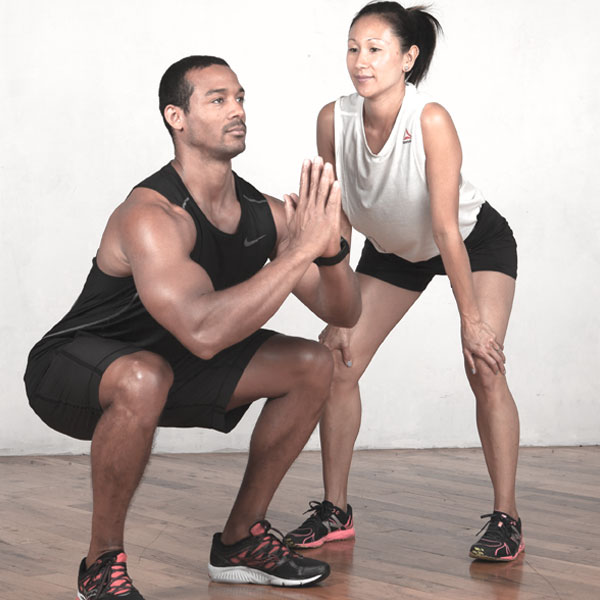
This week, we’ll talk about the importance of the 3 lower body focused movement patterns: squat, hinge and lunge. All three movement patterns involve a hip hinge. The squat and lunge is a form of a hip hinge but in different angles and positioning however all requiring similar movement patterns and muscle recruitment.
What is a hip hinge and what muscles are involved?
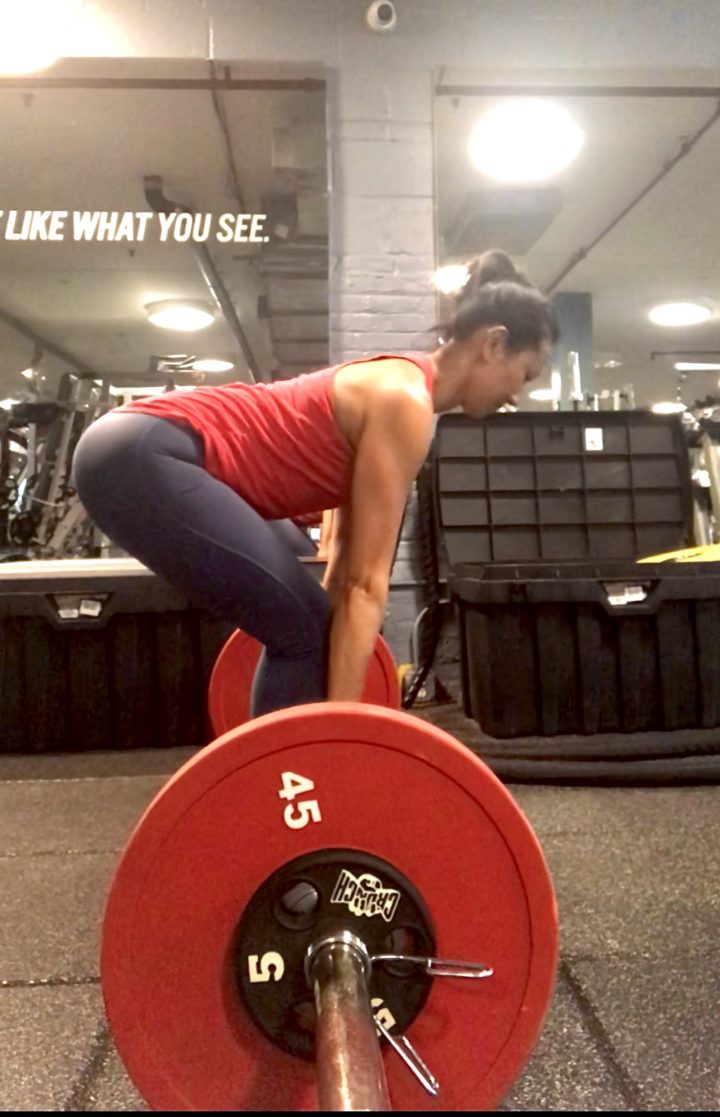
In general, a hip hinge is a flexion and extension originating at the hip that focus on the posterior chain (backside). The primary muscles targeted are the glutes, hamstrings, and erector spinae (back muscles). The adductors, quadriceps and abdominals also help in the movement. It’s very important to keep a neutral spine when hinging to avoid injury especially when picking up heavy loads. One of the most common mistakes is using the lower back to hinge. So when people “throw their backs out”, it’s usually because the hinge was not set up properly and the load was picked up using the lower back instead of the primary muscles.
Common exercises that require a deep hip hinge are deadlifts (pictured above) and squats. If you’re not performing the basic hip hinge properly, more than likely you are not performing those movements correctly and that is an injury waiting to happen.
Daily activities that require you to hinge:
Picking things up from the ground
To take a closer look at something
Putting shoes on
Exercises to master the hinge:
Dowel hinge: place a dowel behind your back vertically (right hand behind neck and left hand behind small of back) with feet hip width apart. Make sure dowel is touching the back of your head, upper back, and sacrum. With knees slightly bent, shift your weight back and push hips as you begin to hinge your torso forward, making sure dowel is connected to your body at those same three points. Once you reach mid way between vertical and parallel to the floor, contract the glutes, push the hips forward and come back up to vertical. Repeat using left hand on top.
Wall hinge: a modified variation of the dowel hinge. Stand 3-4 inches away with your back facing the wall. In keeping a neutral spine and flat back, stick your butt out, and hinge your hips back until the butt meets the wall, then stand back up.
What is a squat and what muscles are involved?
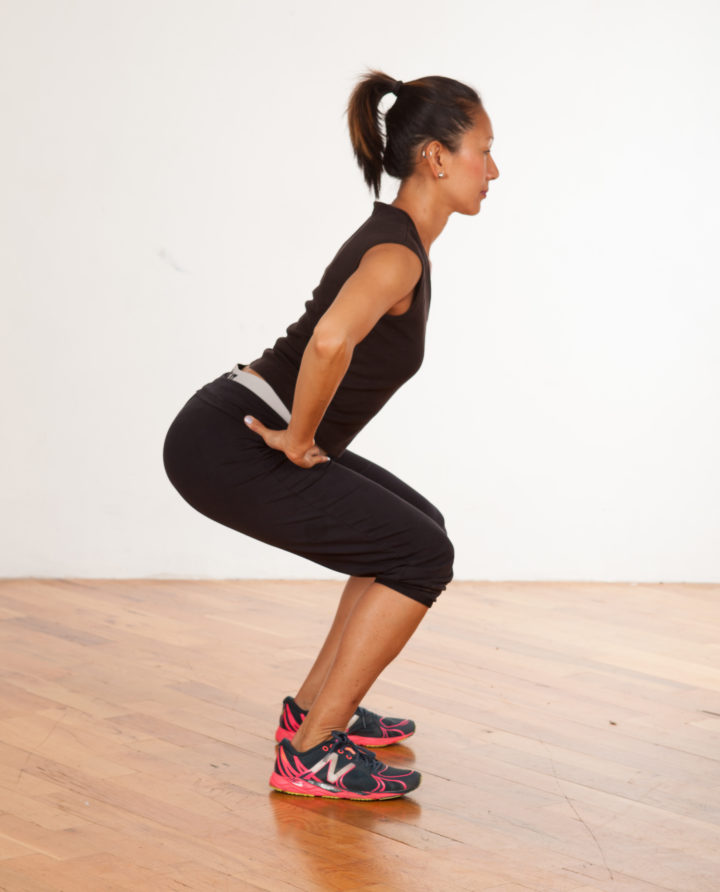
A squat is an exercise where the hips are lowered into a sitting position and then raised back up to standing. During the lowering of the squat, the hip and knee joint are in flexion while the ankle joint dorsiflexes. As you come up from the squat, the hip and knee joint extends and the ankle plantarflexes. The primary muscles involved are the quadriceps, adductors and the glutes. Isometrically, the erector spinae (back muscles) and abdominal muscles play a huge role. The squat test is commonly used to test one’s compensations, tightness, strengths and weaknesses as it targets and challenges so many muscles. Because of this, it is often done incorrectly. So if there is tightness in the hips, lower back, and calves, the form is compromised. If there is heavy load added to the squat, the knees and the lower back will take the grunt of the movement as opposed to the primary muscles. This is definitely one of the human movement patterns that should be performed correctly and often.
Daily activities that require you to squat:
picking up your toddler or heavy bags
sitting/standing in a chair
picking something up from the ground
Exercises to strengthen your squat:
Wall sits: lean up against the wall with your back and position feet hip width apart. Lower down so knees are at a right angle and hold for 30 seconds to a minute. Gradually increase the time and add weight when you feel stronger.
Physio ball squats: lean back up against a physio ball with feet slightly in front of your hips. Bend knees and push back into the ball as you lower down into a squat. Push into feet to stand back up and squeeze glutes.
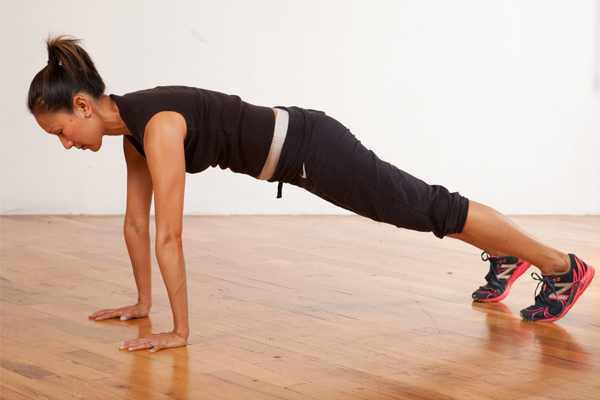
Elbow plank: Lay on belly with elbows positioned directly under shoulders. Lift hips up so only forearms and toes are on the floor. Make sure your body is parallel to the floor, glutes are squeezed and abdominals engaged. Hold for 30 seconds to a minute and longer once you feel stronger.
What is a lunge and what muscles are involved?
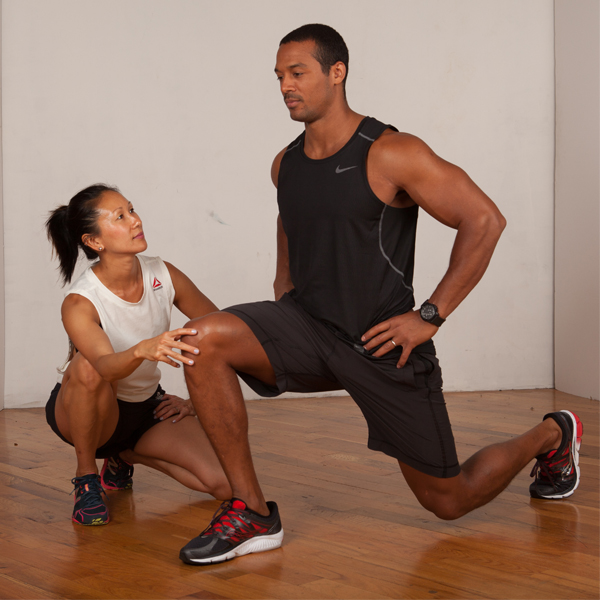
A lunge is a single leg exercise where one foot is forward and flat and the other is positioned behind you. The primary muscles are the quadriceps, glutes, and hamstrings. The stabilizing muscles are the abdominals and the erector spinae (back muscles). There are several variations of lunges (lateral, yoga, curtsy, reverse) but the movement patterns and primary muscles are all the same.
Daily activities that require you to lunge:
Kneeling down to pick something up or tying your shoes
Getting up off the floor
Walking up and down stairs
Exercises to strengthen your lunge:
Kneeling lunges: Start on both knees. Step one foot forward into lunge position then stand up so both feet are together. Use the same foot to step back and lower knee down to bring knees back together. Repeat on other side.
Stationary lunges: Start in lunge position with both knees set up in right angles. Extend legs so both are straight, then lower back leg down to the floor. Repeat for several reps then switch to other leg.
Forward + Reverse lunges: Once the kneeling and stationary lunges are done properly and with ease, progress to forward and reverse lunges. Forward lunges require one foot to step forward followed by the back foot stepping forward to meet the front foot, moving in a forward direction. Reverse lunges require one foot to step back and back knee to bend and lower, use abdominals to stabilize, then front foot pushes back to meet back foot, moving in a backward direction.
Hip hinges, squats, and lunges are done all day every day. These compound movements recruit muscles from the upper and lower body so any imbalances or weakness will alter the form leading to misalignment and injury. These movements are essential to every day living. The most basic functional movements like getting up from the floor, picking things up from the ground, walking up and down stairs should be done with ease and pain free. If not, then working on the strength exercises are a MUST. Practicing the hinge/squat/lunge exercises will help to build strength but what is most important is that you can move through your day-to-day activities without hurting yourself AND…for many many many years to come.
Just last week at a client’s residential gym, I met a man that had been waiting by the door for someone to let him in because he didn’t have the strength to pull the door open. I was shocked and saddened by this. I can’t imagine not being able to perform the most basic tasks that help me get through the day, such as opening a door. Which brings me to discuss two of the 7 Fundamental Human Movement Patterns: pushing and pulling.
Without using a strength meter dynamometer (device that evaluates different forms of strength), a general strength test of a push/pull would be performing push ups and pull ups in good form and without pain. If you struggle with both, assess why and focus on exercises to strengthen and support your muscles to perform these movements properly.
But first, let’s break down the biomechanics of push/pull, its importance, and what exercises can help strengthen them.
What is a PUSH movement and what muscles are involved? Pushing is exerting force to move an external weight away from your body or your center of mass away from the ground. The pectorals, deltoids, triceps are the primary movers in pushing. The serratus anterior, abdominals and the lower body (quadricep and glutes) are just as involved to help stabilize the movement.
Daily activities that require you to PUSH:
– pushing a door
– getting out of bed or off the floor
– placing heavy objects above your head
– moving objects out of your way
Great exercises to help you strengthen your PUSH:
– push ups (modify with knees down if challenging)
– overhead press (barbell or dumbells)
– plank pose
What is a PULL movement? Opposite of pushing, pulling is moving an external weight towards you or your center of mass toward an object. The muscles used for pulling are predominantly in the posterior (back) chain of the body. The lats, rhomboids, trapezius, glutes, hamstrings are the primary muscles. The abdominals, obliques, biceps and posterior deltoids also play a big part.
Daily activities that require you to PULL:
– reaching and pulling an object from the back of a cabinet
– pulling a door open
– picking up heavy grocery bags or luggage
– pulling yourself up from the ground
Great exercises to help you strengthen your PULL:
– pull ups (use a resistance band to help)
– rows and pull downs (with dumbbells, barbell or machine)
– deadlifts
*check out these back exercises, too.
Both movements are incredibly important in day-to-day functioning. Weakness, injury, and limitations in your push/pull will make moving through your day challenging – just like that man waiting by the door . Especially as we age, the ability to push/pull becomes much more of a necessity in the most basic and important movement in life…getting yourself out of bed. So let’s get to work and practice those push/pulls up. I’m always here to help and cheer you on!
As you move through your day, you perform these basic functional movements.
#1 Pull: opening doors, reaching for things, gardening, lifting #2 Push: getting out of bed, pushing doors open, getting/standing up #3 Hinge: picking things up from ground, putting shoes on #4 Squat: sit/stand, lifting heavy objects from ground up #5 Lunge: stair climbing, getting up from ground #6 Twist/Rotation: reaching across your body, turning to see better, changing movement directions as you walk #7 Walk: getting from one destination to another that combines most of the movements above
These 7 fundamental human movement patterns keep you fully participating in life. Whether you are active or sedentary, your body relies on these movements to get things done daily. Limitations in these movements prevent you from performing efficiently and can lead to chronic or acute pain and eventually injury.
Let’s take this way back and view from an evolutionary perspective. These movement patterns were essential to survival: squatting to create a fire, lunging to hunt, pulling to harvest for food, hinging to collect vegetables, and walking miles for food and water. If you physically were unable to complete these movements, your body will think it has a lower ability of survival. Thankfully…those days are long gone. We now have the convenience of Whole Foods, Prime and Instacart that we no longer need to hunt or gather. Yet these movements are still crucial in all aspects of life no matter what you do.
Some examples:
– performing household duties
– picking up your children and being active with them
– manual labor
– daily commuting (climbing subway stairs and walking blocks to a station)
– optimally performing workouts to achieve fitness goals
– being and staying active in your golden years
As much as we have technology to assist us, if you plan on leaving your home and joining the rest of the world, these 7 movement patterns are non-negotiable. So take a moment to assess yourself in each of them. How does your body feel as you perform them? Did you feel any pain, tightness, or weakness? In the next few posts, I will target each movement, what muscles they require, and how to be more mobile and stronger so you can move through your day with confidence, strength, and pain/injury free. Stay tuned!
One of my most memorable New Year’s eve was spent in Woodstock with my good friends Camellia and Renee from Soul Being Wellness. Being in the woods surrounded by great energy, so much love, and delicious food was more than I can ask for. One of the many moments that made this night so special was when we welcomed the new year with a Latin American ritual called El Ano Viejo. A dummy is constructed from newspaper, cardboard, scraps, rags and stuffed with a list of the things you want to release and let go of the year and all things to manifest and create in the new year. The dummy is then burned at midnight welcoming the new year. This experience really stuck with me and will be one I won’t forget.
This year, my plans won’t take me to the woods to celebrate El Ano Viejo, but that doesn’t mean I can’t continue the ritual. This year I will be practicing a similar tradition called Burning Bowl Ceremony. A mindful and intentional practice that can be done in any setting (with caution of course). This simple ritual aims to cleanse you of the past and allow yourself to start fresh to create a more positive and abundant new year.
EASY STEPS TO BURNING BOWL CEREMONY: #1 Create the space
An ideal space would be outdoors (backyard, park, garden, rooftop, etc). Make sure you feel comfortable and safe in this space and it doesn’t contain loud noises or distractions. You want to make sure you can focus with intention.
#2 Set Your Intention
Start with taking 5 deep breaths with your eyes closed. Allows these breaths to ground you and bring your mind to a state of peace and calm.
#3 Make Your List & Let It Burn Baby Burn!
Write down on a piece of paper all the things you want to let go of: negative attachments, mindsets, regrets, sorrow, pain, loss. Place the paper in a metal or glass bowl, light it up, and let it burn. Let the burning allow a feeling of closure, release, and love. You will be surprised how good you will feel after.
So let’s set our intention and light the way into a prosperous new year filled with growth and love.
May 2020 bring you and your family all the peace and happiness the universe has to offer.
Countdown to my fave holiday…Thanksgiving! In less than 36 hours, most of us will be sitting down with our family and friends to enjoy turkey, stuffing, and pie; consuming an average of 4500 calories on this holiday. I encourage my clients to enjoy and indulge in their favorite T-Day dishes, especially if they have been working their butts off all year long with me. I’ll also remind them to be mindful, listen to their bodies, and do these 4 things to avoid going overboard on stuffing and pie.
#1 GO WORKOUT!
If you are planning to consume too many calories on T-Day, give yourself a head start and burn some calories off first. Go for a run, take a HIIT, cardio, or yoga class, or hit the gym in the morning. Better yet, bring a friend or family for accountability! Start the day off feeling accomplished and ready to take on the feast…I mean day! 😉
#2 TAKE PROBIOTICS + DIGESTIVE ENZYMES
Your body is full of bacteria, both good and bad. Probiotics are “good” live bacteria that are helpful to our digestive system. Found in the intestinal tract and made primarily of these 2 groups (Lactobacillus and Bifidobacterium), probiotics aid in digestion and keeping the gut healthy, amongst other benefits (strengthen immune system, weight management, fight against IBS, diarrhea, constipation). Look for foods and drinks that have “live and active cultures” such as yogurt, fermented foods, and kombucha or in a pill or powder form (listing some of my faves).
Digestive enzymes are substances that are secreted by our digestive system and help break down food, allowing the nutrients to be absorbed into our bloodstreams. They help to support proper functioning in our cells throughout the body. Our bodies produce several different enzymes to break down certain foods. For example: amylase breaks down starches into sugars, proteases breaks down protein into amino acids, sucrase breaks down sucrose into fructose and glucose. Supplementing with digestive enzymes will protect from malabsorption of nutrients we need to function optimally. My go-to digestive enzymes are from Dr. Lipman.
These 2 supplements are great to have for every day digestive support. Especially on days like Thanksgiving, where over consumption is likely, we need all the help we can get. Take both these supplements together 20-30 minutes before your meal to assist with digestion and support digestive health.
#3 DRINK A TALL GLASS OF WATER BEFORE YOUR MEAL
Thirty minutes before you sit down to (over) indulge, drink a 16oz glass of water slowly. Drinking water before a meal will give you a sense of fullness and a likelihood of consuming less calories in that sitting. That same glass of water will also help you stay hydrated from the sodium consumed in that meal AND help with digestion by breaking down the foods so your body can absorb the nutrients. YES to all!
#4 MIND YOUR PLATE RATIO
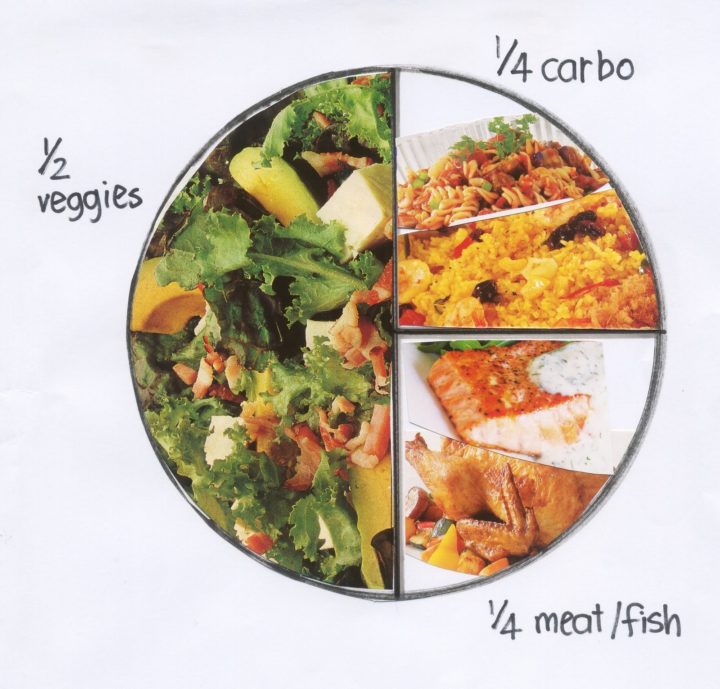
Instead of grabbing the largest plate in the kitchen, grab a medium sized or appetizer plate. Fill half the plate up with salad and/or veggies, a quarter of it with protein (turkey, fish, seafood, etc), and a quarter with carbs (pasta, sweet potatoes, mashed potatoes, stuffing, rice, etc). This will ensure your second helping won’t send you over the edge, mentally and physically. For dessert, cut a sliver instead of a quarter (that would be me!) slice of pie. Take your time, chew at least 20x before you swallow, and savor every single bite and flavor.
Try these and I promise you will feel a big difference. A big part is to be mindful and aware and listen to your body. It’s all about balance and moderation but never deprivation.
On this special holiday, I would love to express gratitude and thank you so much for being a part of my community and keeping up with me. I am truly grateful for you and look forward to sharing more to help you stay fit and healthy. HAVE A SAFE AND HAPPY THANKSGIVING TO YOU AND YOURS! xo
There are certain things you do that come naturally. You don’t even have to think about it. Your mind and body instinctively functions with ease and confidence. Your actions are involuntarily, like second nature. So what happens when you are challenged with something that you are just not good at? You struggle, get easily frustrated, your brain shuts off, become mentally drained, and more than likely you give up and never attempt it again.
Here are 3 things that I suck at but I keep striving to be better.
#1 SNOWBOARDING
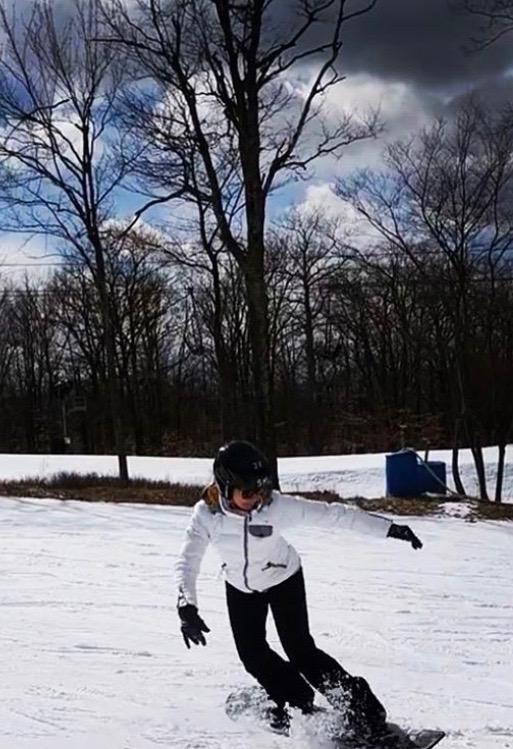
Every year, my family plans a winter trip that I dread. I adore my family and, to me, nothing is better than family time. But I know that I would have to get on a snowboard, ride the lift, and make my way down (repeatedly). I start feeling the frustration days before the trip and already have negative feelings about the whole experience. I’ve got a crap attitude about it from the minute I get there through the whole gearing up process. It’s a lose-lose for me, right? WRONG! Every single time I go, I remember the feeling of being on the board so my body is at ease quicker than the year before. I automatically acclimate to the instability of the board and understand how to fall and land softly. I learn just a little bit more about my body and the sport. So this year’s trip wasn’t so bad. I did walk in with a negative attitude and my brother and I always get into a little argument (as he so sweetly is trying to teach me) but eventually, I was up and down the slopes on my own and felt much more confident. My brother and sister-in-law are snowboard fanatics so this trip will happen every winter…it’s inevitable. But I am determined to get better every year instead of just giving up and sitting in the hot tub. 😉
#2 DANCE CLASS
I LOVE LOVE LOVE to dance and am actually a pretty good dancer on the dance floor. But throw me in a class where the steps are choreographed and timed…I’m the one 5 steps behind. There is a major mental block in my head when it comes to choreography. I still can’t explain what it is but I fight tooth and nail to do better. I have been taking dance classes every week for almost 2 years and still struggle through a class but am doing 100x better than my very first class. Just like training your muscles, training the brain is just as (if not, more) important. New brain cells form, stronger connections between them, and better mental activity. Challenging your brain to different tasks and thought patterns, in the long run, help with better brain function and reduce the risk of cognitive decline. Especially as you age, putting your brain through these tests daily is crucial. The frustration and insecurity I used to feel has been replaced with a bit more confidence and a feeling of “just not giving a crap” because I’m having so much fun. I am so grateful for my client, Amita, for encouraging me to go to Broadway Dance Center. It started my love and motivation to succeed in dance class.
#3 TRAPEZE SCHOOL
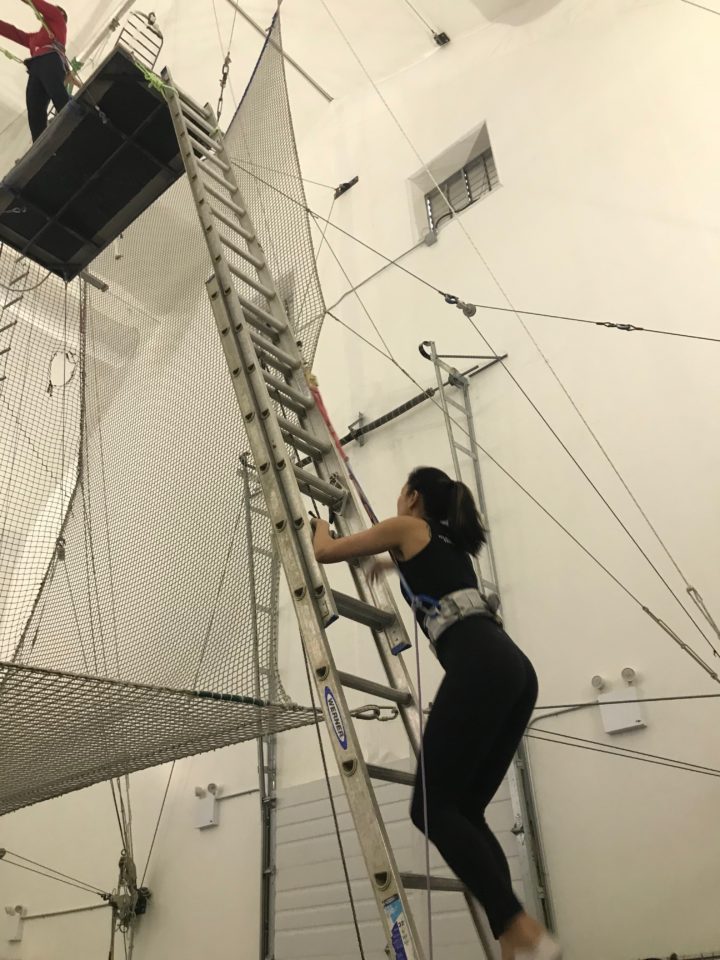
Have you ever climbed up a ladder or looked over an edge and feel your legs quiver and the sensation of falling? That was me every single time I was challenged with height. I hated the feeling and it was sometimes debilitating. My phobia of heights was unbearable and worse part was I had no control over it. So when I came across Trapeze School of NY, I knew I had to take a class. There was just no escaping my fear. A harness is attached to my waist so no reason to fear falling to injury but I still had to climb up a ladder taking me to a platform approximately 50 feet from the ground. Once on the platform, I jump off it and swing back and forth from a trapeze bar. It was nerve racking and so stressful the first 3 attempts but the more I did it, my body adjusted and the less panicky I became. The body is amazing and can acclimate to anything when exposed to repetition. The stress receptors fired up in my brain, kicked me into survival mode and made me stronger with every “fly” (trapeze lingo). I learned to adapt to the climb and the pull of gravity as I leaped off the platform. Slowly, I was able to detach from my fear and feel my body go through the motions. I gained a sense of awareness and began to control my body and mind to perform. I have taken 4 classes so far (and just booked my 5th) and every time I fly I feel more confident. Climbing the ladder is now a piece of cake however jumping off the platform still needs work. But I absolutely love it and have definitely overcome my fear of heights.
You may ask…What’s the point? Why should I put myself in such a vulnerable position? Is it worth it? Who cares? Why start at the bottom? What if I never get better?
My ONE answer to you is WHY NOT??? The feeling of accomplishment alone makes it all worth it. Tackle a challenge, supersede expectations, break down insecurity, and manage the self talk and frustration are all reasons to do something you’re not good at. Not to mention the brain gains! Choose ONE thing you’re not good at or something you have always wanted to do but afraid to fail at…and JUST DO IT!!If you put your mind to it, you will achieve it. I would love to hear about your journey so don’t hesitate to email me and let me know. HAVE FUN doing something you suck at! I’ll be cheering you on!!
Warmer weather is on the horizon and vacations are approaching us. I just returned from an amazing trip to Nicaragua but after 2 full days of traveling, in and out of airports and on connecting flights, my body was aching with tightness and tension. Long haul flights are really tough on the body. Cramped seats, limited movement for hours, terrible posture, and poor circulation all lead to creaky joints and body aches and pains.
Here are 5 EASY MOVEMENTS to do before, after, or during your flight to increase blood flow and keep you loose so you can step off the plane pain free!
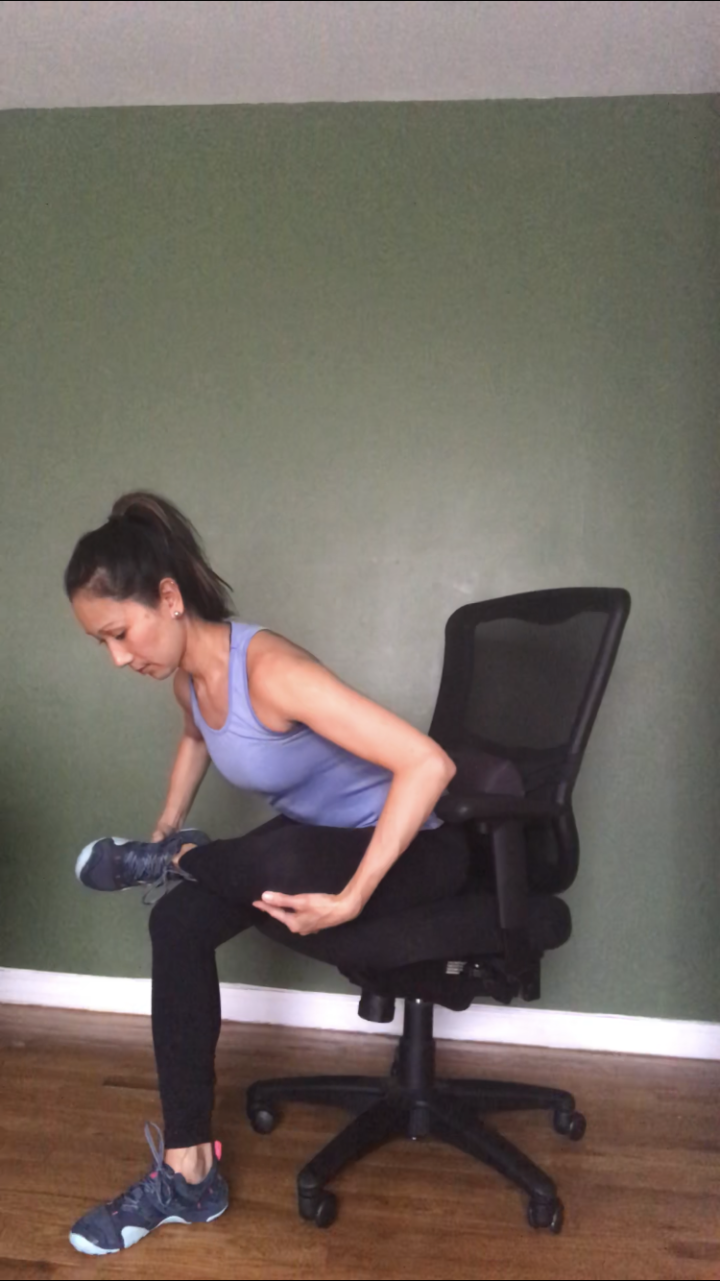
#1 SEATED FIGURE 4 (Hold for 20 deep breaths per leg)
Tips: (1) Flex the foot of the leg in figure 4. (2) Keep chest up and moving forward. (3) Make sure hips are even on the seat.
Focus: Relieves tightness in the glutes, posterior and abductor muscle groups of the hips.
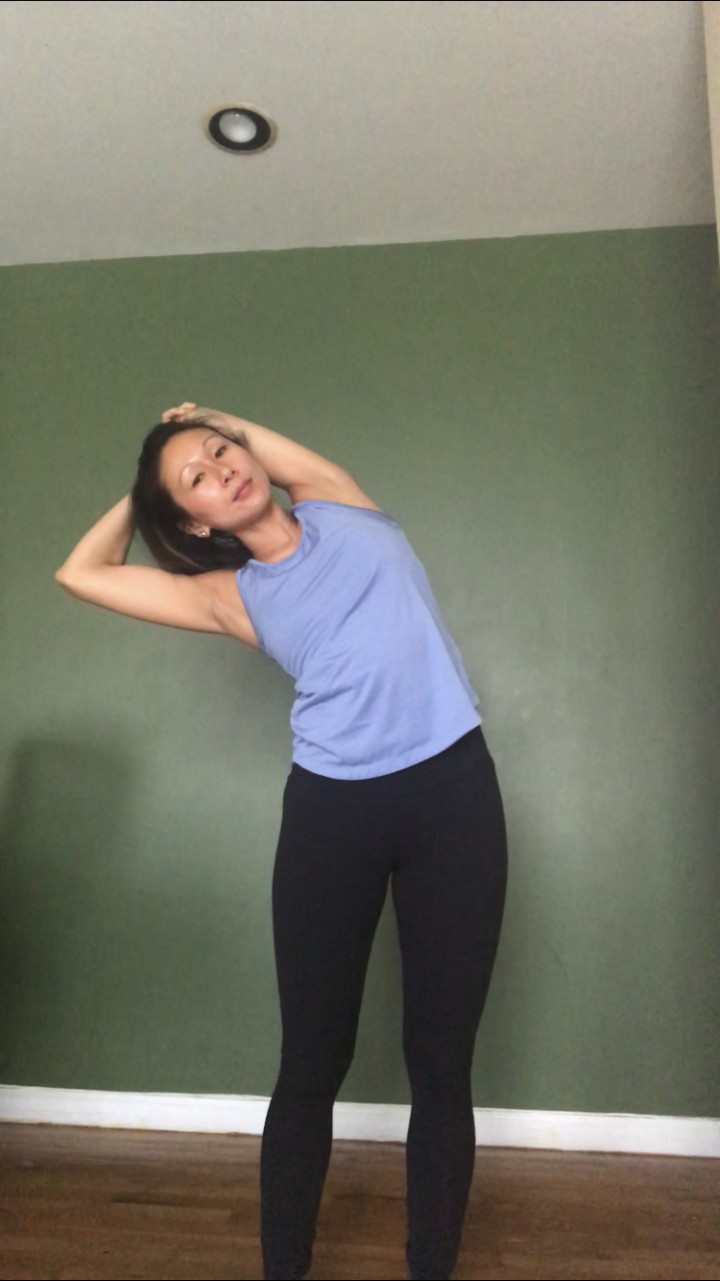
#2 SIDE WAIST & TRICEP STRETCH (Hold for 10 deep breaths per side)
Tips: (1) Place forearm behind the head and keep chin up so arm doesn’t push head forward. (2) Stand up straight and make sure to not rotate the chest. Lean laterally to the side.
Focus: Stretches side waist into outer hip and down side of the leg. Opens shoulder joint and backs of the arms. Increases length throughout the side body.
#3 FOOT ROLL (Roll 2 minutes per foot)
Tips: (1) Use a tennis ball or TP Therapy trigger point ball. For more intensity, try a lacrosse or golf ball. (2) Roll feet while seated for less pressure. Stand for more intensity. (3) Find a tender spot and stay on that spot. That’s the good stuff you want rolled out.
Focus: Myofascial release of all muscles and tendons of the feet. Reduces foot pain and helps with plantar fasciitis and calf tightness. Helps to increase circulation throughout the foot and lower leg.
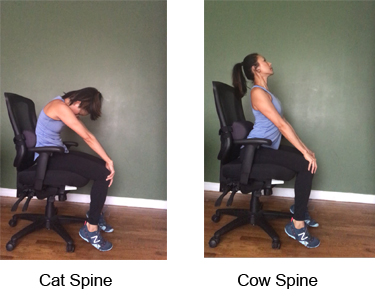
#4 SEATED CAT & COW (Stay for 20 breaths)
Tips: (1) Start the movement from your pelvis (tucking and arching). (2) Breathe with every movement (inhale with cow, exhale with cat or vice versa).
Focus: Increases flexibility of the neck, shoulders, and spine. Also stretches hips, back, abdomen and chest. Movement helps to destress and promote circulation throughout the body.
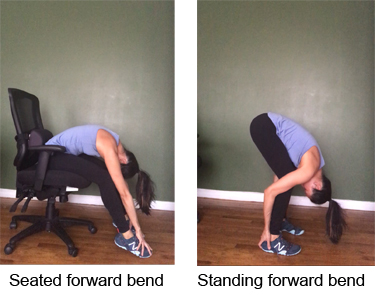
#5 STANDING OR SEATED FORWARD BEND (Stay for 20 breaths)
Tips:
Seated: (1) Bend the knees and keep chest on the legs. (2) Relax your head and neck and stretch arms forward and down.
Standing: (1) Bend the knees and keep chest on the legs while pulling yourself forward and down to toes. (2) Shift weight into mid-foot or balls of the feet (3) Use arms to help pull yourself down the legs.
Focus: Stretches posterior muscles of the body (entire back, glutes, calves, hamstrings, and neck).
Whether you’re traveling for work or on a vacation, the more time you spend on an airplane, the tighter your body will get. For those longer flights, try to get up every hour or so to stretch the legs out, perform these movements and bring circulation back to the body. Your body will thank you for it!
Today the average office worker sits at their desk for 8-10 hours a day! And that doesn’t count the time at home on the couch so that can be over 12 hours of sitting in one day. That is an insane amount of time sitting on your butt, more than likely in poor posture and limited movement for hours at a time.
When sitting for a prolonged period of time, a chain of physical problems happen.
Neck and back muscles tense up from holding the upper body up right.
Spine stiffens from the base of the neck to the tailbone that will eventually lead to an inflexible spine. All muscles surrounding and supporting the spine will tighten up, too. Bad all around.
Hip flexors contract and shorten causing stress and pain in lower back.
Tremendous pressure is applied to lower back discs causing compression and possible nerve damage.
Blood pools in areas not being moved and poor circulation or numbness can occur.
Weak and saggy glutes causes instability through the hips leading to shooting pain and less power in every day walking and movement.
You’re probably sitting right now reading this blog post as I’m sitting writing it. If you are, then stand up, reach your arms up to the ceiling and take a deep breath in. And let’s do these 3 quick stretches to reset your body.
#1 FIGURE 4 HIP STRETCH (Hold for 15 breaths per leg)
TIPS:
Flex the foot on the leg to stabilize the knee.
Lean forward with a flat back and keep gaze forward.
Sit behind your tailbone so the lower back is not rounded.
#2 CAT & COW (Perform for 1 minute)
TIPS:
Make sure to breathe during each movement.
Position hands directly under shoulders and knees under hips.
#3 CHEST OPENER (Hold for 15 breaths per side)
TIPS:
Keep hand in line with shoulder.
Stand as close to the wall as possible and keep turning to face forward.
Guaranteed this will make you feel so much better. And if done throughout the day, it can be a short meditation to reset your mind, too. Set an alarm on your phone for every 90 minutes to stop your work, get up from your seat and take this stretch break with me. It will prevent possible health risks and physical ailments, which is always a WIN WIN!