Yoga

5 Stretches For Better Hip Mobility

In a general sense, mobility is the ability to move or be moved freely and easily. In the fitness world, mobility is being able to perform functional movement patterns without restrictions in range of motion (ROM)

The hip joint is the largest and one of the most important joints of the body. It bears our entire body weight when we walk, run, and jump.  Functionally, the hip joint is one of the most flexible joints and allows the greatest range of motion yet it’s also one of the tightest areas of the body and one that creates chronic and reverberating pain. It connects our upper and lower body so the muscles attached above and below the hip are affected by movements supported by this joint system. These movements require work from these muscles that stabilize and support and will place a certain level of force on the hip. The hip joint must accommodate these forces repeatedly. With repetitive motion, tightness occurs which create restrictions in the body. Mobility becomes challenging due to these limitations.

Open hips help to relieve back pain, improve circulation through the legs, increase agility and flexibility of your gait which all equates to better mobility.  The hips are also at the center of your body and alignment so releasing the hips will help to relieve tightness in areas above and below this ball and socket joint. Super important!

Here are 5 stretches to help you increase hip mobility. 

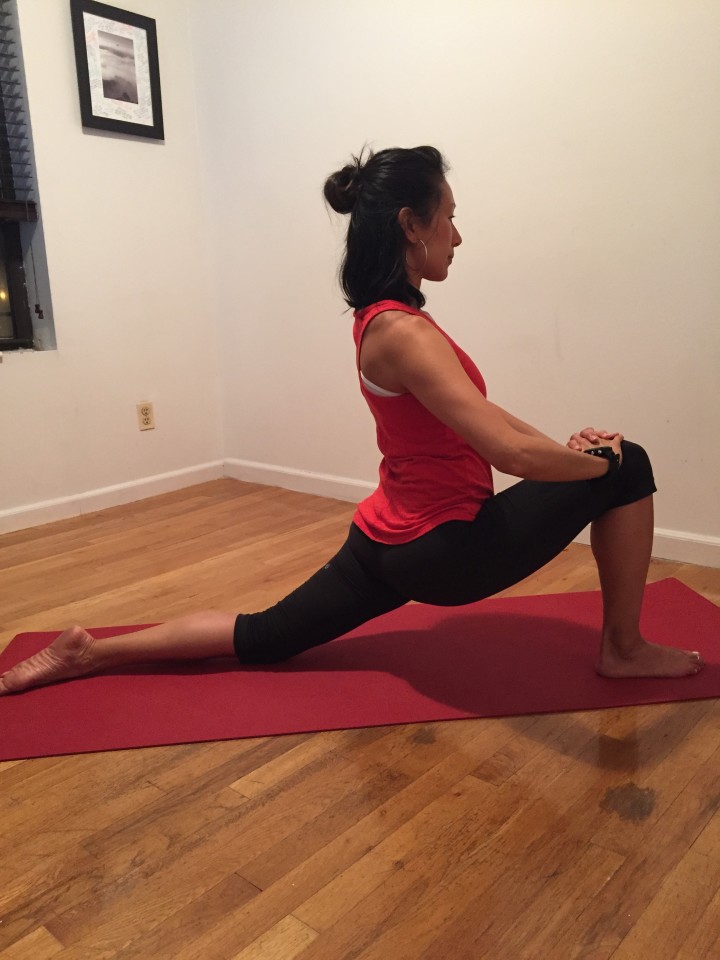
LOW LUNGE
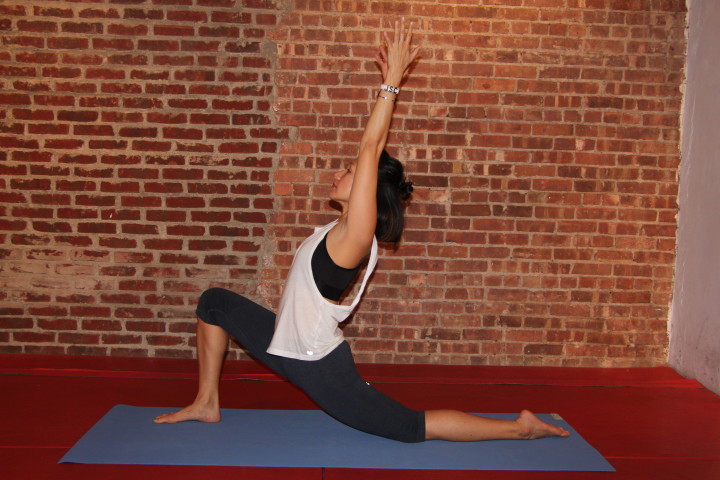
anjaneyasana

GREAT FOR:
– Releasing tightness in the lower back especially for those that experience sciatica and LBP (lower back pain)
– Opening the hip flexors (psoas, rectus femoris, TFL) and the front chain of your body (rectus abdominis, pectoral muscles, side waists)
– Increasing ROM for faster and more agile movements

SOME TIPS:
– Keep the front foot directly under the knee
– Slide back leg as far back as you can so you’re above the knee joint and not directly on the patella (knee bone)
– Try to connect back pinky toe to the floor (slight internal rotation of back leg)
– Draw the abdominals in to protect lower back when leaning back


LIZARD POSE
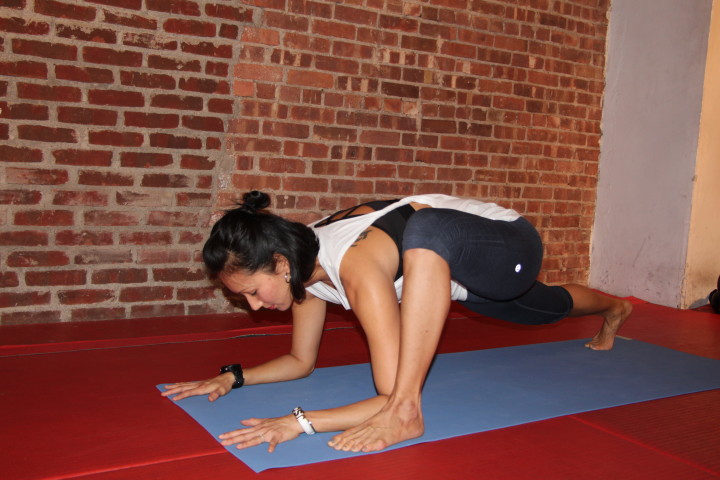
lizard

GREAT FOR:
– Stretching and releasing inner thighs while opening the hip flexors
– Increasing range of motion and gait for longer strides
– Opening the chest and shoulders

SOME TIPS:
– Align the front knee directly above the foot
– Keep back leg as straight as you can. Drop the back knee to the floor to modify
– Keep chest lifted and back as flat as you can (avoid rounding upper back)
– Draw the front knee as close to the shoulder (midline) as you can


PIGEON POSE
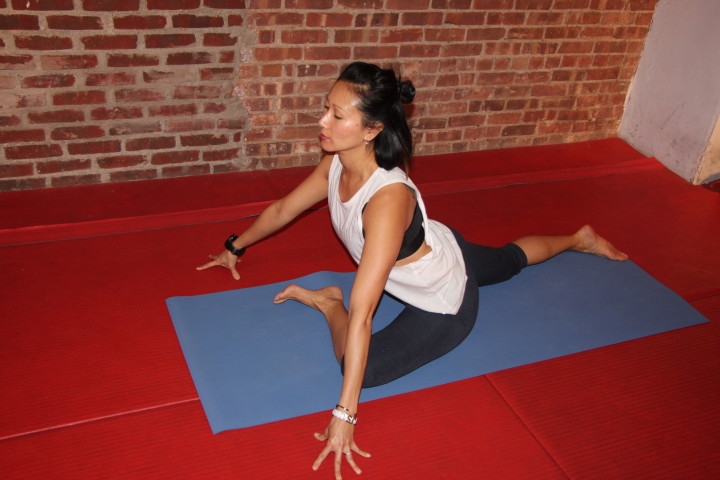
pigeon

GREAT FOR:
– Relieving chronic LBP and sciatica
– Opening the hip flexors and inner thighs
– Releasing tension and increase ROM in the hip rotator muscles (glute medius, glute minimus, piriformis, gemellis)
– Increasing circulation through the legs and digestive and reproductive systems

SOME TIPS:
– Keep back leg as straight as you can
– Keep hips squared by placing each hip on its own side of the mat
– Keep front shin parallel to the front of your mat. Modify by propping your seat up with blankets or blocks
– Keep front foot flexed to stabilize the knee joint


COW FACE POSE
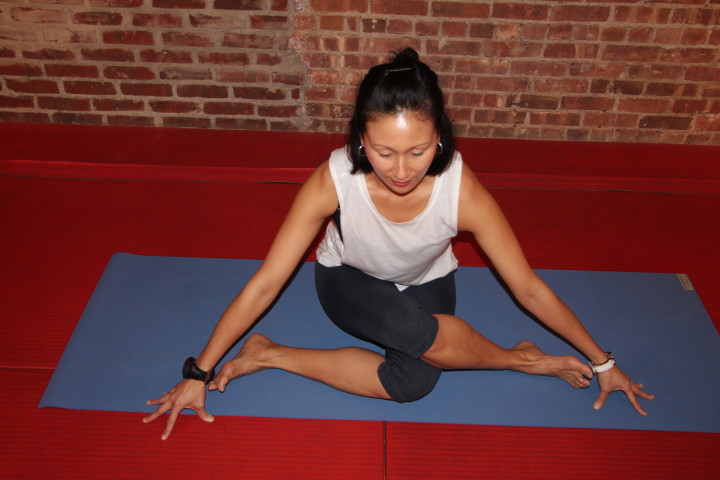
garudasana2

GREAT FOR:
– Releasing tension in the outer hips and lower back
– Opening all hip rotators muscles
– Stretches ankle joints

SOME TIPS:
– Flex both feet to stabilize knees
– Cross legs at the knee joint
– Prop your seat up with blankets or blocks to modify
– Keep a straight back when leaning forward over the legs
– Breathe…this is a very intense hip stretch!


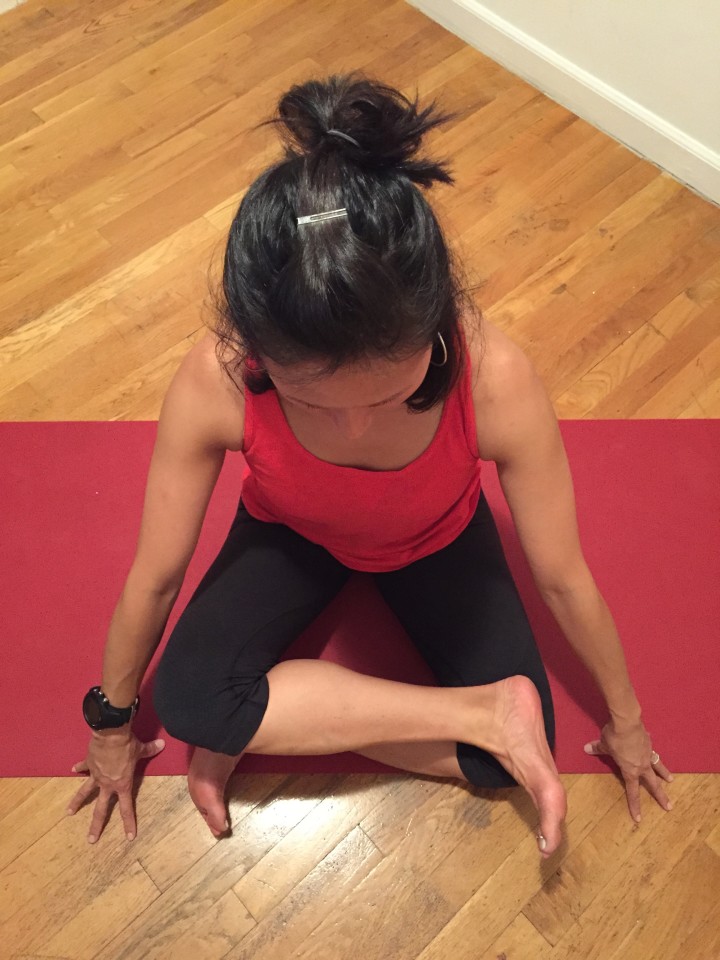
ANKLE TO KNEE
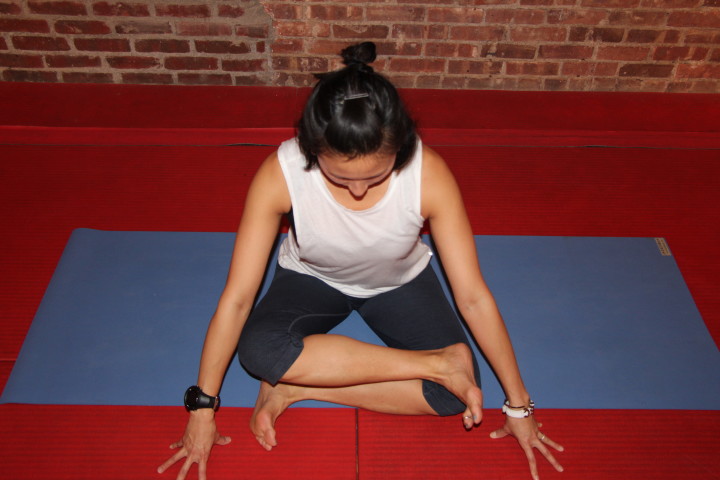
ankletoknee

GREAT FOR:
– Relieving tightness in LBP and sciatic pain
– Releasing hip flexors and rotators
– Increasing ROM for quicker and longer lateral movements

SOME TIPS:
– Align both feet above and below the knees to form a triangle with both legs
– Flex both feet to stabilize knee joint
– Keep lower back slighted arched and back straight when leaning forward

*Hold each stretch for at least 20-30 deep and long breaths. I promise it gets easier, the longer you stay in the stretch.

The muscles and attachments of your hip joint are extremely strong, as they should be to keep this large joint stable. However this also makes stretching it a challenge! For those that sit all day long, your hips are in a constant state of flexion, so working on flexiblity and mobility is not to be overlooked. The tighter the hip, the less you use them. The less you use them, the tighter they get. Vicious cycle! So the more you release and open the hips, the more you can release tension and prevent restrictions…all leading to better mobility. We can all agree that we want to move without limitations and more importantly without pain. So the more mobile our bodies are, the faster we can move and feel good doing so.
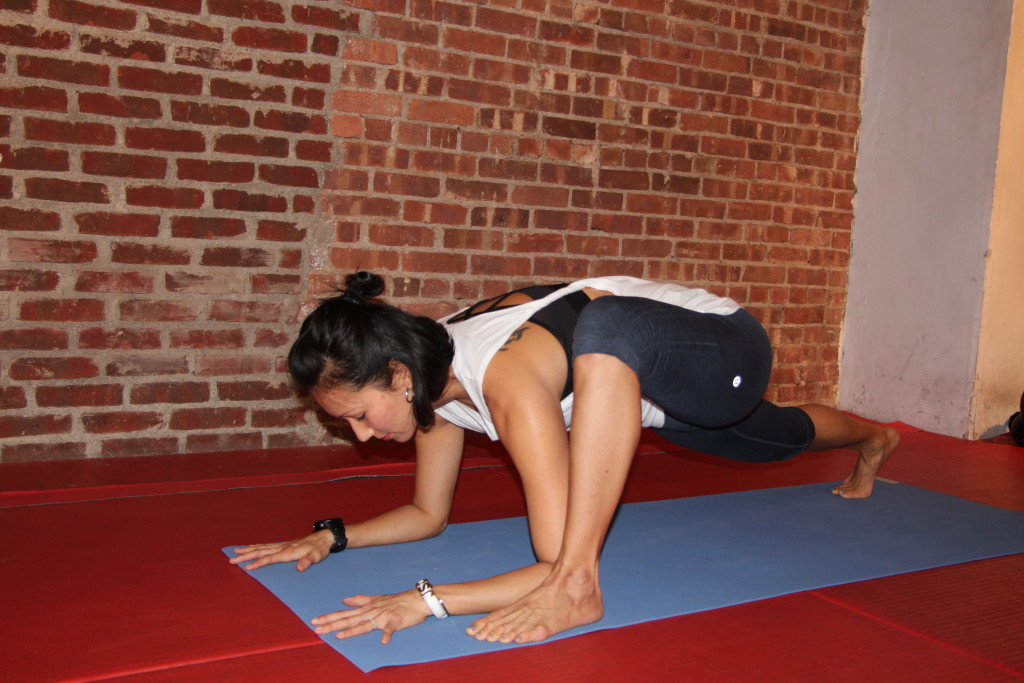


Are You Doing These Right?…4 Yoga Twists Often Done Wrong

Twists are a favorite among many yoga practitioners. These poses can be advanced and have several health benefits.

Rotating and twisting your upper body releases tightness in the lower back to promote spinal neutralization and better rotation and aids in detoxification and digestion. However most who attempt these twists are often doing them incorrectly. Jamming their bodies into a position they’re not ready for or not fully understanding the alignment of the pose are the common reasons yoga twists are often done wrong. The end result of incorrect twisting are over stretched muscles in the hips and lower back which in time will create instability and injuries.

Here are 4 twisting poses, their common mistakes, and how to fix them!

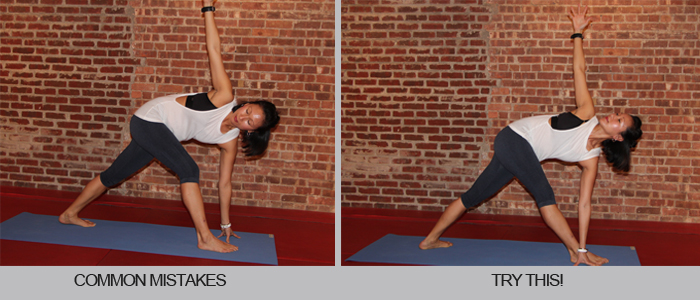
1.REVOLVED TRIANGE POSE (PARIVRTTA TRIKONASANA)

Revolved Triange

Common Mistakes:
– Bending front knee too much
– Hips are tilting to one side
– Yanking the top arm back

Fix it:
– Use a block so the front knee straightens completely.
– Keep your hips in a straight line by moving the hip of the front leg back and the opposite hip forward.
– Twist more at the waist, rotate your chest up and bring your gaze to the ceiling.

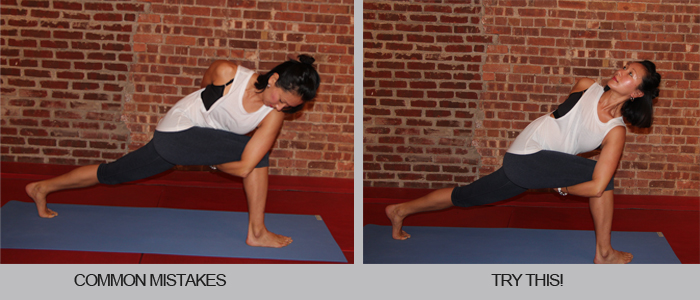
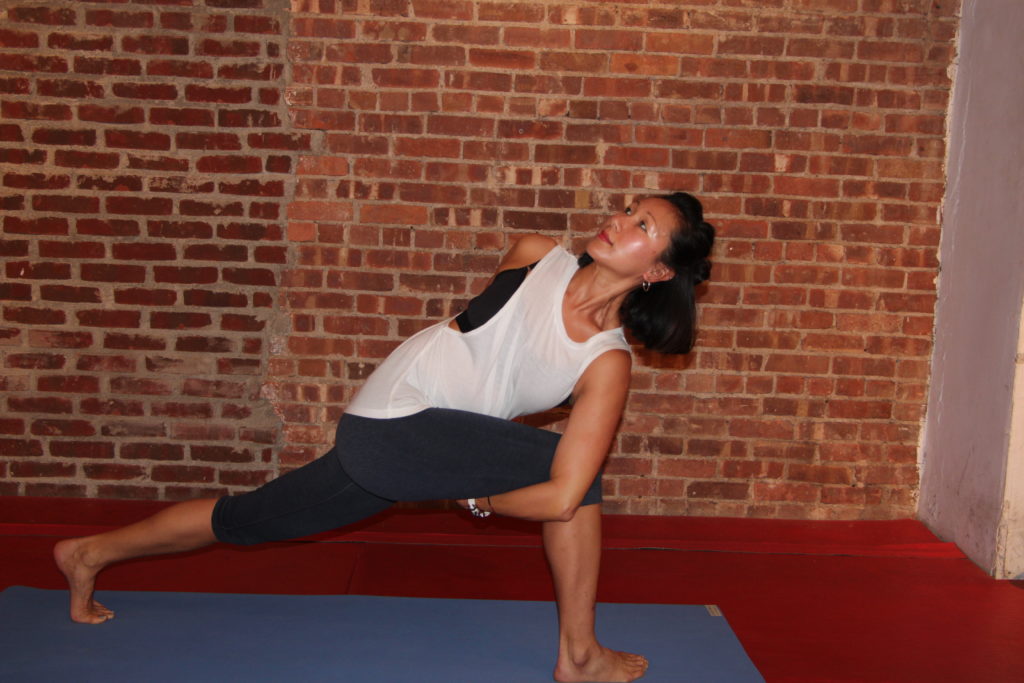
2. BOUND REVOLVED SIDE ANGLE POSE (PARIVRTTA BADDHA PARSVAKONASANA)

Revolved Side Angle

Common Mistakes:
– Back leg bends
– Hip tilts to one side
– Upper body rests on the front leg so chest collapses and top shoulder falls forward

Fix it:
– Completely straighten the back leg to help stabilize and balance. It’s really hard but so helpful.
– Move the hip of the front leg back to align the hips.
– Use the arm to knee connection to elevate the chest, twist more at the waist, and bring your gaze up.

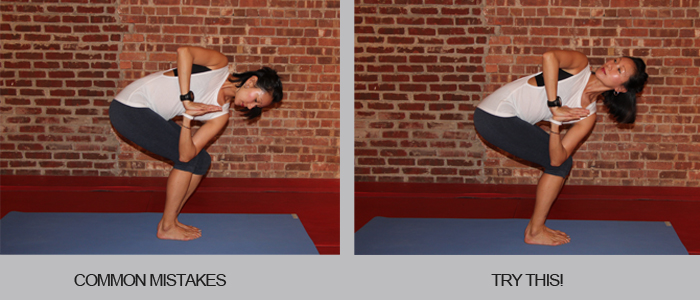
3. REVOLVED CHAIR (PARIVRTTA UTKATASANA)

Revolved Chair

Common Mistakes:
– Shoulders collapse and chest falls forward
– Rounding in the lower back
– Knees and hips are not in a straight line

Fix it:
– Press the arm into the knee and the knee back into the arm to help you twist more at the waist instead of the hips. Press the hands firmly together to widen the collarbones and open the chest.
– Stick your butt out to arch the lower back. This will help to increase the range of motion in your twists.
– If one knee is in front of the other, slide that same side hip back and that will align both your hips and knees.

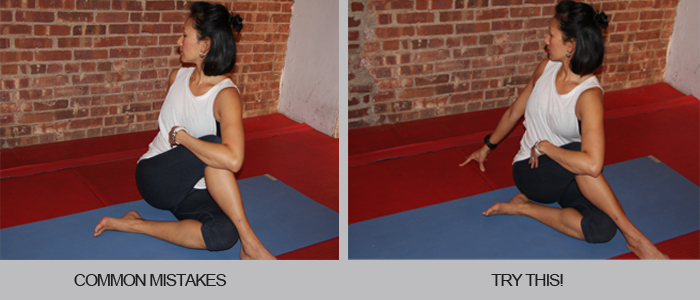
4. SEATED SPINAL TWIST (ARDHA MATSYENDRASANA)

Seated Twist

Common Mistakes:
– One hip is lifted
– Too much leaning forward and chest collapses

Fix it:
– Ground through both sitz bones so hips are aligned before twisting. Placement of the top foot can be adjusted to help with hip alignment.
– Lean back pulling the top leg towards you and use it to twist the torso, lift the chest up, and straighten the spine.

Many people compromise safe alignment so they can get into these twists. You should be able to breathe deeply and feel length in the poses, not congestion and pain. If you’re attempting these twisting poses and struggling to hold them, a modification is a must. Opt to drop the knee down, use props and break down the pose into steps. Little by little, you’ll inch your way into a deep, effortless, and detoxifying twist.

Yoga on Steroids?

“Bootcamp Yoga”, “Yoga on Steroids”,”Kick Ass Yogi”, and “Military Yogi” are some names used to describe me and my yoga classes. I take them all as a compliment because I admit…I do have a very unique and somewhat intense style of teaching.

I started my fitness career as a personal trainer then later received my certification as a yoga teacher. I have crazy love for high intensity sport and training which explains a lot about my style of yoga teaching. Many yogis would disagree with the way I teach but I can give 3 poops about it. There are so many schools and styles of yoga. Some offering a grounding and more spiritual practice and others a more physical and anatomical approach. I am not about chanting or preaching about life lessons (I’m still learning my own so I’m not about to teach someone else) nor do I touch the topic of chakras or energy work. I love and believe in all of the above but it’s just not in me to teach them.

What I strive to teach my students is what most teachers didn’t teach me when I started yoga. And that’s how to prevent injuries from happening when practicing. Students come into class throwing themselves into a flow and jamming their bodies into poses, causing more pain in the long run. I want my students to understand each pose, what muscles to engage, which are lengthened, how to breath and stay focused, and the importance of full body integration during a practice. Most students will rely solely on their flexibility and fail to use their muscles. It’s so important to build strength when practicing. Have a solid and strong foundation in the basic poses and the more challenging (+ pretty) ones such as inversions and arm balancing will come easier.

So YUP…with this in mind, my sequences are intense and chock full of ab/core work, full body strength focused exercises, and long held poses. So what are the benefits to my “power yoga” teaching?

Here they are!
1. Gain a strong understanding of what muscles to engage when holding poses
2. Learn the alignment structure of each pose
3. Build full body strength when holding poses and flowing through them
4. Break a sweat and get the heart pumping
5. Increase flexibility through strength to avoid over-stretching attachments (tendons and ligaments)
6. Prevent injuries and keeping the body safe and efficient for years to come
7. Learn full body/mind connection and awareness

Here’s a quick power sequence that I love to teach and one you can do at home. Use this sequence as your own yoga practice or before a workout to get the heart going, the muscles working, and your body flowing. 😉

I totally get it…a power yoga sequence is not for everyone. Well that’s the beauty of yoga…it’s never a one size fits all.  Because of all the injuries in my early years of practice, it’s become the main reason I teach with focus on alignment and strength. I beg of students (especially those who are just beginning yoga) to take the time to understand the poses as you flow through them. Work with a teacher that will demonstrate and explain the alignment and foundation of each pose. It’s an invaluable lesson that will save you from future injuries and to enjoy a life long yoga practice.

Hey Man…You Need Yoga!

In the female dominated world of yoga, I’m actually seeing more men attending my yoga classes. Although the classes I teach are more of a power yoga style, they’re still coming week after week and I love it. It shows me that the old association of yoga being touchy feely, only for women and for hippies is finally making its breakthrough. Men are understanding the importance of adding yoga and stretch to their fitness routine and those who are consistent are seeing results.

With my experience in teaching yoga and performing personalized stretch sessions, it’s evident that yoga and stretch are great for the body and can increase potential in very specific activities. Here are some examples!

Mike Loves Yoga & Stretch
My good friend and trainer, Mike plays football and in order for him to be faster and more agile on the field, he needs to move in different planes of motion at max speed. If his hip flexors and rotators are tight, his ability of moving quickly and easily is limited to a very specific range. He can lack power in agility or move too quickly when tight which can cause an injury. Mike stretches with me once a week in addition to taking yoga classes.  Great job, Mike!

Manuel Loves Yoga & Stretch
My man loves his overhead squats! This CrossFit exercise requires specific muscle mechanics in order to execute safely and properly. So much mobility, flexibility, and stability is required in the shoulders, hips, hamstrings, glutes and adductors. Without a full range of motion or flexibility in those muscles, this exercise becomes increasingly difficult and unsafe to perform. Manuel spends at least 15 minutes after his workout to stretch, takes my power yoga class, and will grudgingly take a class with me. Yay Manuel!

Jonathan Loves Yoga & Stretch
Jonathan owns a finance company and barks orders all day long to over 100+ employees. He is consistently in demand and pulled in every direction. The stress and tension he feels every day is unbearable at times and the only way he can wake up the next morning to handle the pressure all over again is to create space in his body and mind. But that doesn’t come without challenge. In our stretch sessions, he is forced to succumb to specific yoga poses, stretches, and breathing that help release physical and mental tension. Without this, he would not perform at the peak level his work demands of him. Way to go, Jon!

There you are…solid proof that yoga does a man’s body good.
Here are 4 poses/stretches that all men can benefit from. So whether you perform agility sprints, deep squat, or run a successful company, these are the go-to stretches that will change your life!

LOW LUNGE (ANJANEYASANA)

lunge

Low Lunge

Benefits:
1. Stretches hip flexors (illiopsoas, rectus femoris, sartorius) and rear of the hips (piriformis and glutes)
2. Strengthens quadriceps of the front leg, helping to support and increase stability in the knee
3. Promotes balance and mental focus

Make sure to:
– Align your front knee above the ankle
– Drop your hips down, engage your abdominals to protect the lower back, and lift the chest up

DOUBLE PIGEON (AGNISTAMBHASANA)

doublep

Double Pigeon

Benefits:
1. Stretches outer hips (gluteal group, tensor fasciae latae) and lateral rotators (piriformis, quadratus femoris, gemellus, obturators, psoas, sartorious)
2. Increases range of motion at the hips
3. Therapeutic for stress relief and anxiety

Make sure to:
– Sit as far forward as you can on your sit bones or in front of your tailbone.
– Align your foot directly on the knee and bottom foot directly below the knee.
– Flex both feet to protect and stabilize the knee joint

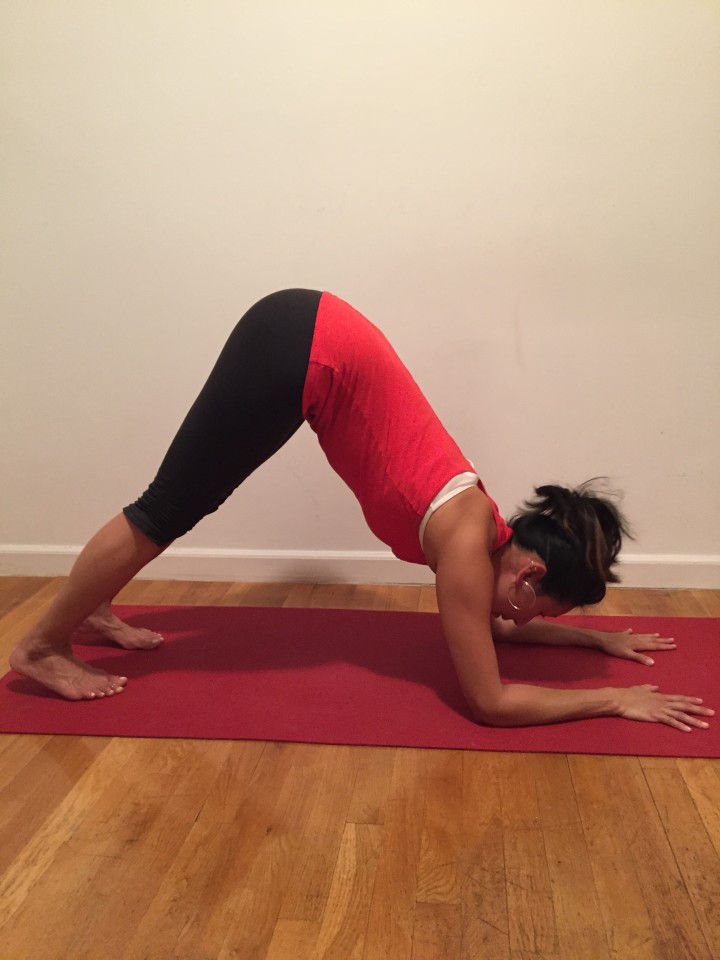
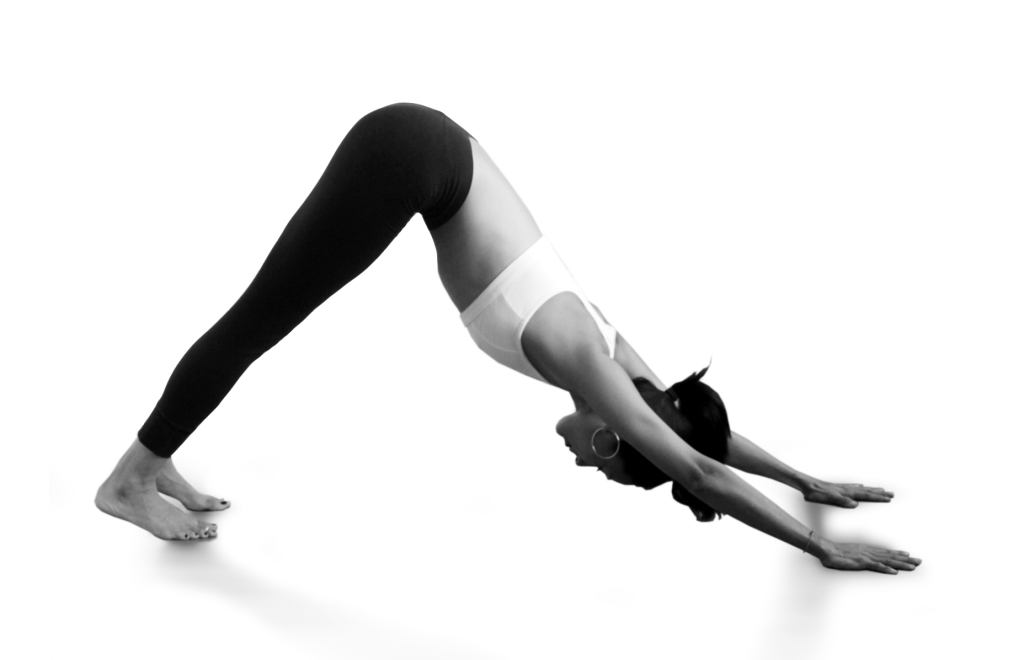
DOLPHIN POSE (MAKARASANA)

dolphin

Dolphin Pose

Benefits:
1. Opens upper back, shoulders, hamstrings, calves, and feet
2. Strengthens core, arms, and legs
3. Calms the brain and helps to relieve stress and tension
4. Great prep pose for forearm stand inversion
5. Relieves headache, back aches, and fatigue

Make sure to:
– Keep the legs as straight as you can and press the heels down to the floor
– Keep a neutral pelvis and slight arch in the lower back
– Press firmly into the forearms to stabilize shoulders and upper back
– Draw shoulders blades down to relax the trapezius from overworking

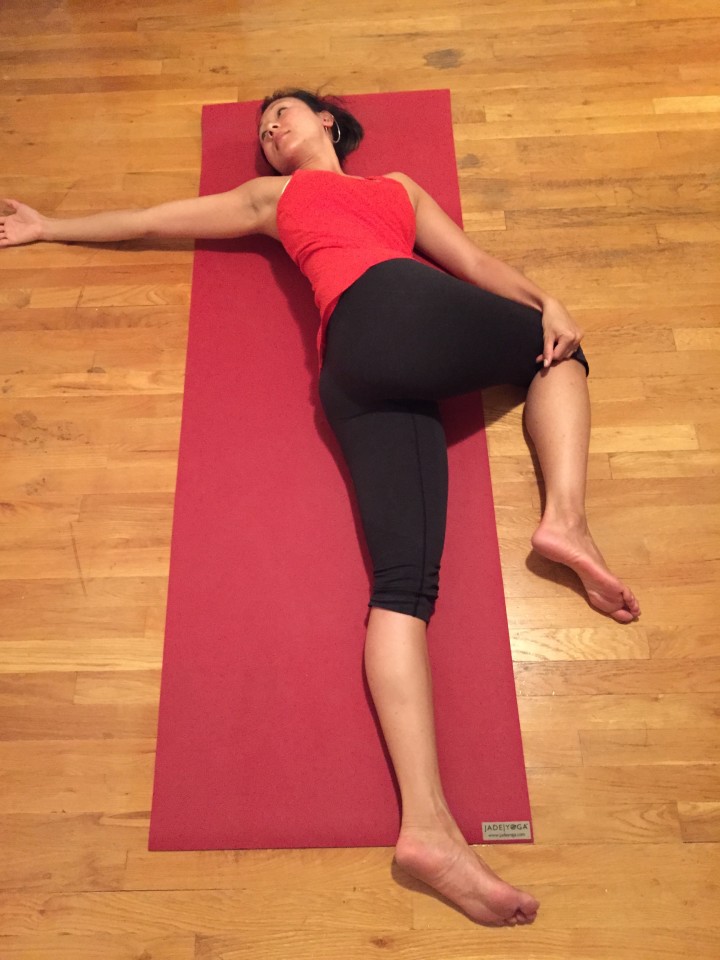
RECLINED SPINAL TWIST (SUPTA MATSYENDRASANA)

spinaltwist

Reclined Spinal Twist

Benefits:
1. Stretches mid to lower back muscles, pectorals (chest), shoulders, hips and glutes.
2. Stimulates and detoxifies the organs
3. Lengthens, relaxes, and realigns the spine
4. Encourages blood flow and aids with the health and function of your digestive system

Make sure to:
– Adjust your hips to align with your spine before dropping your knee to twist. For ex: if you drop your left knee to the right, move your hips slightly to the left before doing so.
– Relax your neck and try to connect both shoulders to the floor
– Breathe deeply when you twist

There are so many more stretches and yoga poses that are beneficial but these are perfect to do when limited on time. They target the hips, shoulders, lower back and chest – the most commonly tight areas in men. Women can absolutely benefit from these stretches, too. All stretches are great as long your body is set up properly and they’re performed safely.

Yes…yoga and stretching can be boring, monotonous, time consuming, and painful. But we work so hard all day to compound, contract, and tighten our muscles with daily activity, workouts, and simply living life. Take the time to create space, lengthen, and reverse those effects so you can move freely and never feel limited in the potential of your body! Spend some time stretching after your workouts, take a yoga class or learn more about my Stretch Sessions. Now…Go Stretch!

Stretch with TRX

Total Body Resistance Exercise (TRX) is a suspension training program that’s known for its strength workouts. The exercises are functional, effective and all dynamically challenge your core by leveraging gravity and your bodyweight as resistance. Here is a great TRX exercise that gets the heart rate up while tapping into your core.

As much as TRX is known for its intensity, it also serves as a great tool to assist in exercises so one can develop better and stronger form. I love using TRX for my workouts but more recently discovered its assistance for getting deeper into yoga poses. Check out these great yoga stretches to try with TRX!

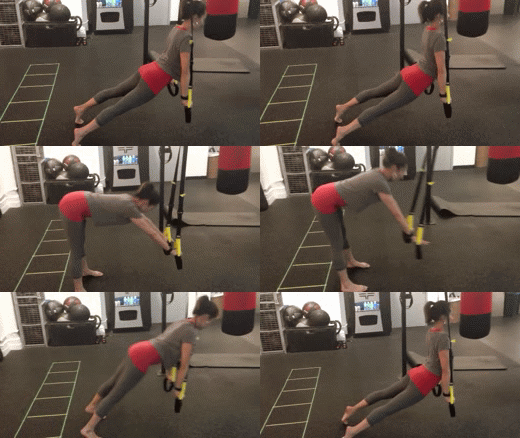
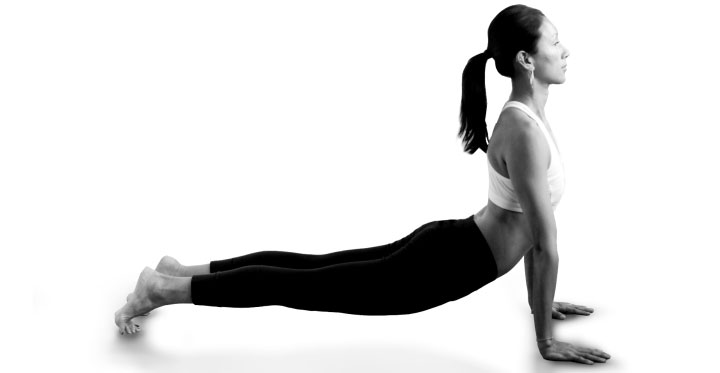
UPWARD FACING DOG
This pose is a back bend and requires strength in the abdominals, legs and upper body to hold the pose. Using the TRX will allow the hips to drop lower giving a better stretch in the abdominal wall and chest. Shifting the weight forward into upward facing dog can be challenging so be sure to engage the core and press firmly through the arms to help stabilize when moving.
Keep in mind! (1) Set up so that the straps are directly under the anchor point (2) Lengthening the straps will deepen the stretch but will also require more core strength (3) Press hands into the handles to push back to standing

updog

fur1w

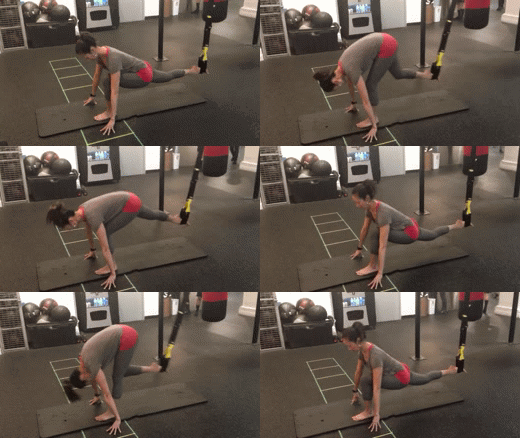
LOW LUNGE TO STANDING SPLIT
One of my favorite hip openers is Anjaneyasana (Low Lunge). This pose stretches the hip flexors particularly rectus femoris and tensor fasciae latae (TFL) which are both very tight muscles due to prolonged sitting or overuse in exercise. Standing split is a balancing pose that challenges the core and leg strength while stretching the hamstrings. So combining the two poses is not only a great warm up but a great way to open up two very commonly tight areas (hip flexor and hamstrings). The release in both will immediately alleviate lower back pain and tension.
Keep in mind! (1) Twist the handles together so they make one big handle/one strap and line up directly under the anchor point (2) Keep the back leg in strap straight when in low lunge pose (3) Keep the front knee slightly bent when in standing split (4) Make sure to keep a flat back and chest up when in low lunge

Lunge

lowlunge

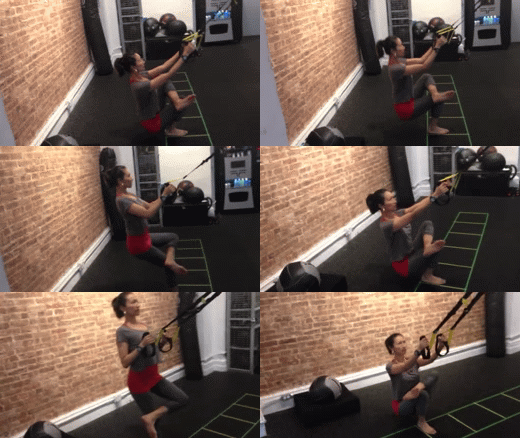
HALF ANKLE TO KNEE (PREP FOR TIP TOE POSE)
A very challenging hip opener as it requires flexibility in so many areas. All muscles in the LPHC (lumbo-pelvic-hip complex) must be open to sit in the full Tip Toe Pose. However modifying with half ankle to knee helps to release tension in the glutes and hip external rotators. The TRX straps will help with balance so that you can sit as low as you can while keeping a straight spine. Moving from seated to standing position will warm up the hip but also strengthen the quadriceps of the standing leg. This stretch will also help deepen your Pigeon Pose and Seated Ankle to Knee.
Keep in mind! (1) Keep your back straight and chest up (2) Very important to flex the foot placed on the knee to protect the joint (3) Move hips back (as if sitting in a chair) when bending the knee (4) Don’t be afraid to use the arms to help pull up to standing

ankleknee

Stretching is an essential part of being fit. Without full of range of motion, your body is restricted to complete any exercise or pose in its proper and ideal form. Find time to incorporate stretching and/or a yoga practice into your weekly fitness routine. Using fitness props such as TRX straps, blocks, yoga straps, bolsters will aid tremendously on modifying and assisting so the body is aligned and working safely, efficiently and pain free. Now…Go Stretch!

Practice to Make it Perfect..For You!

Taking classes and working with a trainer is a great way to get motivated and achieve your fitness goals. An experienced teacher instructs your every move so no need to think about what exercises to do and how to challenge yourself. However an important component of working out is to understand what your body needs. Creating your own workouts and yoga practice is essential to figuring out what you need so you can make your body work better for you!

I had lots of comments and questions from my blog post about my weekly workouts on how I build my own yoga practice. It actually took me awhile to do this. I was unsure of what poses to do and what to do next. I remember taking yoga classes when the teacher would ask everyone to work on their own and do what our bodies needed. I always looked around the room for ideas on what poses to do and exchanged confused looks with others in the room. But practice made it perfect for me!

So where do you start in building your own yoga practice?

FIRST: Sit and observe. Close your eyes for a moment and pay attention to your body. Acknowledge what feels tight, what’s in pain, or what you’d like to stretch and lengthen.

SECOND: Pick 2 things you want to work on. Any more than 2, your focus will get lost. Once you’ve identified the areas of attention, then go ahead and start moving. Think about the stretches and poses you did in class and get right into them.

THIRD: Who cares! Pay attention to only what you want and need. It doesn’t matter what you look like or what others think about your pose or sequence. This is all about you! The less you care about how you look or what people think, the more you are tapping into what you need!

LASTLY: Just breathe. Connect every move with a breath and breathe deeper when holding your poses. Try to stay in each pose for 5-8 breaths. Breathing helps deepen your poses and keep you connected to your body.

Here is a brief clip from my own practice this morning. My focus was on opening the hips to release my tight lower back and quadriceps while creating heat with some core work.

If you need a little guidance, here is a great sequence to get you started! Have fun!


The “Tipping Point”

After years of teaching and doing yoga, I still struggle with inversions. So much so that I included it on my first post of 2014 as one of my New Year’s “explorations”. I have been practicing “Going Upside Down” several times a week and have finally understood the “tipping point” of inversions which has served as an epiphany in my practice.

Stand up straight and visualize an arrow. Imagine the very top of your head as the arrowhead, your body as the shaft, and your feet as the fletching (feathers). The shaft of the arrow will run directly down the center of your body, very much like your spine into your pelvic floor. Like Mountain Pose (Tadasana), where you are standing at the top of the mat, you want to maintain that very same line and structure when attempting inversions. Before you go completely upside down, you have to bring your body to stack, which is the hardest part of inversions. Stacking is when your joints are aligned so they can rely on each other for support. Once you’re stacked, you will immediately feel the “tipping point” where your centerline will find its natural place. Falling out of inversions won’t happen as often because you will be able to catch your body before it does.

Check out my video! I demonstrate in headstand how the “tipping point” can help you find your center in these very challenging inversions. Try it and let me know how you do!

Get your heart rate up with this Yoga Sequence

Known more for balance, stretch, and mind body connection, many would not look to Yoga to lose weight or to help increase cardio endurance.  Unless it’s a Bikram Yoga class (due to the high temperature in the room, your heart rate increases as a means to cool your system down) or performing an intense and fast paced yoga sequence (which is never recommended for beginners due to the likelihood of injury), the average maximum heart rate reached in a yoga class is anywhere from 95bpm-100bpm. MSN writes a good article about calories burned in yoga in comparison to other activities.

As I mentioned in my last blog post, I encouraged everyone to try Chandra Namaskar (Moon Salutation) to find a calming yoga practice. But if you’re looking to get your body warm and increase heat, Surya Nasmaskar (Sun Salutation) is the way to go. I love to add strength and power into my workouts especially when I teach yoga. Not necessary for all sequences but great if you want to cultivate some heat into your yoga practice. Check out this version of a Sun Salutation with two exercises that will increase your heart rate and get your sweat on! Try it!

Chaturanga…the right way!

Chaturanga Dandasana is a challenging asana that’s an essential part of many different yoga practices. Also known as Four-Limbed Staff Pose, the whole body is parallel to the floor, stiff as a staff (spine) with the four limbs equally supporting the body. This posture requires complete body integration.

Jessica in Chaturanga

A perfect Chaturanga

Chaturanga is a key part of the Sun Salutation sequence that strengthens your arms, chest, and wrists and is a great preparation for arm balances. Many students attempt the full posture without fully understanding the pose or taking the time to practice the strengthening components to build the foundation. Needless to say, majority of students are practicing this pose incorrectly.

Here are some common mistakes you will see in Chaturanga:
1. Anterior rotation of the shoulders: Due to weakness in the upper body. Shoulder heads roll forward as elbows bend to lower down.
2. Collapsing in the chest: If shoulders roll forward, this creates a rounding in the upper back and the chest to cave in.
3. Deep arch in the lower back: Happens when abdominals are not engaged. Think plank when you begin to lower your body down.
4. Sagging hips: This happens because legs are not engaged to help support the lower body.

A great modification is to drop the knees to the floor and then lower into the pose.  This will help to focus on strengthening the arms, back, and chest before you bring in the legs.

TRY THIS! This is a great technique that will guide you into the posture, strengthen all the muscles involved, and to slowly build a solid foundation to do Chaturanga the right way!

0
    0
    Your Cart
    Your cart is emptyReturn to Shop