Try This!

8 Minutes to a Stronger Core

Here’s a typical ab routine: 50 sit ups, 50 crunches, hold plank for 1 minute and repeat. A bit boring, redundant, and after some time…ineffective. There’s nothing wrong with those exercises but there is so much more to strengthening your core than crunches and planks.

Most equate the “core” with the abdominals, which is the outer most visible layer, of course, that’s when it’s not covered with fat :). But the core muscles extend far beyond the abs. The major core muscles lay deep beneath the exterior musculature that people typically train. These muscles are the pelvic floor, transversus abdominis, erector spinae, multifidus, internal and external obliques, quadratus lumborum and the rectus abdominis. The minor core muscles are the hip flexor muscle group, adductors, hamstrings, latissimus dorsi, gluteus maximus, and the trapezius. Basically, all the muscles that attach to the pelvis work together to functionally move, support, and stabilize the spine.
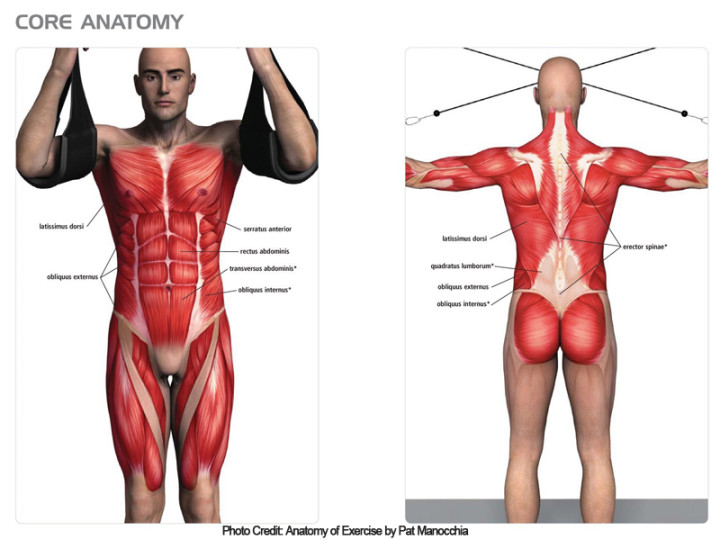
Core1

The core provides us with three dimensional functional movement which is more than just the lateral exercises most ab/core workouts include. Our daily activities include movements in all three planes: frontal (forward/back), sagittal (side to side), and transverse (rotation). Therefore we should train our core to be stronger while moving in those 3 planes, right? Right! So check out this quick and effective workout that will train your core front, back and around.

MINUTE #1: SUPERMAN
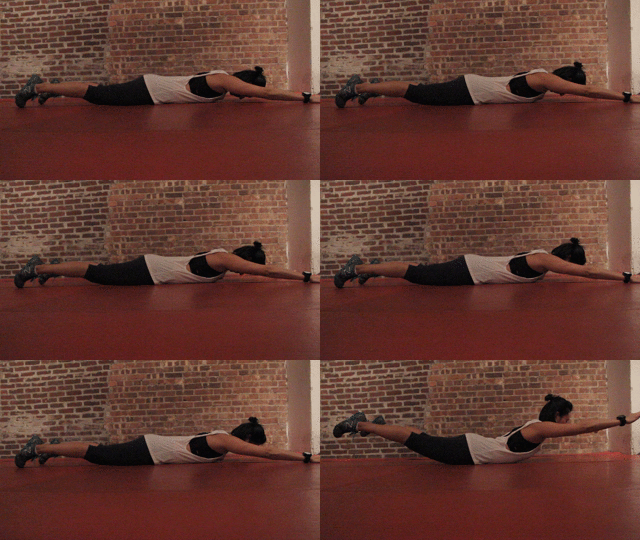
Superman

Break it down:
– Lay on stomach with arms extended alongside ears.
– Press the pubic bone into the floor to initiate a lift in the chest, arms, and legs.
– Engage back body muscles to lift higher and lower down with control.
– Reach fingers and toes in opposite direction to create length in the spine. Slight squeeze of the glutes and inner thighs to lift the legs up higher.

Targets:
– Erector spinae, quadratus lumborum, hamstrings, adductors, glutes, and trapezius


MINUTE #2: GLIDING ELBOW PLANKS
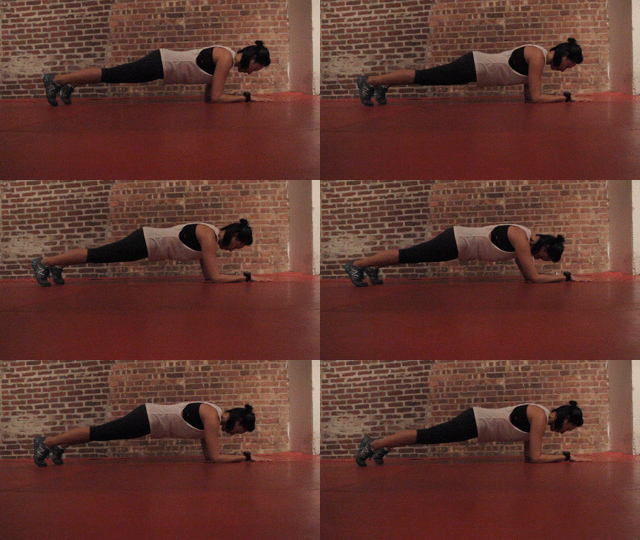
Gliding elbow planks 1

Break it down: 
– Start in elbow plank aligning shoulders directly over the elbows, body parallel to the floor, forearms push against the floor to slightly round upper back, legs engaged, feet flexed.
– Slide shoulders forward so they glide past the elbows. Feet glide forward onto tip toes.
– Slide shoulders back so they move slightly behind elbows. Feet glide back onto the balls or mid foot.

Targets:
– Rectus abdominis, multifidus, transversus abdominis, serratus anterior and posterior, pectorals, and deltoids.


MINUTE #3: SIDE LEG LIFTS
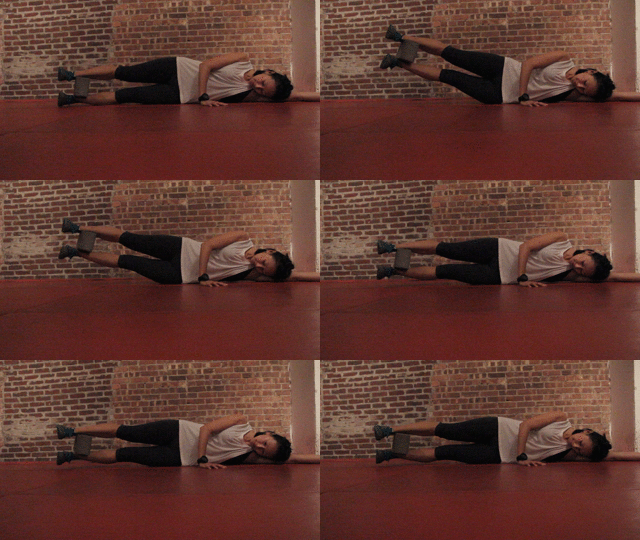
sideleglifts1

Break it down:

– Lay on one side with hips slightly tilted forward. Relax head and neck and place arms under the head.
– Place a block in between the feet to keep adductors (inner thighs) engaged.
– Squeeze the block and engage obliques to lift both legs up. Try to relax upper body.

Targets:
– Transversus abdominis, multifidus, external/internal obliques, and adductors


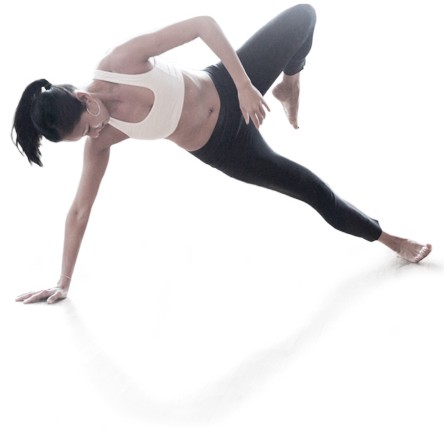
MINUTE #4: SIDE PLANK TWISTS
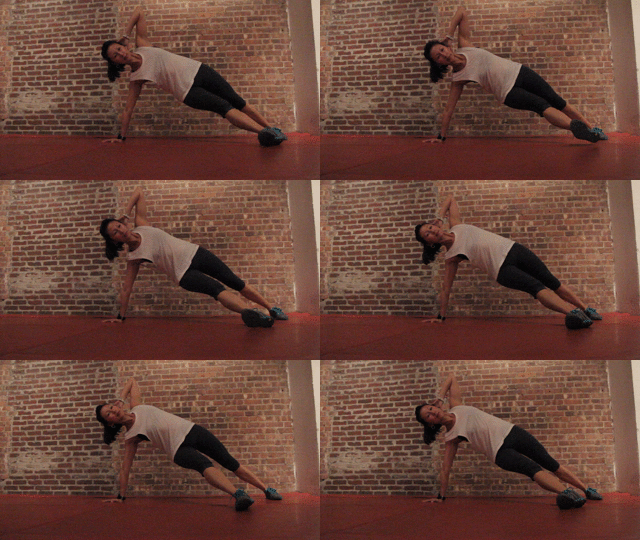
sideplanktwists

Break it down:
– Set up in side plank on the right side with shoulders directly positioned on top of the hand. Stagger feet so the right foot is in front of the left.
– Bend the left elbow to bring hand behind the head and open the chest.
– Push the floor away with the right hand to stabilize core and slightly lift right leg up towards abdomen.
– Move your left elbow across chest towards the leg so the elbow and knee connect in the middle.
– Release the foot back down while opening the chest.
– Repeat for 30 seconds then switch to the left side.

Targets:
– Rectus abdominis, multifidus, internal/external obliques, quadriceps, deltoids, serratus anterior/posterior, transversus abdominis

PERFORM THESE EXERCISES 2x FOR A TOTAL OF 8 MINUTES! 

Add these exercises to your routine and give your core a three dimensional workout. Targeting the front, back, and sides of your core will help you set up a stronger and more stable foundation. Your core becomes a force transfer center and stabilizer to assist you in all exercises and every day activities. The more you understand the muscles that make up your core, the more they will work. Training your entire core to work efficiently will help with balance and stability, a straighter spine, better posture, injury prevention and a stronger, more powerful you! Win Win! Now get to work! 
 

5 Stretches For Better Hip Mobility

In a general sense, mobility is the ability to move or be moved freely and easily. In the fitness world, mobility is being able to perform functional movement patterns without restrictions in range of motion (ROM)

The hip joint is the largest and one of the most important joints of the body. It bears our entire body weight when we walk, run, and jump.  Functionally, the hip joint is one of the most flexible joints and allows the greatest range of motion yet it’s also one of the tightest areas of the body and one that creates chronic and reverberating pain. It connects our upper and lower body so the muscles attached above and below the hip are affected by movements supported by this joint system. These movements require work from these muscles that stabilize and support and will place a certain level of force on the hip. The hip joint must accommodate these forces repeatedly. With repetitive motion, tightness occurs which create restrictions in the body. Mobility becomes challenging due to these limitations.

Open hips help to relieve back pain, improve circulation through the legs, increase agility and flexibility of your gait which all equates to better mobility.  The hips are also at the center of your body and alignment so releasing the hips will help to relieve tightness in areas above and below this ball and socket joint. Super important!

Here are 5 stretches to help you increase hip mobility. 

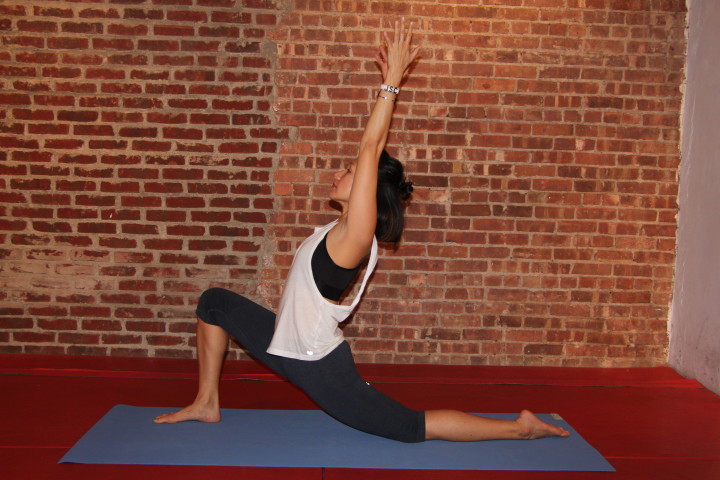
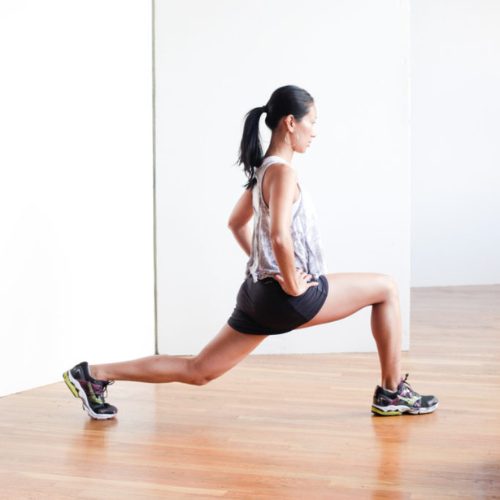
LOW LUNGE

anjaneyasana

GREAT FOR:
– Releasing tightness in the lower back especially for those that experience sciatica and LBP (lower back pain)
– Opening the hip flexors (psoas, rectus femoris, TFL) and the front chain of your body (rectus abdominis, pectoral muscles, side waists)
– Increasing ROM for faster and more agile movements

SOME TIPS:
– Keep the front foot directly under the knee
– Slide back leg as far back as you can so you’re above the knee joint and not directly on the patella (knee bone)
– Try to connect back pinky toe to the floor (slight internal rotation of back leg)
– Draw the abdominals in to protect lower back when leaning back


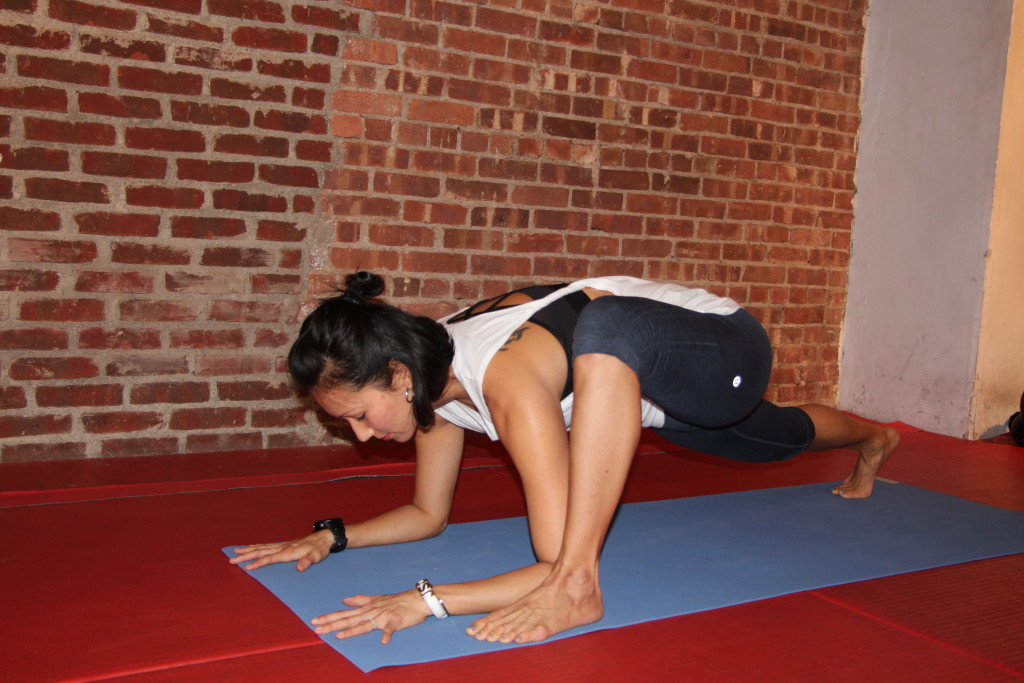
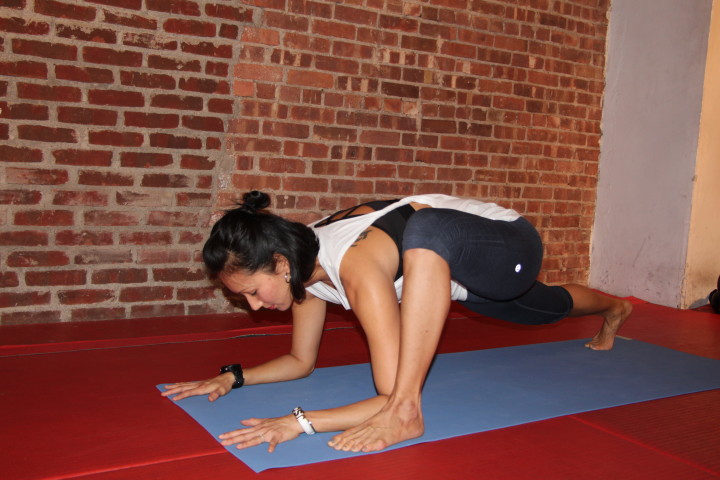
LIZARD POSE

lizard

GREAT FOR:
– Stretching and releasing inner thighs while opening the hip flexors
– Increasing range of motion and gait for longer strides
– Opening the chest and shoulders

SOME TIPS:
– Align the front knee directly above the foot
– Keep back leg as straight as you can. Drop the back knee to the floor to modify
– Keep chest lifted and back as flat as you can (avoid rounding upper back)
– Draw the front knee as close to the shoulder (midline) as you can


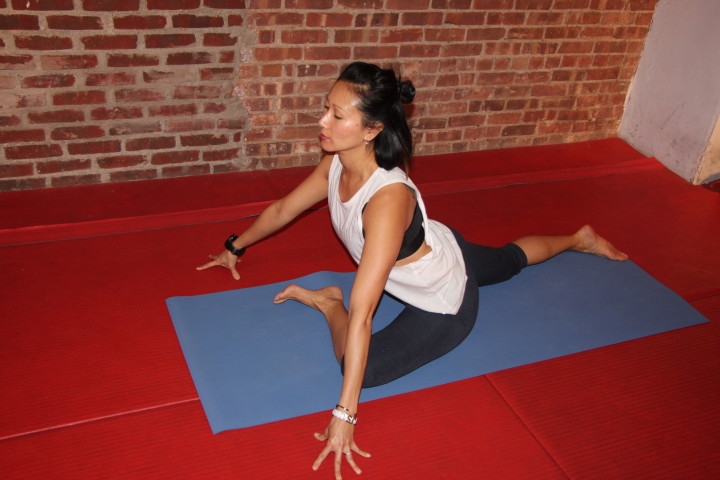
PIGEON POSE

pigeon

GREAT FOR:
– Relieving chronic LBP and sciatica
– Opening the hip flexors and inner thighs
– Releasing tension and increase ROM in the hip rotator muscles (glute medius, glute minimus, piriformis, gemellis)
– Increasing circulation through the legs and digestive and reproductive systems

SOME TIPS:
– Keep back leg as straight as you can
– Keep hips squared by placing each hip on its own side of the mat
– Keep front shin parallel to the front of your mat. Modify by propping your seat up with blankets or blocks
– Keep front foot flexed to stabilize the knee joint


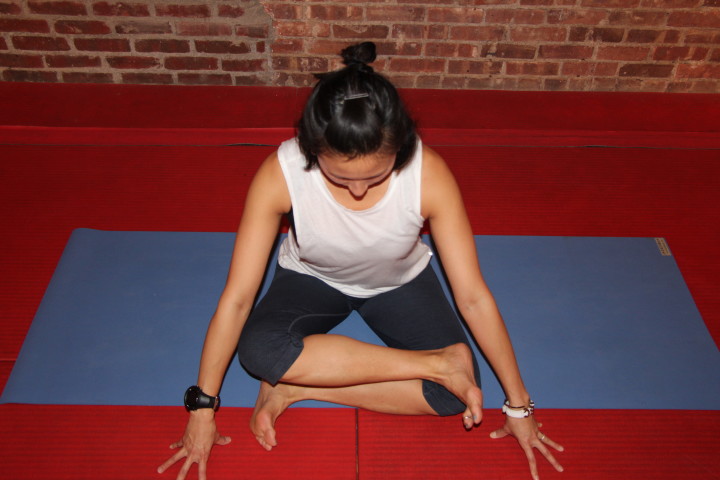
COW FACE POSE

garudasana2

GREAT FOR:
– Releasing tension in the outer hips and lower back
– Opening all hip rotators muscles
– Stretches ankle joints

SOME TIPS:
– Flex both feet to stabilize knees
– Cross legs at the knee joint
– Prop your seat up with blankets or blocks to modify
– Keep a straight back when leaning forward over the legs
– Breathe…this is a very intense hip stretch!


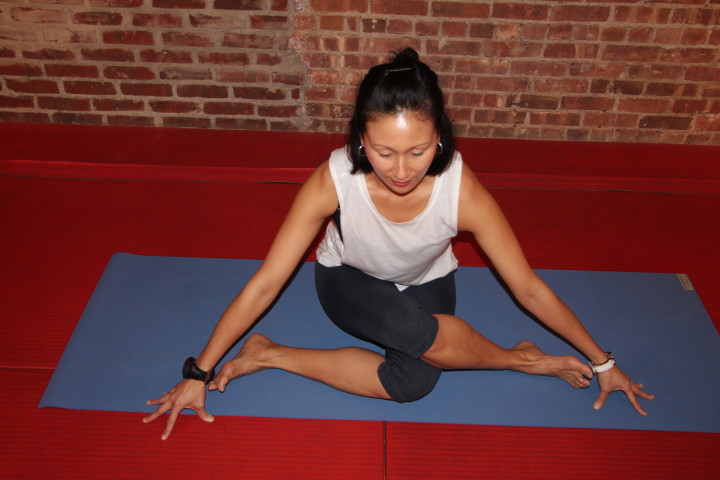
ANKLE TO KNEE

ankletoknee

GREAT FOR:
– Relieving tightness in LBP and sciatic pain
– Releasing hip flexors and rotators
– Increasing ROM for quicker and longer lateral movements

SOME TIPS:
– Align both feet above and below the knees to form a triangle with both legs
– Flex both feet to stabilize knee joint
– Keep lower back slighted arched and back straight when leaning forward

*Hold each stretch for at least 20-30 deep and long breaths. I promise it gets easier, the longer you stay in the stretch.

The muscles and attachments of your hip joint are extremely strong, as they should be to keep this large joint stable. However this also makes stretching it a challenge! For those that sit all day long, your hips are in a constant state of flexion, so working on flexiblity and mobility is not to be overlooked. The tighter the hip, the less you use them. The less you use them, the tighter they get. Vicious cycle! So the more you release and open the hips, the more you can release tension and prevent restrictions…all leading to better mobility. We can all agree that we want to move without limitations and more importantly without pain. So the more mobile our bodies are, the faster we can move and feel good doing so.


3 Back Exercises You Should Be Doing!

At least once a day, I hear someone complain about pain in their lower back. Slipped or bulging discs, pinched nerves, back spasms, tightness, chronic pain…to name a few. With all the sitting, twisting, bending, and pounding we do on a daily basis, it’s hard to have a healthy and happy back. I can see how 3 out of 4 people have experienced some form of back pain, making it 90% of Americans with LBP (lower back pain).

The muscles of the back are very complex but yet divisible as each layer serves a specific purpose in movement.

  • Superficial Layer: attaches and moves the upper extremities
    • Trapezius
    • Latissimus Dorsi
    • Levator Scapulae
    • Rhomboid Group
  • Intermediate Layer: in charge of breathing and expansion as they are connected to the ribs
    • Serratus Posterior Group
  • Deep Layer: moves the trunk and supports the entire back
    • Spinalis
    • Multifidus
    • Longissimus
    • Iliocostalis
    • Splenius group

Due to high stress in our lives and the hours of sitting, it’s inevitable that our backs will start to change shape and adapt to the environment that we expose it to. Poor posture, weakness, tightness, and compensations are the common sides effect of poor functioning in the back. The importance of keeping your back strong and posture in alignment will absolutely help with your quality of life along with performing basic everyday movements and activities, particularly in exercise and sport.

Some great back exercises are the more common ones you will see at the gym.

  • Seated row
  • One arm row
  • Pull ups/ chin ups
  • Lat pulldowns

These exercises are definitely a part of my routine. But the 3 back exercises below target so much more than just the superficial layer of the back. They tap into all the layers and give your legs and core a workout and stretch, too.


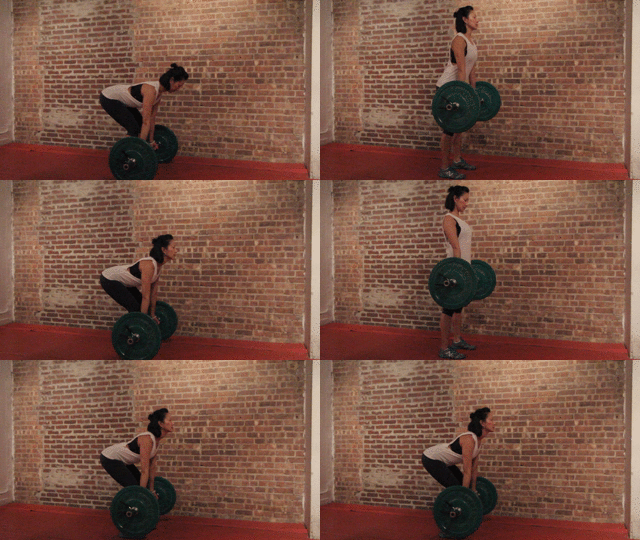
#1 DEADLIFTS: Not only the quintessential weightlifting exercise but also an exercise that mimics a real life lift. Picking up your baby, a heavy box, luggage, a table, all should be in the form of a deadlift.

Deadlift2

Important Form to Keep:

– Feet are set up hip width apart
– Slight natural arch in the lower back
– Chest up to avoid lower back rounding
– Hips go back first and then knees bend


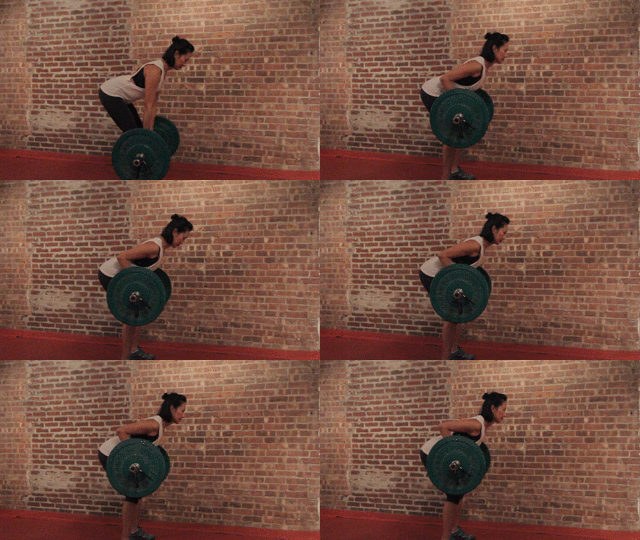
#2 BENT OVER BARBELL ROWS: a full body compound exercise that works the upper and lower back, abs, hips, and arms. This exercise isolates these muscles to build a stronger and more muscular back.

NewRow

Important Form to Keep: 

– Keep knees slightly bent
– Natural arch in the lower back
– Keep head neutral in line with your spine
– Keep your torso parallel to the floor. If need to, come up a few inches when pulling the back to the chest.
– Avoid thrusting hips forward when pulling heavier weight.


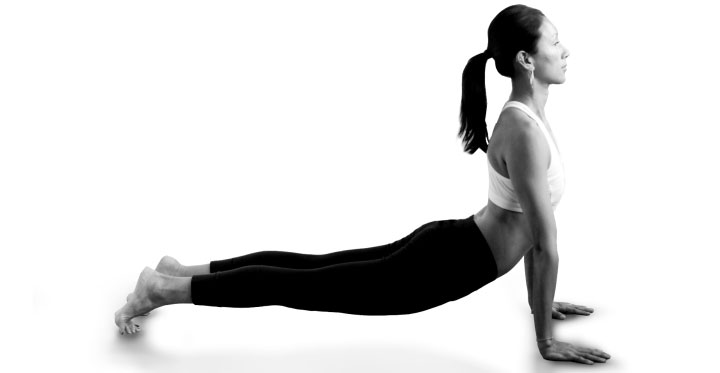
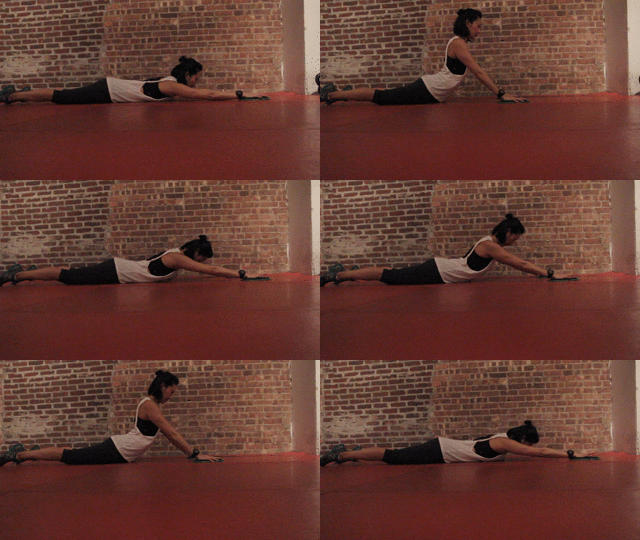
#3 SLIDING COBRA (BACK EXTENSIONS): a Pilates twist to the typical back extensions you see on the Roman Chair/Hyperextension bench. Use glides or small towels under each hand for easy sliding. Looks pretty easy and graceful until your third or fourth rep. 🙂 Works the upper and lower back plus the glutes, abs, obliques, hamstring, triceps while stretching and opening the chest. Sweet!

Extensions2

Important Form to Keep:
– Relax your shoulders and trapezius so there’s lots of space between your ears and shoulders
– Press your hips into the floor to initiate the lift
– Avoid squeezing glutes
– Squeeze shoulder blades together to keep chest open
– Keep head neutral in line with spine

Our back muscles are layered and multi-functional and most of them attach to our spine. Which is why they control so much of how we stand and why we experience LBP. We use these muscles daily and often demand more from them than they can handle. So build a strong back so the spine is in its proper and optimal position. This will also enable your body to move in a full range of motion through a strong foundation so restrictions won’t prevent you from doing a certain exercise, lifting a heavy object, or just moving throughout your day.  So if you don’t already incorporate these back exercises into your routine, now is the time!

Strong Backs = Better Postures! Get to it! 🙂 

Are You Doing These Right?…4 Yoga Twists Often Done Wrong

Twists are a favorite among many yoga practitioners. These poses can be advanced and have several health benefits.

Rotating and twisting your upper body releases tightness in the lower back to promote spinal neutralization and better rotation and aids in detoxification and digestion. However most who attempt these twists are often doing them incorrectly. Jamming their bodies into a position they’re not ready for or not fully understanding the alignment of the pose are the common reasons yoga twists are often done wrong. The end result of incorrect twisting are over stretched muscles in the hips and lower back which in time will create instability and injuries.

Here are 4 twisting poses, their common mistakes, and how to fix them!

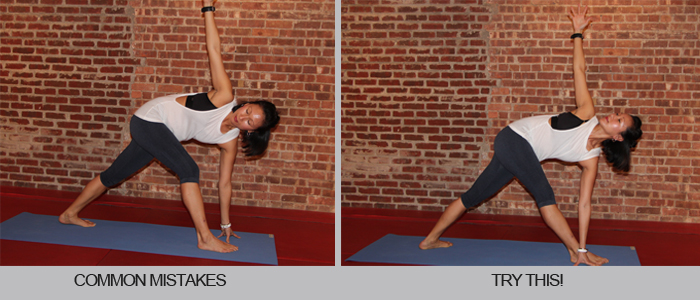
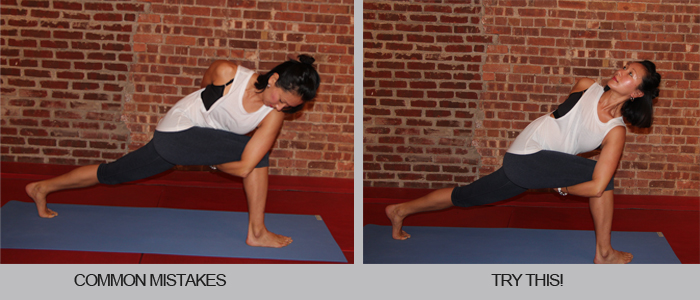
1.REVOLVED TRIANGE POSE (PARIVRTTA TRIKONASANA)

Revolved Triange

Common Mistakes:
– Bending front knee too much
– Hips are tilting to one side
– Yanking the top arm back

Fix it:
– Use a block so the front knee straightens completely.
– Keep your hips in a straight line by moving the hip of the front leg back and the opposite hip forward.
– Twist more at the waist, rotate your chest up and bring your gaze to the ceiling.

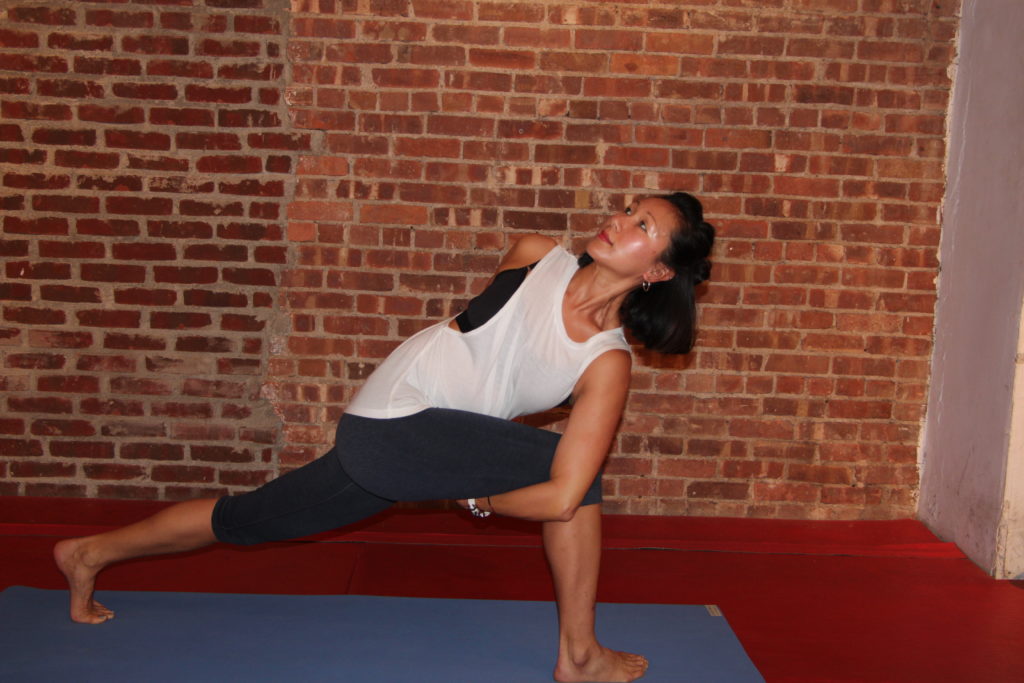
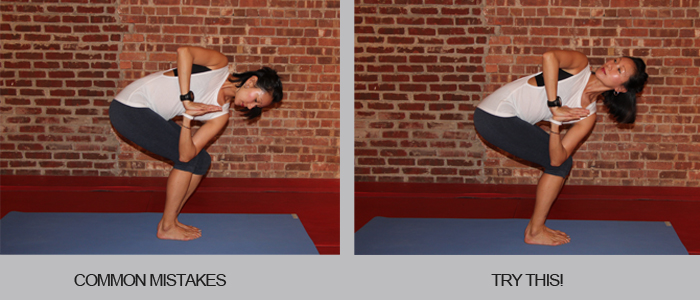
2. BOUND REVOLVED SIDE ANGLE POSE (PARIVRTTA BADDHA PARSVAKONASANA)

Revolved Side Angle

Common Mistakes:
– Back leg bends
– Hip tilts to one side
– Upper body rests on the front leg so chest collapses and top shoulder falls forward

Fix it:
– Completely straighten the back leg to help stabilize and balance. It’s really hard but so helpful.
– Move the hip of the front leg back to align the hips.
– Use the arm to knee connection to elevate the chest, twist more at the waist, and bring your gaze up.

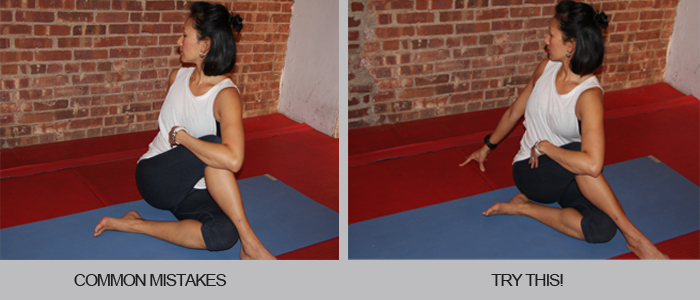
3. REVOLVED CHAIR (PARIVRTTA UTKATASANA)

Revolved Chair

Common Mistakes:
– Shoulders collapse and chest falls forward
– Rounding in the lower back
– Knees and hips are not in a straight line

Fix it:
– Press the arm into the knee and the knee back into the arm to help you twist more at the waist instead of the hips. Press the hands firmly together to widen the collarbones and open the chest.
– Stick your butt out to arch the lower back. This will help to increase the range of motion in your twists.
– If one knee is in front of the other, slide that same side hip back and that will align both your hips and knees.

4. SEATED SPINAL TWIST (ARDHA MATSYENDRASANA)

Seated Twist

Common Mistakes:
– One hip is lifted
– Too much leaning forward and chest collapses

Fix it:
– Ground through both sitz bones so hips are aligned before twisting. Placement of the top foot can be adjusted to help with hip alignment.
– Lean back pulling the top leg towards you and use it to twist the torso, lift the chest up, and straighten the spine.

Many people compromise safe alignment so they can get into these twists. You should be able to breathe deeply and feel length in the poses, not congestion and pain. If you’re attempting these twisting poses and struggling to hold them, a modification is a must. Opt to drop the knee down, use props and break down the pose into steps. Little by little, you’ll inch your way into a deep, effortless, and detoxifying twist.

Not The Typical Healthy Resolutions You Should Consider

As we wrap up 2015, we reflect on the good, bad, what ifs, should and shouldn’t haves, and realize that changes need to be made for the New Year. So come January, we all begin the tradition of performing acts of self improvement. We go full force with the same ol’ resolutions year after year.

“Hit the gym every day!”
“I need to lose 15lbs!”
“I want to get big beefy arms!”
“I want a bubble butt!”

“I vow to stop eating carbs!”
“No more meat for me!”
“I give up on desserts!”
“I will allow myself only 1 glass of wine a week!”
etc…

But as usual, by month 3, we lose steam, get frustrated, and end up forgetting what we’re trying to achieve. So consider the not-so-typical resolutions. A resolution you can integrate and make part of your day to day. One so you’re not suffering every waking hour. One that you can experience a progression rather than failure. And maybe one that’s not so measurable so you can stick to it.

Here are some healthy resolutions you probably haven’t thought of but should definitely consider.

#1  START A JOURNAL
How appropriate, huh? Now you can write your resolutions in this journal so you won’t forget them. I actually find this really hard to keep up so I start small. Instead of daily journaling, I set one or two days to write everything I’m feeling at that moment. It could be absolutely nothing and I’m bored out my mind or it can be chock full of aggression and frustration or happiness and love. Whichever it is, it feels pretty amazing to put pen to paper instead of taking it out on my hubby. Huffington Posts breaks down some great benefits from journaling.

#2  TRY ONE NEW FOOD A WEEK
I am a creature of habit and literally eat kale and wild rice every day..and order the same take out every week…and eat the same snacks…and go to the same restaurants to order the same favorite meal. It’s annoying. Why? Because I fear bad food experiences. Why try something new when you can have your usual that’s always good? Well that’s why. Because it’s always good so why not explore something better? And if not better, at least you tried and now you know! So allow yourself to get out of your comfort food zone. Go to your favorite restaurant and choose a different entree. Research a new recipe. Go to the market and buy a fruit or veggie you rarely enjoy. Crave for something out of the norm, find it, and EAT IT!

#3  DO WHAT KIDS DO
When I was a kid growing up in Brooklyn, I was obsessed with double dutch and punch ball. I’m not thinking to run outside now to do both but try an activity that you’ve always wanted to do as a little kid or used to do. Some great activities would be: handstand, jump roping, play in the mud, hide and go seek, roller skate, skateboarding. It’s a great way to re-connect with your inner child and try something new while being active, too!

#4  DO LESS WORK
My brother will probably kill me for this resolution because he’s one of the hardest working people I know but I feel pretty passionate about this one. As I get older, I’m realizing how much time is lost from moments of peace and quiet and downtime. For as long as I can remember, I’ve always had 2-3 jobs, basically working my ass off and around the clock. Having started my own business last year, I find myself working even harder and longer hours. If you’re one of the same, join me and consider setting some boundaries. Allow yourself to shut down after a certain time. Turn off your phone, computer, tablet and enjoy some QT with the people that you love or simply being on your own. Manage and maximize your time carefully so to be more efficient when working. This will help you find more time to relax and enjoy life (definitely apply this to your workouts, too).


You’re probably surprised that, as a personal trainer and yoga teacher, I’m not asking you to set weight loss goals or take more yoga classes. Through my years in the fitness industry, I see the motivation every new year followed by frustration months after. It’s disheartening to see people get discouraged because they’ve set goals that are too challenging to achieve simply because they don’t have all the tools. So when making your 2016 New Year’s resolutions, be realistic and kind to yourself. Consider one that you can actually stick to and make a part of your life…for the rest of your life! Or try one of my past year’s resolutions or these wacky resolutions. Hahah!

HAVE A SAFE AND HAPPY 2016!


Stay Sane this Holiday Season

For the past 2 weeks, my days have been tireless and longer than usual. And it won’t get any easier as Christmas and New Year approaches. I’ve found myself just running from dawn to dusk tackling my day and running off adrenaline. The moment I get home, I feel drained, depleted and realize my entire day was one big fat blur.

This is the time of year when we are all tapped out. Schedules are maxed, time is limited, and lists are extra long. Squeezing in another commitment is nearly impossible. As we run-run-run and tick off the Wunderlist (I’m obsessed with this app), we are also losing touch with being present as the days pass. So the one thing that has helped me stay sane this holiday season is scheduling time (yes I actually put this on my calendar) to sit still and breathe.

Meditation helps to slow down a racing mind….calm the nerves…be more productive…live longer and fuller lives. The list goes on. But this artful technique to induce consciousness and train our minds is not an easy feat. Our so called “monkey minds” are hard to tame. It has taken me over 5 years to attain a calm and peaceful state in my meditation seat. I have tried them all but found these 4 techniques the most effective (and enjoyable) to help me get out of my own head and slow down.

flame

 – A DANCING FLAME –
I learned this technique during my yoga teacher training. Burn a candle and watch the flame flicker. Not only is it beautiful to watch but also very calming and instantly relaxes you.


binaural-meditation
 – FOCUS ON SOUND –
Sound association transports us to a fond memory. My favorites are sounds of the ocean and rainfall. These sounds take me to a serene space that relaxes my mind and removes all worrisome thoughts. There are several great apps with a wide selection of calming sounds like waterfall, rain drops, and crashing ocean waves. My favorite is Calm (even their website relaxes me).

Music and melody is also a great way to tune you out. Relax Melodies App not only has a variety of soothing sounds but guided meditations that are customizable too.

breathelungs
 – COUNT YOUR BREATHS –
Close your eyes – inhale deeply through the nose for 4 counts – exhale slow and full for 6-8 counts. Repeat. A very common and simple technique but it does take more focus as your mind can easily steer away. If it does, no worries, just stop and start again.


mala

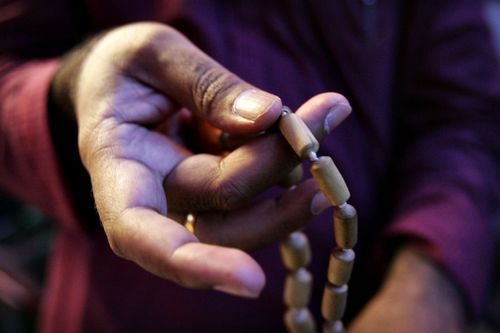
 – MALA BEADS AND GRATITUDE –
Sit comfortably with your mala beads and think of one thing you are grateful for. Focus on that gratitude as you slowly push one bead at a time with your thumb and middle finger. Retrace the beads when you complete the string as many times as you’d like.

I know it sounds counterproductive to schedule yet another commitment in your day but remember that meditation is essentially resting the mind. So even if for just 2 minutes you capture the moment of being still and centered, you have achieved a different state of consciousness that is outside of your normal waking state or in this case, a frantic holiday state. This rest will help you find clarity and be more present as you chug away into your day. If it helps us to enjoy the holiday season just a tad bit more, I’m game. Have a Wonderful Holiday!! xo

A THANKSGIVING WORKOUT YOU MUST DO

I (heart) Thanksgiving! A day of the year where we gather with family and friends and do absolutely nothing but eat, drink and lounge around the house. As a personal trainer, this is my busiest time of the year. My classes are packed and my clients squeeze in an extra session because they know what is to come on this joyous day of feasting!

Personally, I make sure I get in a workout the day of and after Thanksgiving. And guess what… you should too!
Here’s a pre and post Thanksgiving workout that will burn lots of calories so you can justify the 3 extra servings of turkey and pie. 🙂

Go Up & Go Fast (12 minute treadmill work) – YES this is all you need!
1 min     4.0 speed / 5.0 incline
1 min     5.5 speed / 8.0 incline
2 min     6.0 – 8.0 speed / 3.0 incline
2 min     Sprint! 7.0 – 11.0 speed / 1.0 incline
1 min     6.0 speed / 8.0 incline
2 min     Sprint! 8.0 -11.0 speed / 3.0 incline
1 min     6.0 – 9.0 speed / 5.0 incline
1 min     Sprint! 8.0 – 11.0 speed / 1.0 incline
1 min     4.0 speed / 5.0 incline

Modify the incline or speed but try to keep to the minute. I included a sprint range so to accommodate all fitness levels. Not a fan of the treadmill?? You can take this run outside and find landmarks to sprint to. For ex: from one lamp post or bench to another for sprint range. Use hills for sprints instead of distance.

Heart Rate Up / Keep it Up! (In this order for 3 sets)
1. Elbow to hand plank with push ups: 5 each arm / 10 push ups total
Start in hand plank, lower right arm into elbow plank, press up with right hand to hand plank then add push up. Repeat with left arm.

2. Kettlebell Swings: 20 swings (with at least 20lb+ kettlebell)
Set your feet hip width apart and arms straight holding kettlebell. Thrust hips forward to raise kettlebell up and no higher than shoulder height. Make sure to keep your back straight and chest up. Be safe and check out these tips first. 

3. Split Squats (option to add weights): 15 reps each leg
One leg rests on a bench with the other leg in front. Bend both knees into a right angle keeping your upper body weight forward into the front leg. Check out a demo here.

4. Jump squats (option to hold weight at your chest): 15 jumps
Bend knees to squat deep and then jump as high as you can landing back into a deep squat. Make sure to land softly and with bent knees.

5. Mountain climbers: 1 minute
Start in plank position with a towel or glide under each foot. Keep your shoulders aligned with your wrists and slide one knee in towards your chest and slide back. Repeat on other leg and switch. Check out a demo here. 

This workout targets your entire body and will kick your butt in less than 45 minutes. Your goal is to get your heart rate up and keep it up so try to do each exercise back to back with minimal rest in between each set. Check out last year’s workout to add more core work and extra time on the treadmill.

Now go have an amazing time with your family and friends and enjoy an extra slice of pecan pie (you know I will!).
Happy Thanksgiving!! 

Yoga on Steroids?

“Bootcamp Yoga”, “Yoga on Steroids”,”Kick Ass Yogi”, and “Military Yogi” are some names used to describe me and my yoga classes. I take them all as a compliment because I admit…I do have a very unique and somewhat intense style of teaching.

I started my fitness career as a personal trainer then later received my certification as a yoga teacher. I have crazy love for high intensity sport and training which explains a lot about my style of yoga teaching. Many yogis would disagree with the way I teach but I can give 3 poops about it. There are so many schools and styles of yoga. Some offering a grounding and more spiritual practice and others a more physical and anatomical approach. I am not about chanting or preaching about life lessons (I’m still learning my own so I’m not about to teach someone else) nor do I touch the topic of chakras or energy work. I love and believe in all of the above but it’s just not in me to teach them.

What I strive to teach my students is what most teachers didn’t teach me when I started yoga. And that’s how to prevent injuries from happening when practicing. Students come into class throwing themselves into a flow and jamming their bodies into poses, causing more pain in the long run. I want my students to understand each pose, what muscles to engage, which are lengthened, how to breath and stay focused, and the importance of full body integration during a practice. Most students will rely solely on their flexibility and fail to use their muscles. It’s so important to build strength when practicing. Have a solid and strong foundation in the basic poses and the more challenging (+ pretty) ones such as inversions and arm balancing will come easier.

So YUP…with this in mind, my sequences are intense and chock full of ab/core work, full body strength focused exercises, and long held poses. So what are the benefits to my “power yoga” teaching?

Here they are!
1. Gain a strong understanding of what muscles to engage when holding poses
2. Learn the alignment structure of each pose
3. Build full body strength when holding poses and flowing through them
4. Break a sweat and get the heart pumping
5. Increase flexibility through strength to avoid over-stretching attachments (tendons and ligaments)
6. Prevent injuries and keeping the body safe and efficient for years to come
7. Learn full body/mind connection and awareness

Here’s a quick power sequence that I love to teach and one you can do at home. Use this sequence as your own yoga practice or before a workout to get the heart going, the muscles working, and your body flowing. 😉

I totally get it…a power yoga sequence is not for everyone. Well that’s the beauty of yoga…it’s never a one size fits all.  Because of all the injuries in my early years of practice, it’s become the main reason I teach with focus on alignment and strength. I beg of students (especially those who are just beginning yoga) to take the time to understand the poses as you flow through them. Work with a teacher that will demonstrate and explain the alignment and foundation of each pose. It’s an invaluable lesson that will save you from future injuries and to enjoy a life long yoga practice.

Never Underestimate the Booty!

Everywhere I look – fitness sites to social media to marketing campaigns – having a booty is ubiquitous and desirable. This was not always the case. A big butt was not something one would aspire for. It was actually quite the opposite. Especially women, they wanted narrow hips and a small butt. Well the trend has taken a turn. The era of skinny is over and a more curvaceous and healthy physique is in.

Several reasons to want and work for a great butt. #1 Serves as an accessory to a pair of jeans #2 Makes women biologically attractive #3 Streamline the body’s silhouette and increase curvature. The list goes on. Obviously these are all aesthetic reasons and legitimate (I should add!) but do we really know what having strong and round glutes does for our bodies biomechanically? Probably not...so let me explain!

– THE ANTIGRAVITY MUSCLE –
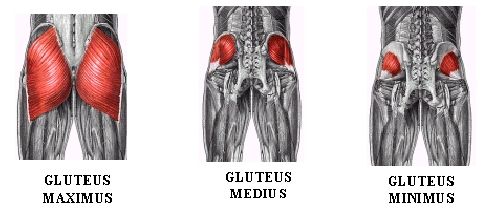
The butt (gluteal muscles) is the biggest and most powerful muscle in the body yet it’s often the weakest. This muscle group is made up of 3 muscles: gluteus maximus, gluteus medius, and gluteus minimus. All work together to keep your torso erect and to hold your upper body up when in motion. If not for the glutes, we’d be slumped over and crooked.

Glute-muscles

– BETTER POSTURE –
If you’re like 86% of American workers, you are sitting all day long at your job. Add to that the number of hours one sits reading, watching tv, playing games, surfing the net, this can total up to 13 hours a day of flattening your butt in a seat. It’s been labeled the “sitting disease” and can be more harmful to our health than you think. Because of prolonged sitting, the hip flexors become very short and tight making it difficult for one to stand up straight. However if the glutes are strong, they help to lengthen your hip flexors and keep your body in alignment. That in turn helps to relieve the chronic low back pain 80% of the population experiences and prevents you from looking like a hunchback.

– INJURY PREVENTION –
The gluteal muscles are prime mover muscles responsible for extension, abduction, and internal/external rotation. These motions are critical in performing basic exercises such as walking, running, stepping to more dynamic movements like sprinting, jumping, and power lifting. So when the glutes are weak to initiate these movements, other muscles will chip in and take on some of the workload. This is called syngergistic dominance. As this pattern continues, these helper muscles become overactive, overloaded, and susceptible to problems. Muscles do not engage properly, joint motions alter, alignment will change, and injuries occur. The most common muscle groups that suffer from weak glutes are the hamstrings and hip complex – basically all muscles attached to the pelvis and knees. Some common injuries are runner’s knee, IT band syndrome, Achilles tendinitis, and hamstring tears. The stronger the glutes the less the helper muscles will have to work. The right muscles will do their job so the body can move efficiently and safely.

– BIGGER GLUTES = MORE POWER –
For those that are into sport specific training, strength training and body building know how important the glutes are in primary exercises like squats, dead lifts, lunges, jumps, and sprints. Performing these exercises with weak glutes will force your body to compensate (again using those helper muscles) and will cease to gain strength, move faster, and more powerful in these movements. This makes progressive training stagnant and really frustrating especially when a competition or sport is involved.

Now that you know how important it is to strengthen your glutes, let’s get to work. There are dozens of glute focused exercises but here are the most effective (and my fave)!

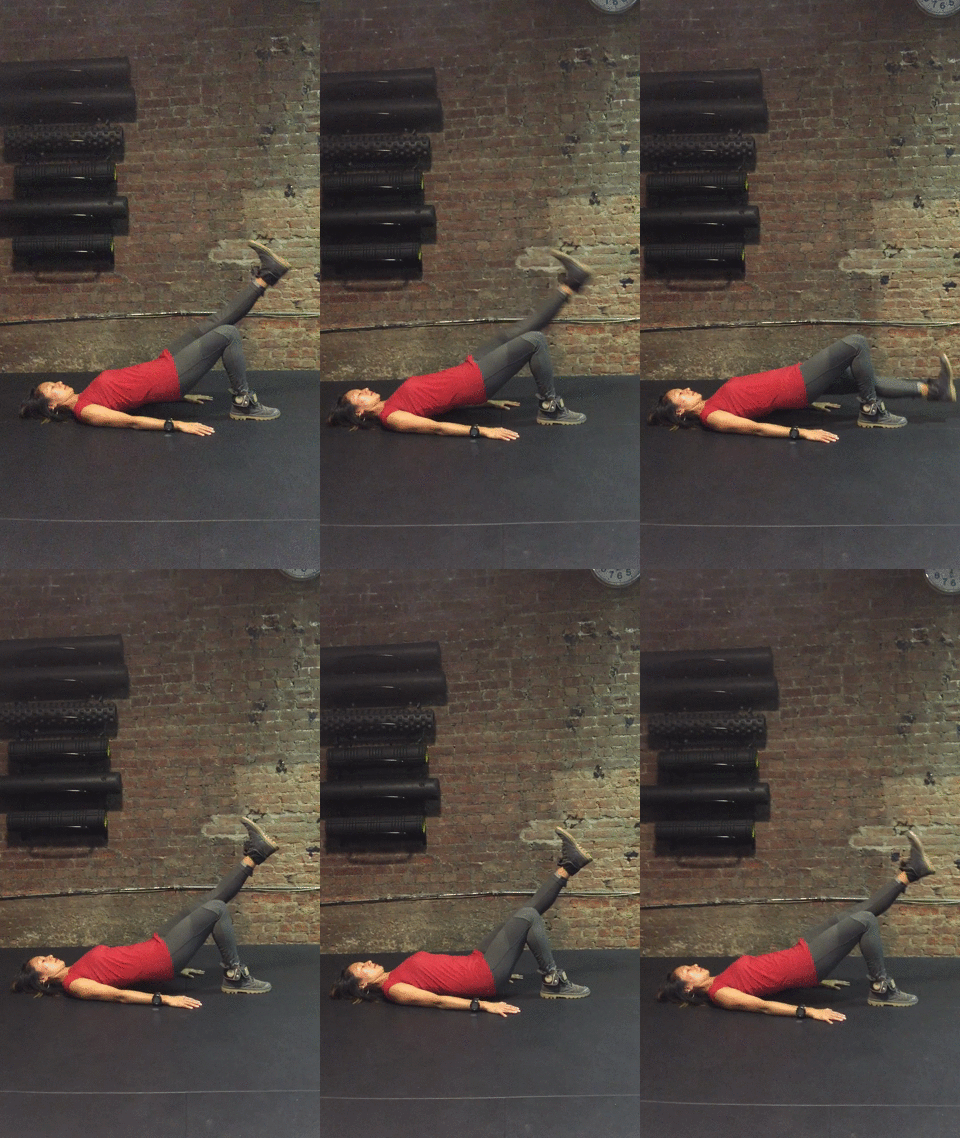
#1 SINGLE LEG BRIDGE & KICKS

bridges

Single Leg Bridges & Kicks

Maintain proper form:
– Keep hip points at the same height through the set
– Drive the heel firmly into the floor to engage glutes and hamstrings and to execute lift of the hips
– Flex the foot when lowering leg down and point the toe when leg lifts up
– For single leg glute lifts, keep knees together by squeezing inner thighs together to stabilize the hip

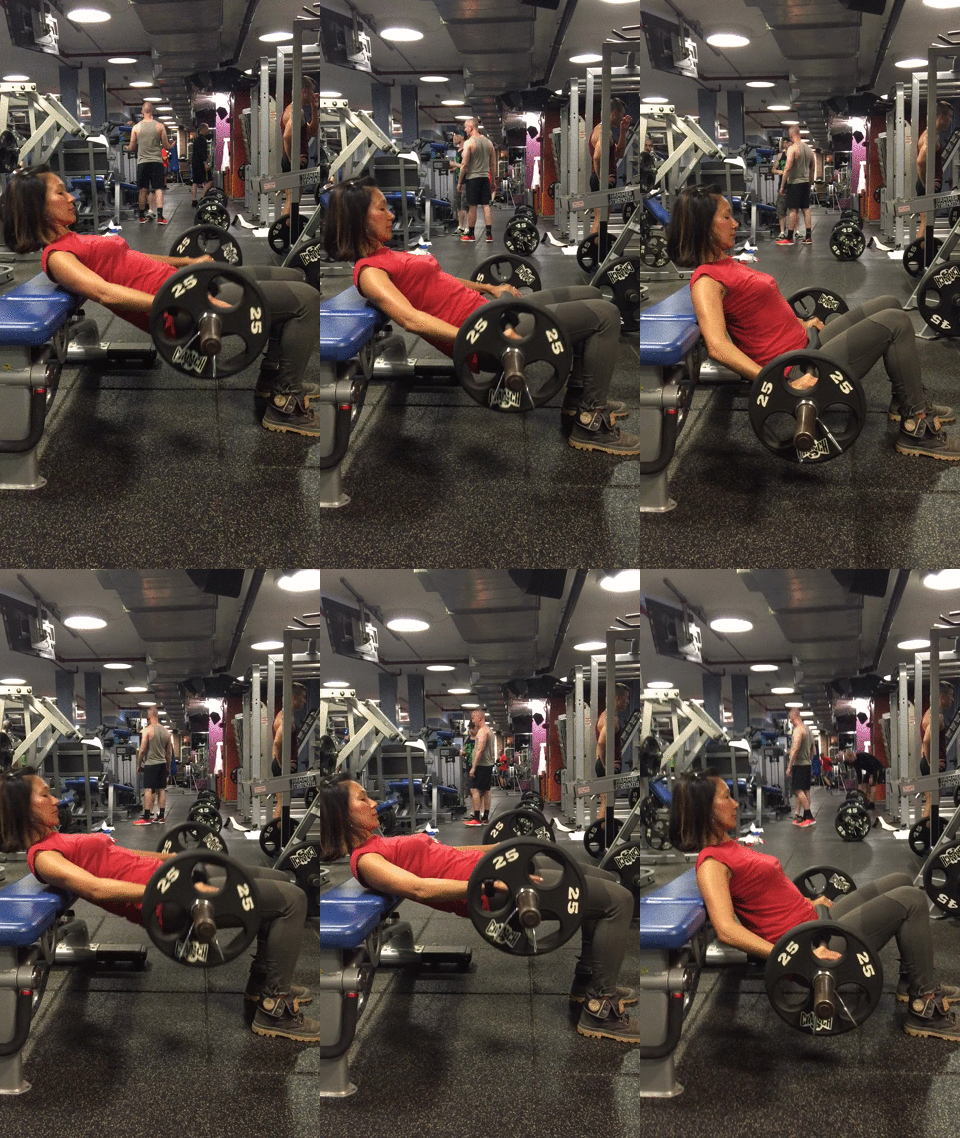
#2 WEIGHTED BRIDGES

weighted bridges

Weighted Bridges

Maintain proper form:
– Align feet directly under the knees
– Drive the heels down to elevate hips and squeeze glutes at the top
– Draw abdominals in to protect lower back
– Lift hips up in a controlled motion engaging glutes, quads, and hamstrings
– Use a balance bad or cushion under bar to protect boney hip points

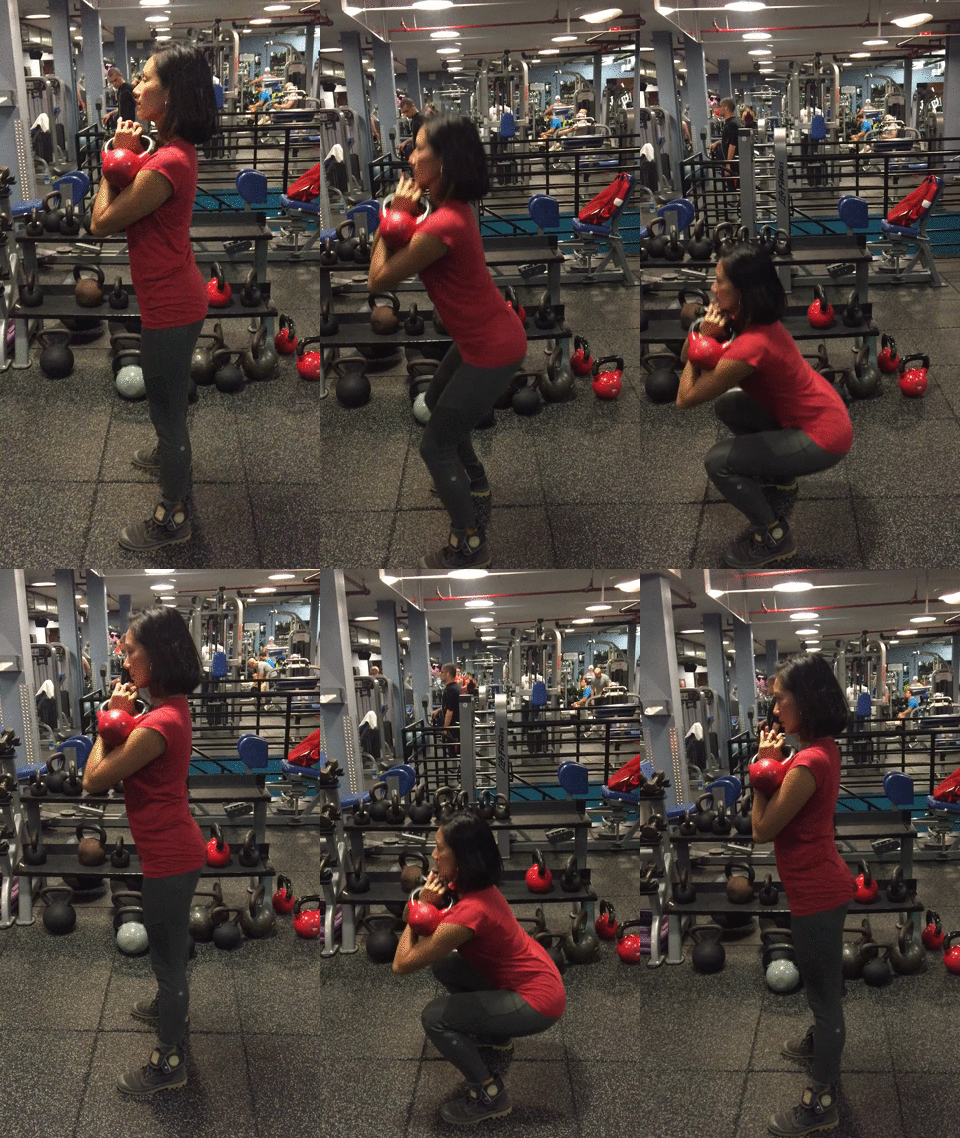
#3 DEEP SQUATS

squat

Deep Squats

Maintain proper form:
– Engage the abdominals to straighten spine and keep chest up
– Set feet hip width apart (slightly turn toes out)
– Lower your seat down past the knees
– Avoid knees moving too far forward beyond toes

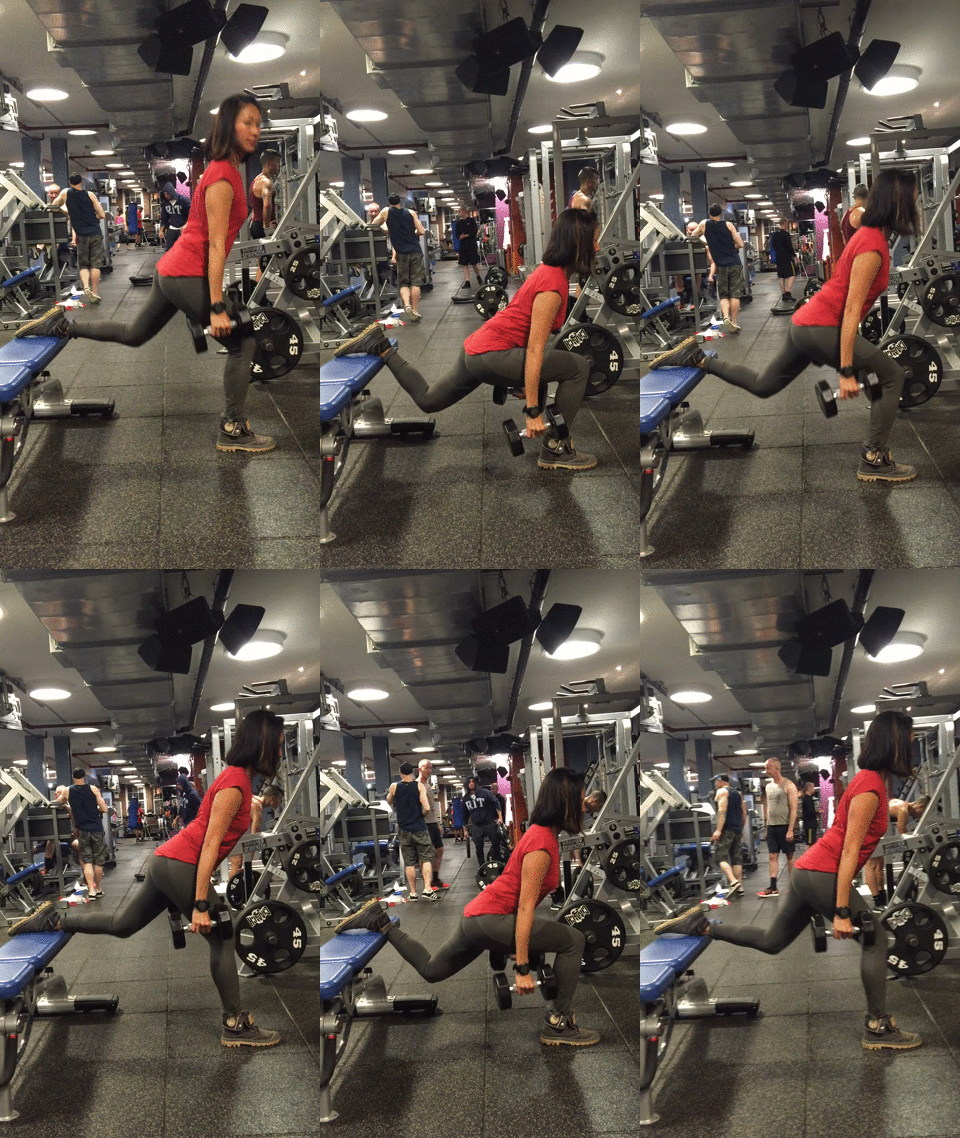
#4 SPLIT SQUATS

lunges

Split Squats

Maintain proper form:
– Relax the foot on the bench and completely disengage the back leg
– Shift upper body weight to the front leg
– Bend knee into right angle making sure knee does not go beyond toes
– Keep abdominals engaged to protect lower back and keep spine straight

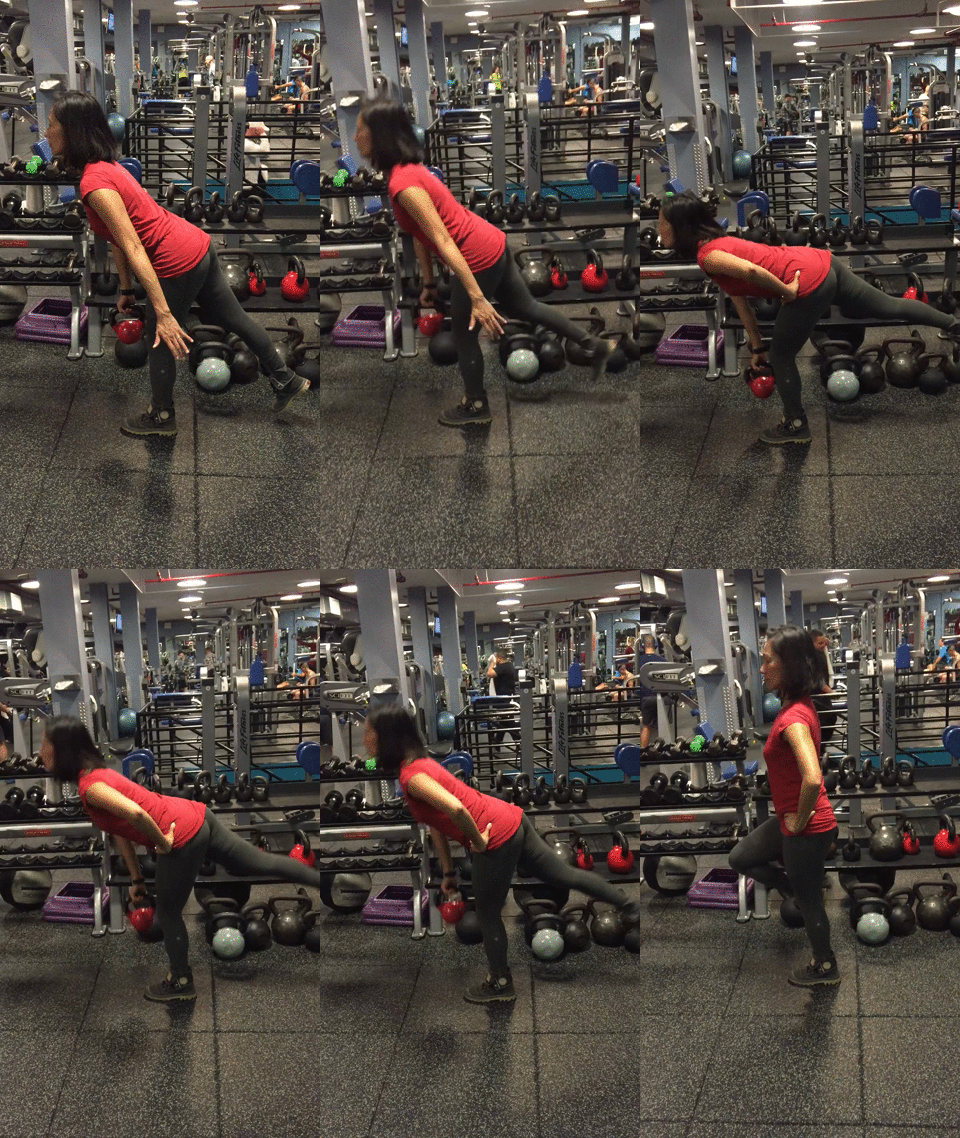
#5 SINGLE LEG DEADLIFTS

deadlift

Single Leg Deadlifts

Maintain proper form:
– Slightly bend the standing leg
– Engage abdominals and back muscles to keep upper body in full extension
– Activate and extend back leg so it becomes an extension of your upper body
– Avoid gripping toes for balance
– Squeeze glutes when standing straight up

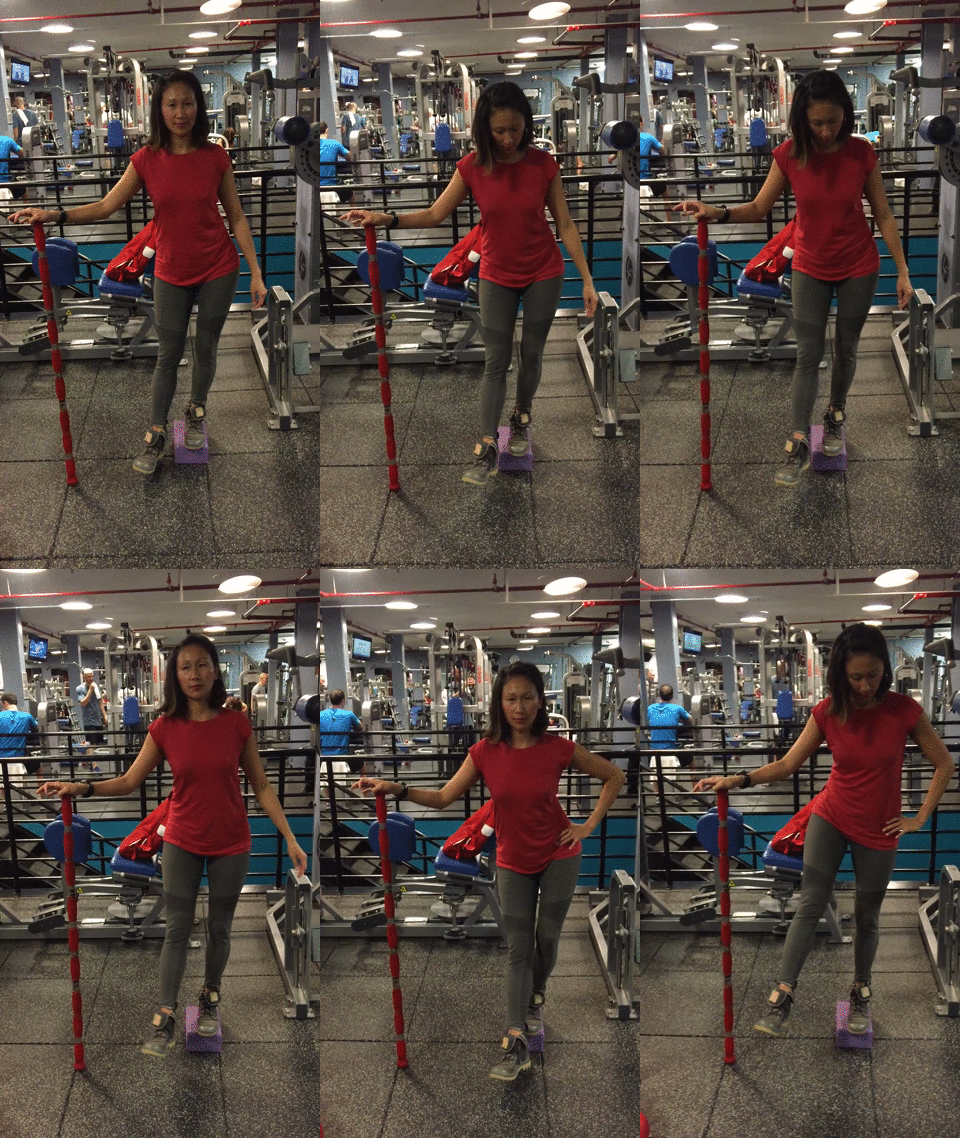
#6 HIP HITCH

glute medius

Hip Hitch

Maintain proper form:
– Slightly bend standing leg
– Keep abdominals engaged to keep chest up and spine straight
– Shift the active hip as far to its own side to get a deep stretch followed by strong contraction when hitching hip up


Sure the aesthetic of a great butt may be enough for some to work on these exercises. But don’t sell your booty short. It can be more powerful than you think. Shoot for strong glutes and your body will thank you for it!

TRY THIS! GRAB A TOWEL AND GO!

I know how demanding life can be with family, work, and social responsibilities. Sometimes the thought of working out is an unappealing and impossible feat. I hear the reasoning and the excuses all day every day!

Making fitness a priority, setting time aside, and being as efficient as possible to maximize the little time you have is the key to getting your workouts in. There is no longer a need for 90 minute or 2 hour workouts. If you have the time, then more power to you! But if you’re limited on time, like I am, then you have to make good with what you have.

There are so many options these days that don’t require you to even leave your home for a kick ass workout. YouTube videos, on-demand workouts, TRX exercises and so on.

Check out my workout that requires 3 things: (1) YOU (2) 20 minutes (3) 2 small towels. Perform these 5 exercises back to back with minimal break in between and feel the burn. 🙂

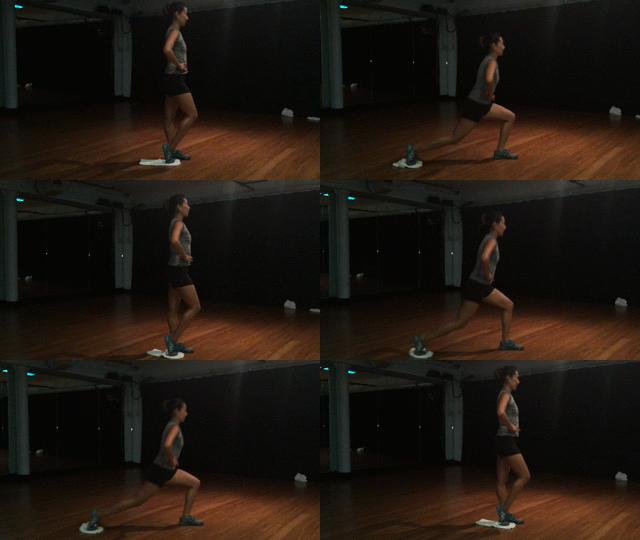
#1 SLIDING LUNGES 

lunge

Stand with your feet hip width apart. Place the towel under the right foot and begin to slide the towel back, bending both knees into a right angle. Track your front knee in line with your toes, making sure it does not move in front of the shoelaces.
DO: 20 repetitions on each leg. GO!


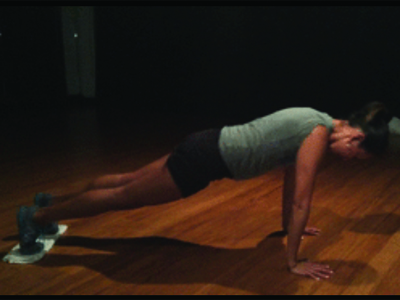
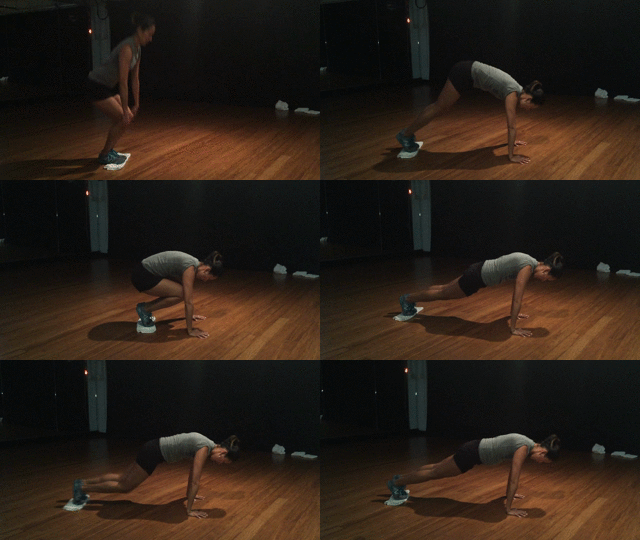
#2 MOUNTAIN CLIMBING

moutaincimbers

Start in plank position with one towel under each foot. Make sure your shoulders are directly above your hands, body is straight and abdominals are engaged. Slide right leg in to your chest, then slide it back. Slide the left leg in and back. Begin to move faster while maintaining a straight body in plank.
DO: Climb for one minute. Option to widen your legs on the last 15 seconds. GO!


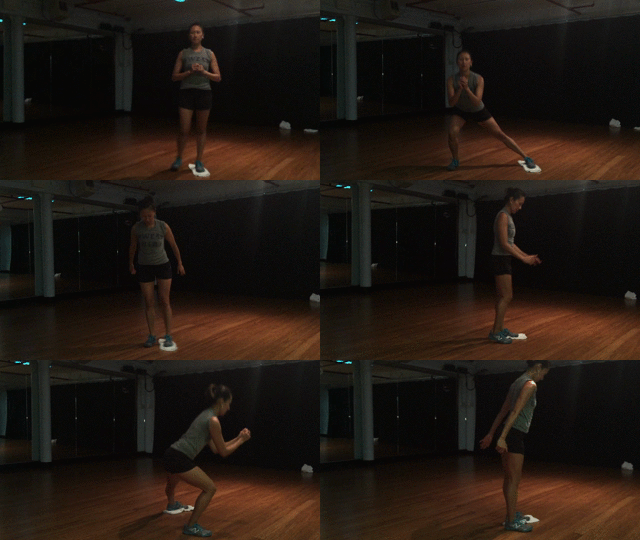
#3 SIDE GLIDE LUNGES

side lunge

Stand the feet together with one towel under the right foot. Slide right foot out to the side keeping the leg as straight as you can, while left leg bends and hips lower into a squat. Keep the chest up when lowering your hips. Engage the adductors (inner thighs) and slide the right leg back to the left leg. Repeat and then switch.
DO: 20 repetitions on each leg. GO!


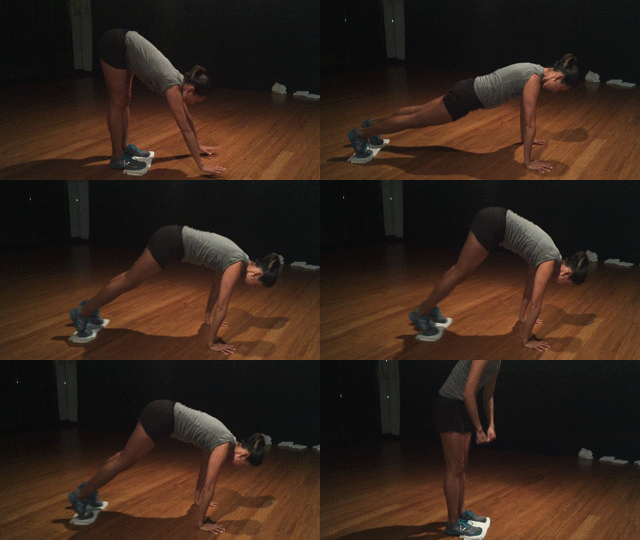
#4 PIKE UPS

pikes

Start in plank position with both feet on a towel. Shift your weight forward into the arms and start to draw your abdominals in to slide your feet to the hands, keeping the legs as straight as you can. Slide back into plank pose to start again. Engage your abdominals to avoid the hips from dropping when sliding back to plank.

DO: 15 repetitions. GO!


#5 KNEES IN / KNEES OUT

knees in (1)

Start in plank position with both feet together on a towel and shoulders directly over the hands. Use your abdominals to pull both knees in towards your chest then extend legs back out into plank. Slide both knees to the outer right arm then slide back to plank. Repeat on the left and then back to the middle. Keep your weight in the hands and your arms strong throughout the set. Slightly round the back to engage your Serratus anterior muscles and refrain using the lower back for support when sliding back to plank.
DO: 15 repetitions (middle, left, and right is considered 1 rep). GO!


There are so many exercises you can do with a towel but these are my fave. This workout gets your heart rate up and targets several different muscles groups. Challenge yourself and perform these exercises back to back for 4-5 sets with minimal break in between. There’s no way you won’t get a sweat going!

Great workout – Minimal Time – No Equipment – In Your Home! What’s better than that? LET’S GO!

0
    0
    Your Cart
    Your cart is emptyReturn to Shop