Julia Chan

The Secret Core Muscle

I have been adamant about practicing my inversions these past few weeks and have reached a point where I’ve overcome the fear of going upside down and can now focus on the muscles engaged to get up and stay up. This is where I discovered the power of the Serratus Anterior.

What’s the deal with Serratus Anterior?
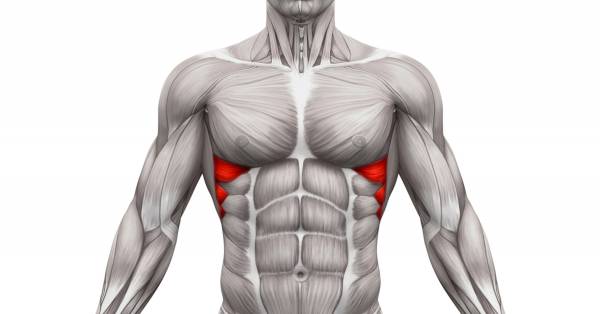
Known as the “boxer muscles”, the serratus anterior are the muscles that boxers rely on for multi dimensional movement and speed. Movements such as pushing, pressing, punching all stem from the strength and power of these muscles. Protraction and retraction of the scapula (shoulder blade) help strengthen the serratus and provide a strong and stable foundation for the chest and back to move from. This also supports your shoulder in rotational movements. Also when strengthened and developed, aesthetically, these are the sexy muscles that define the upper sides of your abdominal area.

Where can I find my Serratus Anterior?
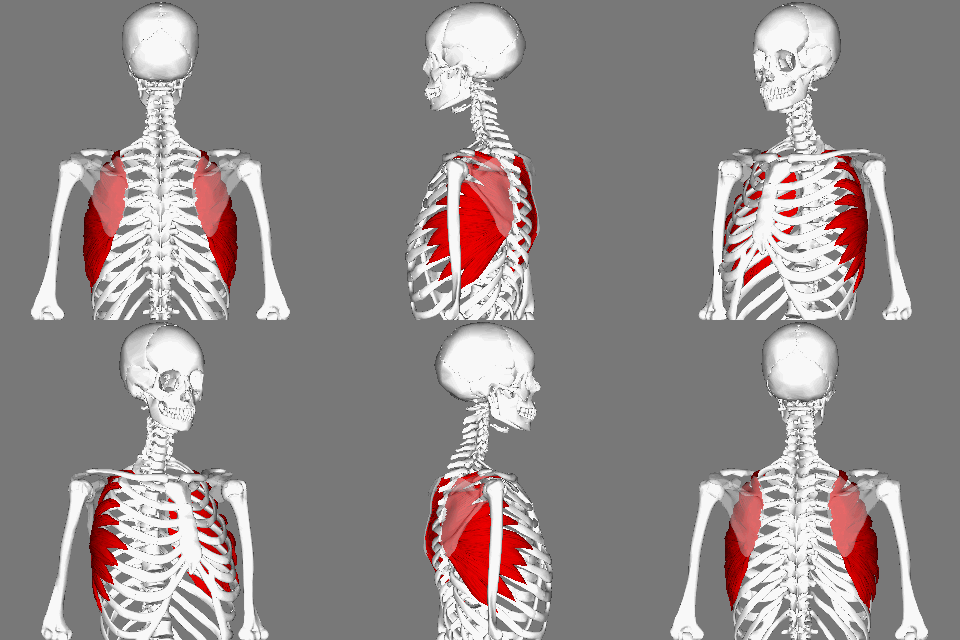
Connected to your rib cage originating on the surface of the 1st to 8th rib, the serratus muscle wraps to the medial border of your scapula. Due to the wrapping, this creates a “wing” appearance and function that plays a crucial role in mostly all back and chest exercises. Because of its attachment to the ribs, the serratus also serves as a breathing accessory. Taking deep breaths will increase the internal pressure which provides stronger support for stabilization, action, and resistance.

Serratus_anterior_muscle_animation_small

Why the Big Deal?
Several reasons!
(1) Common in sports and exercise, shoulder pain and injuries comprise of 21% of the population with 40% of those injuries lasting over a year and treatments accumulating to an annual cost of $39 billion, according to NASM. Weakened serratus also contribute to neck problems due to tension, tightness and possible numbness down the arm because of poor circulation. Strengthening these muscles will help to provide more stabilization so your joints can remain safe and healthy.

(2) Let’s go back to the whole reason of this post…my inversion exploration! Because the serratus stabilizes the positioning of the shoulders, arms, and midsection and aids in breathing to create full expansion of the rib cage, it is the secret core muscle to getting up into inversions and maintaining arm balances. When activating the serratus in these challenging poses, you create a drawing in and “push up” effect (for ex: crow pose, peacock pose, headstand, forearm stand). When engaged, you will feel the power and lightness of your body with minimal effort.

(3) A common mistake in exercise is using the path of least resistance. We all want to use the larger muscle groups to power through exercises because they’re easier to recruit so we don’t feel the pain/burn as much. The serratus anterior is a muscle group that is not often seen but yet carry a load of power. However, activating these muscles are more about connecting and feeling rather than forcing and powering through.

Focus and great detail is needed to fine tune the serratus anterior. Although its power is evident in sports such as boxing, its “quiet” function is so important in more calmer activities like yoga. So instead of just pushing through your next inversion, arm balance, or back/chest exercise, take your time and connect to this secret core muscle. You’ll find that it’s almost effortless. Almost… 😉

*Check out my next blog post on some great exercises to strengthen your Serratus Anterior!


Stretch with TRX

Total Body Resistance Exercise (TRX) is a suspension training program that’s known for its strength workouts. The exercises are functional, effective and all dynamically challenge your core by leveraging gravity and your bodyweight as resistance. Here is a great TRX exercise that gets the heart rate up while tapping into your core.

As much as TRX is known for its intensity, it also serves as a great tool to assist in exercises so one can develop better and stronger form. I love using TRX for my workouts but more recently discovered its assistance for getting deeper into yoga poses. Check out these great yoga stretches to try with TRX!

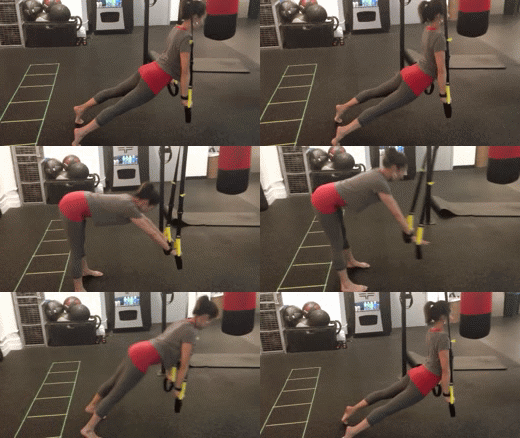
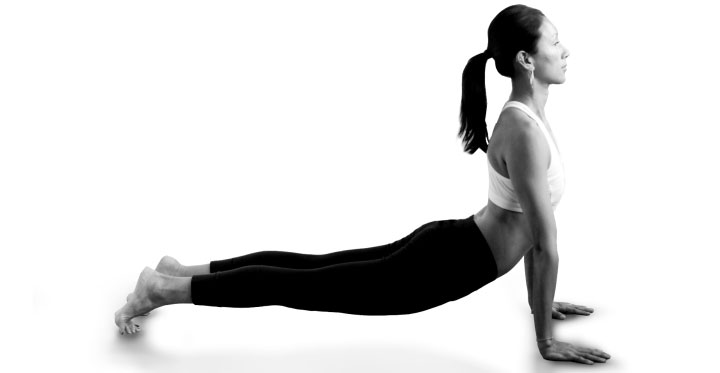
UPWARD FACING DOG
This pose is a back bend and requires strength in the abdominals, legs and upper body to hold the pose. Using the TRX will allow the hips to drop lower giving a better stretch in the abdominal wall and chest. Shifting the weight forward into upward facing dog can be challenging so be sure to engage the core and press firmly through the arms to help stabilize when moving.
Keep in mind! (1) Set up so that the straps are directly under the anchor point (2) Lengthening the straps will deepen the stretch but will also require more core strength (3) Press hands into the handles to push back to standing

updog

fur1w

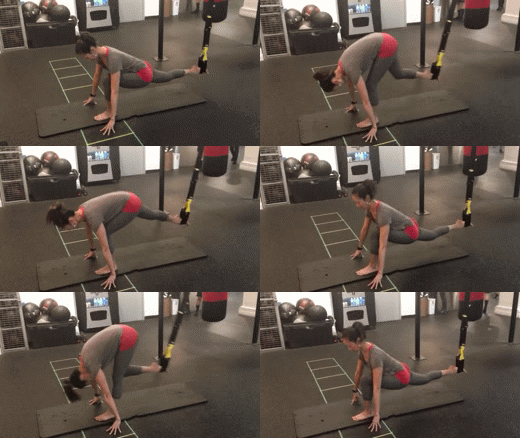
LOW LUNGE TO STANDING SPLIT
One of my favorite hip openers is Anjaneyasana (Low Lunge). This pose stretches the hip flexors particularly rectus femoris and tensor fasciae latae (TFL) which are both very tight muscles due to prolonged sitting or overuse in exercise. Standing split is a balancing pose that challenges the core and leg strength while stretching the hamstrings. So combining the two poses is not only a great warm up but a great way to open up two very commonly tight areas (hip flexor and hamstrings). The release in both will immediately alleviate lower back pain and tension.
Keep in mind! (1) Twist the handles together so they make one big handle/one strap and line up directly under the anchor point (2) Keep the back leg in strap straight when in low lunge pose (3) Keep the front knee slightly bent when in standing split (4) Make sure to keep a flat back and chest up when in low lunge

Lunge

lowlunge

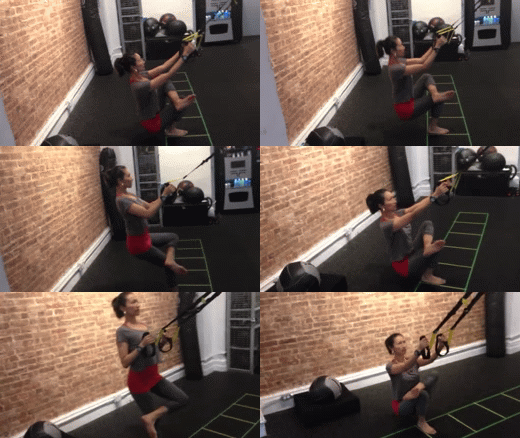
HALF ANKLE TO KNEE (PREP FOR TIP TOE POSE)
A very challenging hip opener as it requires flexibility in so many areas. All muscles in the LPHC (lumbo-pelvic-hip complex) must be open to sit in the full Tip Toe Pose. However modifying with half ankle to knee helps to release tension in the glutes and hip external rotators. The TRX straps will help with balance so that you can sit as low as you can while keeping a straight spine. Moving from seated to standing position will warm up the hip but also strengthen the quadriceps of the standing leg. This stretch will also help deepen your Pigeon Pose and Seated Ankle to Knee.
Keep in mind! (1) Keep your back straight and chest up (2) Very important to flex the foot placed on the knee to protect the joint (3) Move hips back (as if sitting in a chair) when bending the knee (4) Don’t be afraid to use the arms to help pull up to standing

ankleknee

Stretching is an essential part of being fit. Without full of range of motion, your body is restricted to complete any exercise or pose in its proper and ideal form. Find time to incorporate stretching and/or a yoga practice into your weekly fitness routine. Using fitness props such as TRX straps, blocks, yoga straps, bolsters will aid tremendously on modifying and assisting so the body is aligned and working safely, efficiently and pain free. Now…Go Stretch!

Get Out of Your Rut!

The inspiration for this post came to me after subbing a yoga class last week. I must have a completely different teaching style than the original teacher – the feedback I received from the students made it loud and clear. Some students didn’t take to my style and left (it happens!) but several students approached me after class with curiousity, expressed they’ve been taking the same class for years and I was exactly what they needed. Nice compliment but this got me thinking that these students (even the ones who left) were in a “rut”.

A rut is a habit or patterned behavior that becomes dull, unproductive and really hard to break. Don’t get me wrong…”ruts” in fitness is not necessarily a bad thing. You’ve been doing the same exercise for years and you’re fine with that. These students found a teacher they love and stuck with her. I am sure they advanced their practice, learned a whole lot and was happy attending her class. I have been taking the same yoga class for years so I’m guilty of it myself. But there’s a lot to be said in trying something out of the norm and exploring anew…different teacher, new kind of workout or exercise, dancing or playing a sport.

Here are 4 reasons to get out of your rut and explore something new!

#1 A humbling experience
I was shy to try boxing because I never felt I had it in me or that I would look silly doing it. Well, I looked ridiculous and had no clue what I was doing. I was programmed to move the same way for so long that I had to re-train my body to do something totally different. Even something as simple as standing in a boxing stance was hard for me. Slipping was just asking for too much. My first few sessions with my boxing trainer was ego shattering but also a very humbling experience. It forced me to get out of my patterned ways and back into breaking movement down into simple steps.  Learning this sport made me feel so uncoordinated but it also got me to connect with my body again. When learning a new exercise or movement, your neuromuscular junction is retraining, reprogramming, and creating new patterns. This enhances and promotes mind body connection keeping the nervous and muscular system in constant communication. A frustrating and eye opening experience but one that was so worth it!

#2 Get out of your comfort zone
I get it…no one likes to be uncomfortable! Stepping out of a comfort zone can be very challenging because it requires us to dig a little deeper and tap into a space that we don’t normally go. Your body adapts to the same exercises and workouts and will stop advancing at some point. You may be worried about not knowing anyone in a new class, not being able to keep up, unfamiliar with the techniques, or using different muscles, etc. Just remember that everyone started in that very same place. Once you get out of your own way, jump in without any doubts, you’ll immediately find comfort in everything that you do.

#3 Connect with new people
Community is a huge part of fitness. Every studio or gym has its own culture and with that brings a group of people that share common interests. Once you get out there to explore, you are surrounded by like minded people that are all there to work hard. This is a great environment and opportunity to meet new people. You never know who you’ll meet at your new dance or bootcamp class.

#4 For the better of your body
We all need to get shocked from time to time. If you’re repeating your workouts, bored, lack enthusiasm, unmotivated, then guess what…so are the muscles in your body. In order to continuously challenge the body and grow, you need to shock it every now and then. And the only way is to try something new. Without a doubt, you will move differently and use muscles that you never knew you had. I recently started taking Pilates and that class kicks my butt every week. I always pride myself on how strong my core is so I was shocked at how difficult it was for me. Well, I’m hooked now and am realizing that it’s helping me heal an old injury at the same time feel stronger when doing inversions. Who knew?

We often don’t know what we need until we are introduced to it. We all make judgements on what works for our body and what doesn’t. But how do we really know until we try it. If you even have the slightest curiosity on trying a new class, don’t think twice and just go! If you’re bored and need a change, that is all the reason to check out a new teacher or class. The biggest take away from getting of your “rut” is simply being able to say you tried. That’s all you can ask for! So with the new year approaching us, tis the perfect time to get out of your old exercise habits. Get out of your comfort zone, be humble, meet new people, do good for your body and most importantly…HAVE FUN!

Workout Before (& After) You Pig Out!

Thanksgiving is my favorite holiday. It’s when I really take the day off, hang with my family, laugh, play games, and relax. I know most of us love all of the above but let’s face it…we’re more excited about gorging our faces with multiple servings of turkey, stuffing, potatoes, and pie. I’m not for pigging out but I know how delicious the dishes are on this holiday (my mom makes the most amazing stuffing…hands down!). So if you plan on stuffing face all day long and consuming, what the news has reported, well over 3,000 calories in one sitting, then working out is a MUST!

Here’s a quick and effective workout to do before and after your feasting marathon:

Blast the Calories with Cardio: 20 minute treadmill workout

3 min     5.0 – 6.0 speed at 5.0 incline
2 min     6.0 – 6.5 speed at 8.0 incline
1 min     6.0 speed at 3.0 incline
2 min     7.0 – 11.0 speed at 3.0 incline
1 min     4.5 – 5.0 speed at 3.0 incline
2 min     5.0 – 6.0 speed at 6.0 incline
2 min     6.0 – 7.0 speed at 8.0 incline
1 min     6.5 – 7.0 speed at 1.0 incline
1 min     7.5 – 11.0 speed at 1.0 incline
1 min     3.5 – 4.5 speed at 1.0 incline
2 min     6.0 – 7.5 speed at 3.0 incline
1 min     5.5 – 6.5 speed at 1.0 incline
1 min     4.0 speed at 1.0 incline
*Please modify by decreasing speed only when needed.

Blast the Belly with Core Work: 3 sets back to back

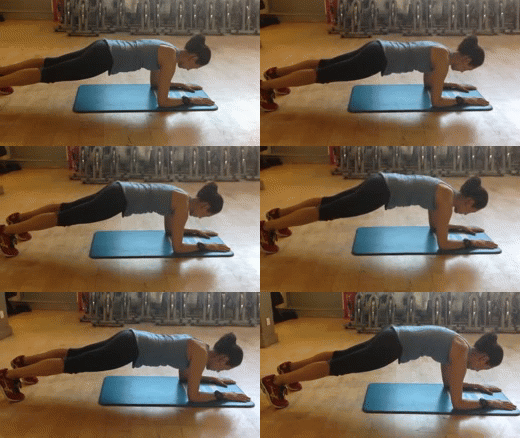
1. Elbow Plank to Hand Plank: 1 minute total
Stay in elbow plank for the first 30 seconds then press up into hand plank for another 30 seconds.

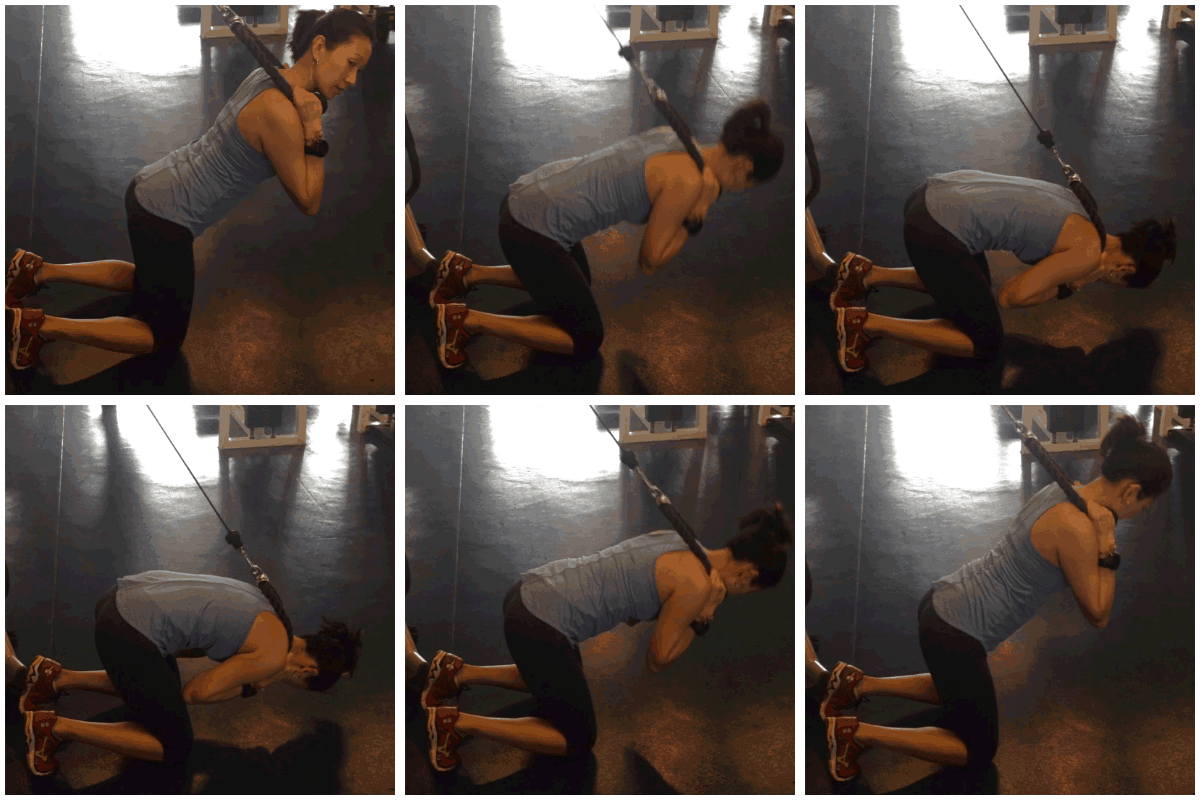
2. TRX Mountain Climbing: check out my post for instructions. Can also be performed without TRX.

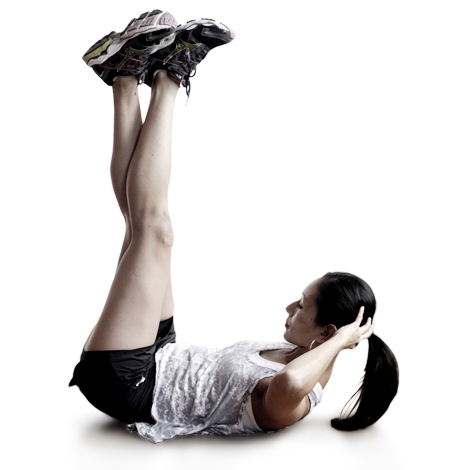
3. Alternate leg raises: 20 reps on each leg
Support your neck with your hands then press your lower back into the floor to lift your shoulders up. Lower one leg down then switch legs. 

4. Elbow to side plank: 10x each side
Start in elbow plank. Shift your weight onto your right side, stacking your feet into side plank. Then go back to elbow plank and switch to the left side.

5. Hand plank reverse crunch on stability ball: 15 reps
Set up in hand plank with your shins on a stability ball. Perform a reverse crunch by rolling the ball towards your chest while keeping your shoulders on top of the wrists. Extend your legs and repeat.

Let’s get to work! Work hard, burn those calories, and enjoy your Thanksgiving meal…guilt free! Have a happy one!


So Fresh + So Clean!

Everywhere you look, someone or something is telling you that your body is toxic, filthy, dirty and you need to clean your gut and diet. Working out and eating right is just not enough. A crucial part of living a healthy and fit lifestyle now consists of blending, juicing and cleansing. Skeptics think cleansing is a fad and only out to make money. While others stand behind the benefits of cleansing. So what are these benefits?

Here are just a few:
#1 Get rid of the crap. We don’t eat healthy all the time. Years of drinking, fried foods, cheesy pizzas, and drowning brownie sundaes get stuck in our system, particularly in the lining of our intestines. Cleansing helps to clear out the pipes and flush out the crap so we can eat more and digest effectively.

#2 Make a healthy change. Doing a cleanse is a wedge between our old ways and a new way. Eating the same foods day in and day out puts the body in a slump (especially the wrong choices in foods). Daily habits can also become addictions (need for coffee, sugar, fried foods, etc). Deciding to make this change prompts other physical changes in the body such as improved skin, higher energy levels, stronger immune system, healthy and strong hair and nails, increased vitality and an overall improved sense of well being.

#3 Boost weight loss. Cleanses are great to help drop those few extra pounds. The shift in your usual eating habits and focus on eating clean or raw will help you lose that last bit of weight…plus more.
*I love MindBodyGreen’s article on more great benefits of cleansing.

Cleanses

The rage of cleansing has brought on numerous juice bars with their own line of cleanses and nutritionists/holistic doctors concocting their own program. Making the choice for the right cleanse to be very overwhelming. Here are a few cleanses I highly recommend and who they’re perfect for.

Be Well by Frank Lipman’s Cleanse and  Dr. Alejandro Junger’s Clean 
These two are my fave because you can actually eat on these cleanses. In order for me to function, I need to be able to put solid food in my mouth and chew. Both programs ask for clean eating supported by daily shakes and supplements. A week to 3 weeks long of dedication and commitment is necessary for completion.
Perfect for: (1) active people (2) those looking for a permanent and overall change in their diet and lifestyle

Organic Avenue’s Love Easy and Cooler’s Raw Cooler
These cleanses are short and sweet (offered in 3 or 5 day programs)! Both provide a one stop shop with juices and foods, although a bit pricey. But nonetheless their options are fresh, mainly plant based, gluten/dairy free, and most importantly delicious.
Perfect for: (1) those new to cleansing (2) those who don’t cook or are limited on time (prepared and ready to enjoy) (3) Looking for an easy transition cleanse that won’t take up too much time or energy

BluePrint and Suja’s Original Fresh Start
Purely juice based, these cleanses sound easy but can be pretty challenging. Although both programs are stocked with yummy fresh juices, relying on liquid alone is a tough feat especially for those new to cleansing or have had poor diets all their life.
Perfect for: (1) those that have cleansed before, have restricted diets and looking for a re-boost or reset (2) looking for quick results in short time (increased energy, weight loss) (3) not too serious about cleansing but are curious

~ Ejuva
This is for the no joke, “I’m super serious about my gut health”, and raw/vegan advocates that want to intensely clean out their guts.  Ejuva is an herbal body cleanse that eliminates and detoxifies from your throat to your bum. Designed in 4 phases, each step prepares you for a deeper detox into the next phase for an overall gradual cleansing that is easy on the body. This program takes you through all steps of cleansing: fasting to juicing to raw meals. Most have reported Mucoid Plaque as their end result.  The accumulation of partially digested and putrefying matter sits in the intestines and is extracted during this intense colon cleanse. Eeeekk…did I mention that this was a serious cleanse?
Perfect for: (1) those who have done cleanses and are really looking for a more substantial and intense cleaning (2) those with chronic ailments, allergies, digestion problems and have tried everything else.

Especially with Autumn underway, most are looking to cleanse for several reasons: post summer binge drinking, bored, needing a challenge, lose weight before they put it back on for the holidays, or taking their health and wellness to the next level. Whatever the reason is, be realistic and choose a cleanse that will best fit your lifestyle. Don’t set yourself up for failure only to feel worse in the end. If you’re not ready for the longer cleanses, start short and work your way up. Cleanses are here to stay and will be there when you’re ready. Happy Cleansing!


Burpees, Push Ups, Squats…OH MY!

I’m a one-on-one trainer at heart but I’ve been leading more classes lately to expose myself to groups and to tap into a different side of my teaching. One of the main reasons I stick to personalized fitness training is because I can focus on teaching form and technique to make sure my students move safely and in alignment. But as of late, I’ve struggled with coaching several people performing exercises in ‘eh’ form and most in terrible form. I cringe when I teach these classes and I have to force myself from stopping the class so I can show the proper form. Instead I try to emphasize what muscles to use and the importance of correct form. But I’m losing this battle and I’ve come to terms that I can’t force people (or their bodies) to cooperate in these classes.

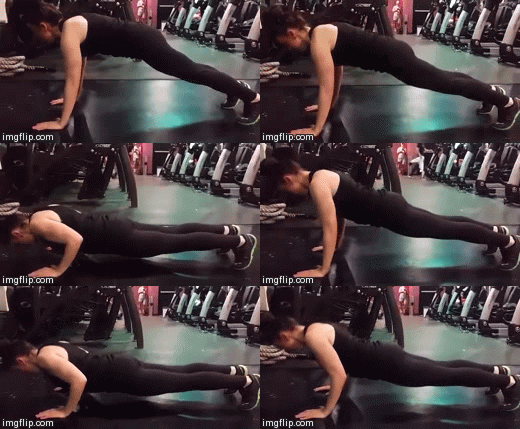
The three exercises that are most commonly performed in poor form are burpees, push ups, and squats. And that’s not only in a class setting but also on the gym floor and in training sessions. They’re all challenging exercises that require full body strength and range of motion so it makes sense why they are often done incorrectly. Let me explain the proper form for each with the help of my student, Nadia, in the video clips and images below.

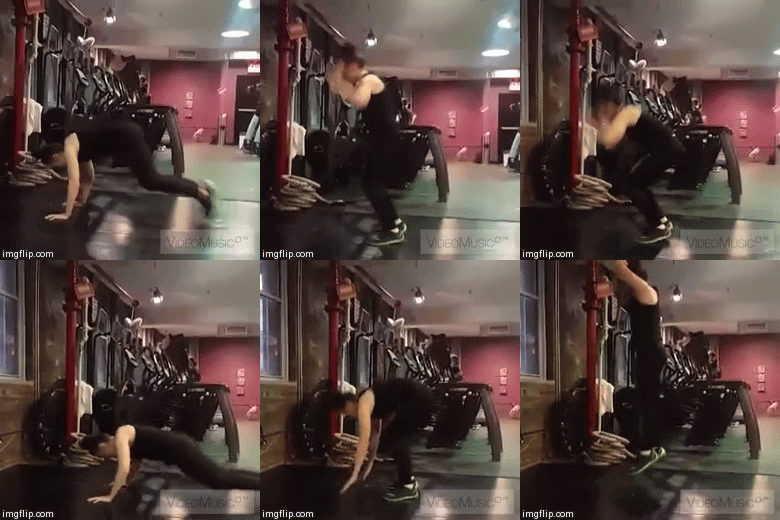
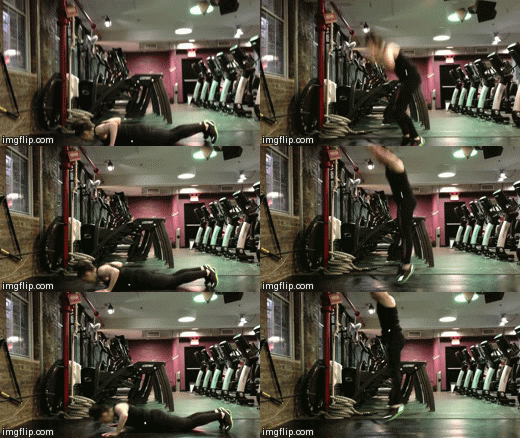
BURPEES: A dynamic and full body exercise that requires strength and cardio endurance. A burpee should only be done by someone who has already developed a foundation in strength and balance and can understand how the body should land and exert force.
Most common mistake: Jumping back and landing in plank. There is too much compression in the spine when jumping back into a plank pose. Repeated jump backs into plank can create lower back pain and possible spinal disc injury.
Fix it! Once you jump back into plank, quickly jump forward again. In the advanced version, once your feet are off the ground to jump back, bend your elbows right away to land your chest to the floor.

Modified Burpee

Modified Burpee

Advancedburpee

Advanced Burpee

PUSH UPS: A calisthenic exercise that requires a pressing up of the entire body weight in plank pose. The muscles in the upper body and core are essential for strength and stability. Another exercise that requires full body strength.
Most common mistakes: Those not strong enough to perform a push up will usually (a) sink their lower back which shows minimal or no core engagement (b) less than 45 degree bend in the arms which shows weakness in the upper body (c) bobbling of the head which shows they’re not moving from a solid foundation and just trying to get through the exercise.
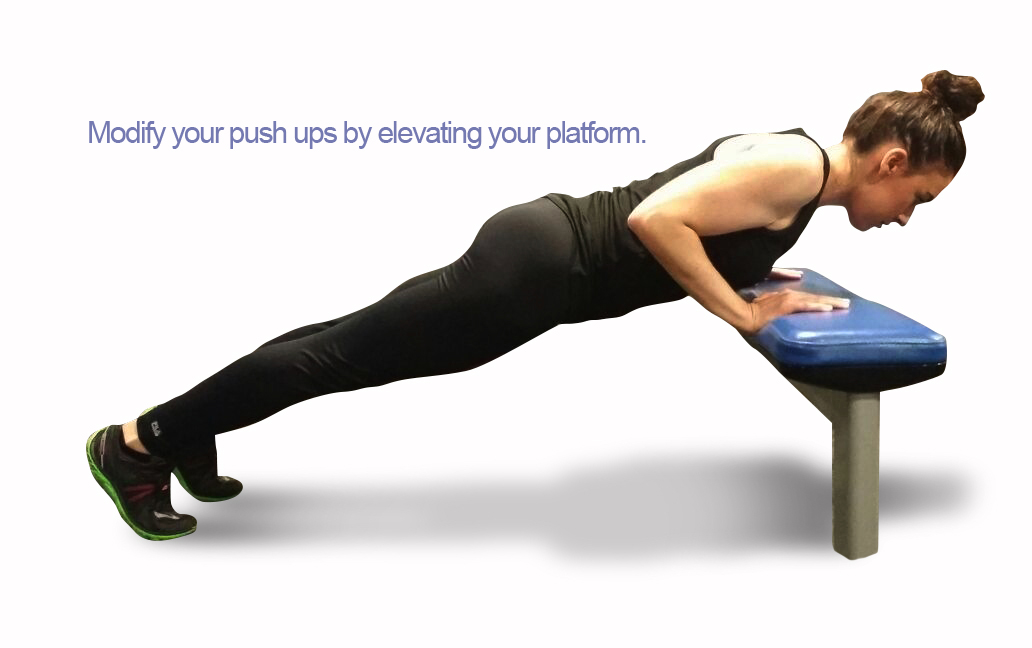
Fix it! Nadia shows us a perfect push up below. If your upper body is not quite strong enough, drop your knees to modify. Another great alternative is to elevate your platform which will decrease the load you have to press up.

Perfect push up

Perfect push up

Pushup_platform

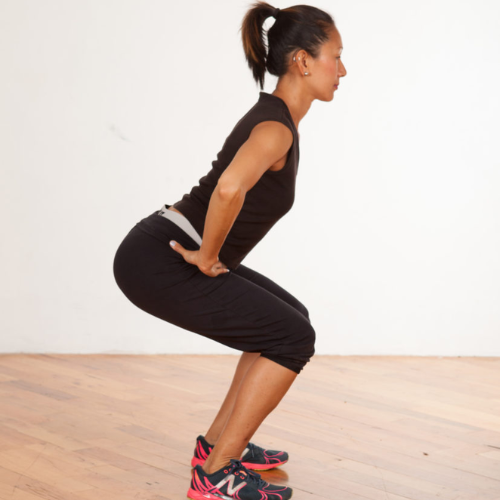
SQUATS: A compound, full body exercise that requires strength primarily from the lower body and isometrically from the entire body especially the core and upper body. I was always under the impression that squats were only for the legs and glutes. But this exercise requires full body engagement and is used as a great assessment to show strengths and weaknesses in the body.
Most common mistakes: If the body is not fully engaged, you will most often see (a) knees collapsing towards each other (b) deep lower back arch (c) heels lifting up and knees falling forward past toes.
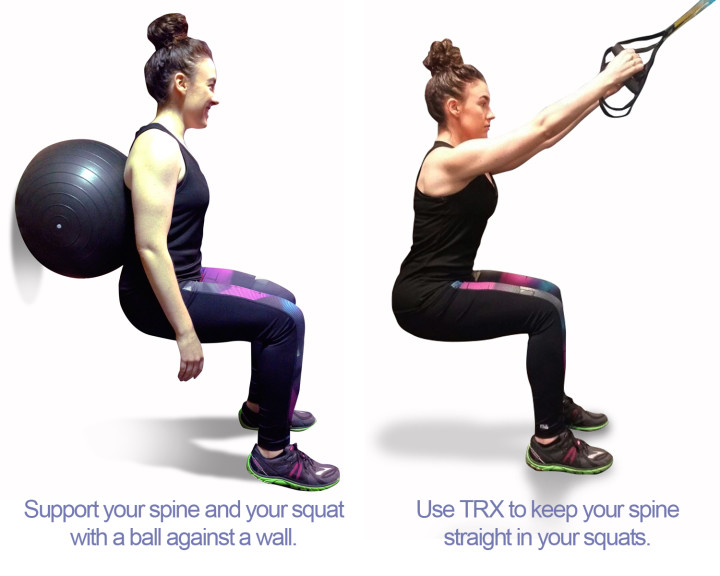
Fix it! There is no shame in using a stability ball for support in perfecting your squat. Place the ball against the wall and position your back against the ball. Align your feet hip distance, bend your knees to lower down into your squat. Make sure your knees don’t go past your shoe laces and your lower back keeps its natural arch and rolls against the curve of the ball. Using TRX is also a great way to work on your squats. The TRX straps assists to keep your spine erect while your lower body can focus on proper form. Using these modifications are great ways to build strength so eventually you won’t need them.

Squatversions

It’s not anyone’s fault that they can’t perform these 3 exercises in perfect form.  They’re all really tough exercises.  Most people don’t have enough knowledge or information on how to do so. Or more than likely, their bodies may not be able to move that way that day. So modify, move with consciousness and effectively. This will ensure a safe workout so you can continue your workouts…pain free!

Practice to Make it Perfect..For You!

Taking classes and working with a trainer is a great way to get motivated and achieve your fitness goals. An experienced teacher instructs your every move so no need to think about what exercises to do and how to challenge yourself. However an important component of working out is to understand what your body needs. Creating your own workouts and yoga practice is essential to figuring out what you need so you can make your body work better for you!

I had lots of comments and questions from my blog post about my weekly workouts on how I build my own yoga practice. It actually took me awhile to do this. I was unsure of what poses to do and what to do next. I remember taking yoga classes when the teacher would ask everyone to work on their own and do what our bodies needed. I always looked around the room for ideas on what poses to do and exchanged confused looks with others in the room. But practice made it perfect for me!

So where do you start in building your own yoga practice?

FIRST: Sit and observe. Close your eyes for a moment and pay attention to your body. Acknowledge what feels tight, what’s in pain, or what you’d like to stretch and lengthen.

SECOND: Pick 2 things you want to work on. Any more than 2, your focus will get lost. Once you’ve identified the areas of attention, then go ahead and start moving. Think about the stretches and poses you did in class and get right into them.

THIRD: Who cares! Pay attention to only what you want and need. It doesn’t matter what you look like or what others think about your pose or sequence. This is all about you! The less you care about how you look or what people think, the more you are tapping into what you need!

LASTLY: Just breathe. Connect every move with a breath and breathe deeper when holding your poses. Try to stay in each pose for 5-8 breaths. Breathing helps deepen your poses and keep you connected to your body.

Here is a brief clip from my own practice this morning. My focus was on opening the hips to release my tight lower back and quadriceps while creating heat with some core work.

If you need a little guidance, here is a great sequence to get you started! Have fun!


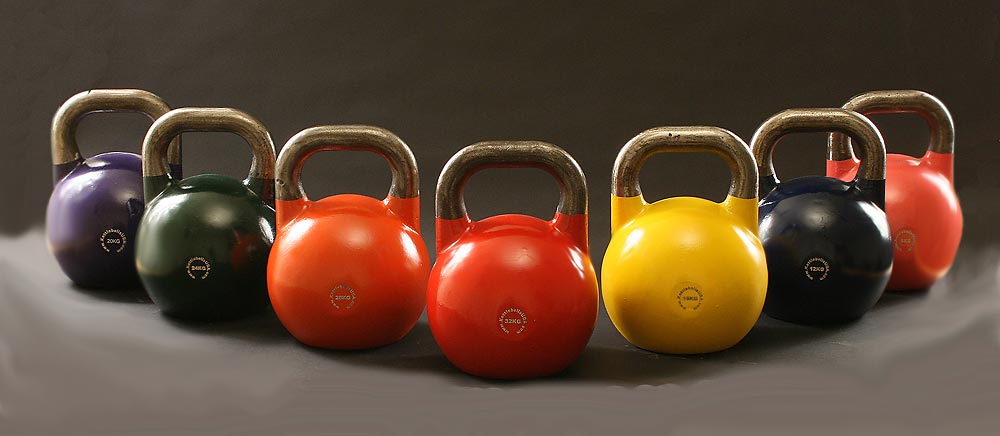
Kettlebell 1-2-3

#1 SAFETY FIRST
Kettlebells should only be used by and/or with someone certified to work with them. First things first, find a space that gives you enough room to swing without any contact to surface or people. Second, make sure that you hold on tight to the kettlebell. I’ve seen them fall through wood floors and crashing into mirrors. Not fun! Third, make sure that your body is physically prepared and trained to lift the weight. Avoid injury to you and others is top priority!

#2 ALL ABOUT THE CORE
Kettlebell exercises are dynamic and require the whole body to participate. To lift and control a kettlebell, one has to focus on the entire body, especially the core, to contract as a group. When lifting or swinging a kettlebell, make sure to engage your core (abdominals, back and glutes) through the entire set. This will not only provide more strength and stability in your moves but will also help to support your joints and protect your lower back.

#3 TECHNIQUE TRUMPS QUANTITY
They are odd shaped, heavy and the moves are not your conventional push/pull exercises. Kettlebell workouts require a full range of motion, power and momentum. It works several muscles simultaneously through ballistic movements. If the technique is not there, your form will suffer and eventually injury will follow. Start with a lighter weight (15- 20lbs) and make sure your posture, mobility and form is on point. Perform the exercises correctly in each set before you begin to add more reps or weight. The better the form the more you will benefit from this amazing workout.

I heart kettlebells! They provide a total body workout that targets cardio, strength, and flexibility.  I use them with most of my students and they love it. But even I am cautious when I teach them.  It only takes one bad move to result an injury. As the same with all workouts, move from a strong and safe foundation and your body will thank you for it. Now go pick up a cannonball!

A Week in the Life of My Workouts

A question that all my students ask me is “What do you do for your workouts?” I answer vaguely so to not take up too much of their time talking about me. So I’d like to finally break down the week in the life of my workouts!

Header_blog


MONDAY: Most dread Mondays but I get excited for it because I get to run with my dog, Drogo. Weather permitting, I start the day off with a brisk walk to the park and once I get to Bridle Path in Central Park, it’s full speed ahead. I get bored easily so I mix things up with variations of running (sprints, skips, tip toes, backwards) and always add shuffles (regular and criss cross). I also find an area where I can do some resistance training. Some great exercises that can be done on a park bench: push ups, step ups, tricep dips, leg raises, mountain climbers, planks, and side planks. I add in walking lunges, squats/jump squats, frog squats and side lunges to make it a full body workout.

TUESDAY: This is my HIIT (High-Intensity Interval Training) day. I have very little time so I make sure every minute counts. My warm up is 20 minutes on the Stairclimber (with rotating steps). This helps get the heart rate up, warm up my legs, and gets me pumped for what’s to come. I love kettle bells and TRX so I make sure I incorporate both. Here is an example of a routine that I’ll work on.
– 30 walking lunge steps with kettle bell or free weights
– 15 TRX single leg lunges (each leg)
– 20 kettle bell swings
– 15 single arm rows with kettle bell
– 20 TRX Jump Squats
– 15 close grip push ups
– 10 single-leg plank to arm core exercise (each side)
– 25 leg raises
– 1 minute plank to side plank
– Forearm stand
– 5 minute jump roping
REPEAT! I’m in and out in an hour!

WEDNESDAY: This is a dual workout day that gets both the fire and water side in me. I train with my friend and professional boxer, Emmanuelle Brujan at Work Train Fight Gym and punch his mitts senseless for an hour. Not only is this a great cardio and strength workout but he keeps me on my toes and teaches me how to react quickly to defend myself. Later on in the day, I find time to work on my own yoga practice. I use this self practice as a way to tune in, give my body a break, and create some clever sequencing and techniques to teach my students for the week.

THURSDAY: This is my day to focus on strength training. I’ll warm up with either the stair master, a run in the park, or some TRX squats with some dynamic stretching. I focus on the larger muscle groups and work on developing them with more weight, less reps and with super sets or drop sets. I’ll do a sequence of 5-6 exercises back to back then jump on the treadmill for a 3 minute sprint and then rest/stretch for a minute before I start again. Most sequences are done in 3 successions and then I’ll move on to another muscle group. I usually hit legs, back, core, and arms for this workout. I walk out feeling like She-Ra but am sore for days after.

FRIDAY: This is probably my fave day of the week. Friday class at Katonah Yoga with Phillip Askew closes my week. It’s anything but restorative or easy but it’s necessary after all the lifting, pushing, and pounding I do all week. I get to stretch, lengthen, and practice my inversions with the “Inversion King”. I leave class feeling long, lean, and accomplished.

I like to rest over the weekend but if up to it, I’ll sneak in a quick run in the park. My weeks don’t always pan out as planned but the workouts do remain the same. I may throw in a class here there (I love Barry’s Bootcamp and BollyX) and try to explore other fitness studios (Brick’s BX class is next on my list). Variety in your workouts are important not only to challenge your body but to keep you interested and sticking to a routine. A combination of power/strength workouts with stretching and lengthening sessions work for me. So whatever floats your boat, always listen to your body and be sure to rest. It will only make you better for next week’s workout.

The “Tipping Point”

After years of teaching and doing yoga, I still struggle with inversions. So much so that I included it on my first post of 2014 as one of my New Year’s “explorations”. I have been practicing “Going Upside Down” several times a week and have finally understood the “tipping point” of inversions which has served as an epiphany in my practice.

Stand up straight and visualize an arrow. Imagine the very top of your head as the arrowhead, your body as the shaft, and your feet as the fletching (feathers). The shaft of the arrow will run directly down the center of your body, very much like your spine into your pelvic floor. Like Mountain Pose (Tadasana), where you are standing at the top of the mat, you want to maintain that very same line and structure when attempting inversions. Before you go completely upside down, you have to bring your body to stack, which is the hardest part of inversions. Stacking is when your joints are aligned so they can rely on each other for support. Once you’re stacked, you will immediately feel the “tipping point” where your centerline will find its natural place. Falling out of inversions won’t happen as often because you will be able to catch your body before it does.

Check out my video! I demonstrate in headstand how the “tipping point” can help you find your center in these very challenging inversions. Try it and let me know how you do!

0
    0
    Your Cart
    Your cart is emptyReturn to Shop