Julia Chan

5 Steps To Avoid Getting Sick

We are just a few weeks away from Spring so the weather can be very temperamental. One day we’re freezing in our down jackets the next day we’re in shorts and tee shirts. This transitional phase and crazy temperature swings can break down our immune system, making us susceptible to a cold or flu. Our bodies tell us when we’re on the verge of getting sick. So once those signs show up, don’t wait… try my emergency kit and drop kick that cold ASAP. Because who has time to get sick…NOT US!!

This is my 5-step program when my immune system needs a boost to battle:

#1 FIRST LINE OF DEFENSE: UMCKA

umcka

The first signs of a cold (any and all symptoms), I run for Umcka and squeeze in a few drops repeatedly throughout the day. Best taken once the symptoms start to creep in, Umcka is homeopathic so it works safely with your body and no need to worry about side effects.


#2 SORE, ITCHY THROAT: APPLE CIDER VINEGAR
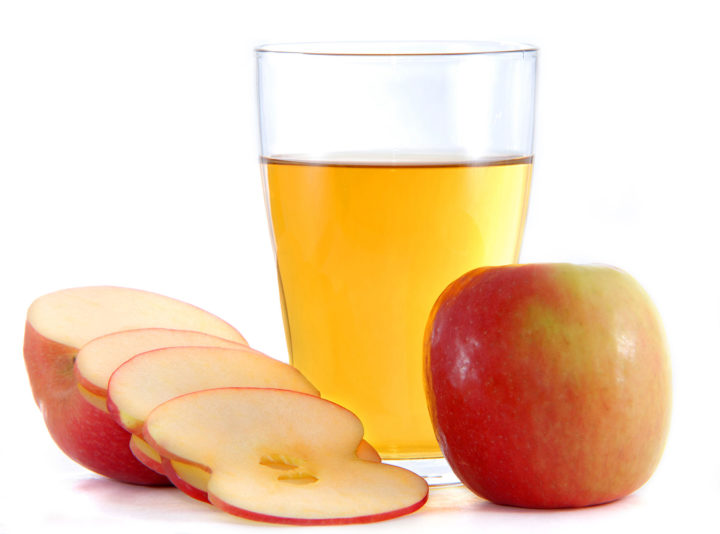
Apple_cider_vinegar

This healthful tonic which includes powerful healing compounds such as acetic acid, potassium, magnesium, probiotics and enzymes kill unwanted bacteria. It’s a crucial part of fighting off a dry, irritated sore throat before it evolves into an evil bronchial or chest infection. Also a good source of polyphenols, this fermented beverage provides numerous benefits to skin, digestion, immunity health, and helps to prevent cardiovascular diseases, cancer, diabetes, and neurodegenerative diseases. Make sure to purchase it organic and raw (one that includes the “mother”. I like Bragg’s) and dilute with water (so not to burn your throat – as I learned the hard way). Gargle several times a day until your throat feels better or make this a part of your nightly routine, like my mama does.


#3 ONLY ONE FUNCTIONING NOSTRIL: NETI POT 

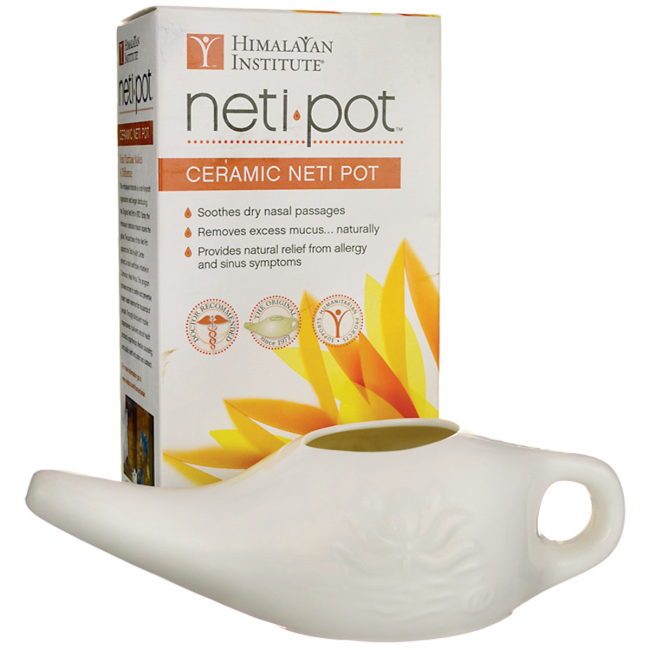
netipot

How frustrating is this!? Breathing out of just one nostril (or worse…no nostrils) is a major inconvenience and makes functioning through your day so much more of a challenge. Nasal irrigation with a Neti Pot is not the most comfortable but very effective to thin out mucus, flush out and clear dry, crusted nasal passageways (EW!) so you can breathe again and avoid sinus infection. You do feel like you’re drowning and it’s a wet mess but bear through it and you will feel 100% better. For those with seasonal allergies, the Neti Pot will do wonders for you.


#4 HELP BEFORE MY HEAD IMPLODES: EUCALYPTUS ESSENTIAL OIL

steam
Anti-inflammatory, decongestant, antiseptic, antibacterial, and stimulating, are just some of the benefits of the eucalyptus leaf. It’s powerful medicinal benefits help to ease nasal congestion and help kill off the cold virus. You can apply eucalyptus essential oil (my fave is Olbas) directly on your nostrils or rub some in your palms and take a few deep inhalations through your nose. For those suffering major congestion, apply a few drops of the essential oil into a pot of boiling water. Place a towel over your head to trap the steam around you and take several deep breaths. You may need a break from time to time as the steam/heat can be very intense. But you will feel immediate relief, I promise you!


#5 I HURT FROM HEAD TO TOE: CALM MAGNESIUM & SLEEP

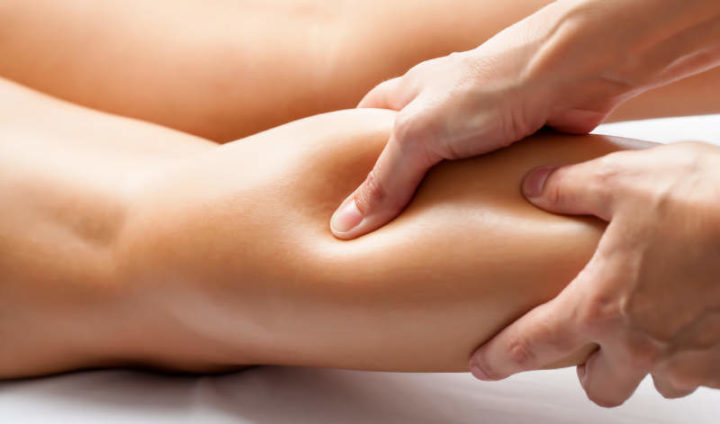
sleep

Sleep is one of the most powerful weapons we have against fighting the cold and flu bug. The hours you spend sleeping is the time when your body heals. Cells repairs during this time, hormones are released to promote tissue growth and reparation, your immune system is building back up so your energy levels increase. When you deprive yourself of sleep, you are not giving your body time to recharge so you can function at your best the next day. Every night before bed, I enjoy a cup of hot water with a whopping Tbsp of Calm Magnesium powder and make sure I get at least 6-7 hours of sleep. When you’re sick or for those days you’re feeling depleted, make sure to tuck yourself in earlier and get at least 8 hours of rest. It is vital to fend off illness.


There is no way we can function optimally at the levels we demand of ourselves every day when we’re run down and sick. With our daily schedules and responsibilities we want to show up 100% when we can. But when our bodies shut down from these annoying cold and flu bugs, our bodies are communicating to us to STOP AND TAKE CARE NOW! Remember, without our health we are NOTHING! These steps are easy…you just have to make the time for them. 🙂 TAKE CARE AND BE WELL!

3 Tips: How to Motivate Yourself to Work Out!

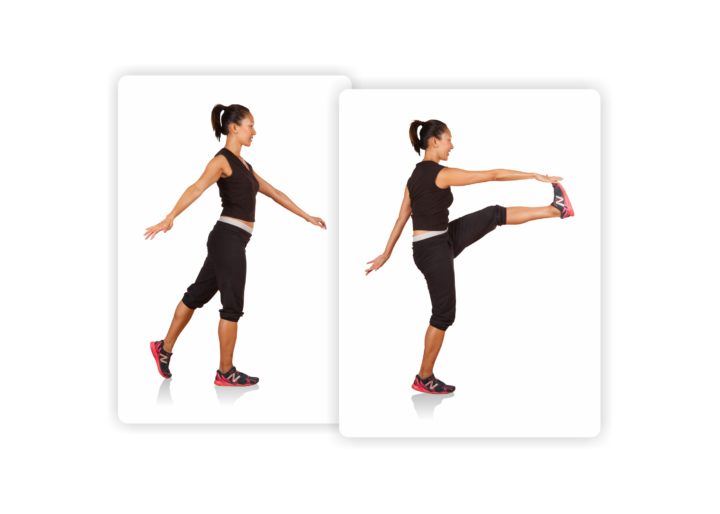
alternate hand to foot kicks

Now that we have reached mid January, we should have some plan in place to work towards our intentions and goals for this year. As every year, most new year goals are fitness or health related. But where do you start and how do you keep that momentum going? Check out my 3 tips featured on Garage Gym Planner  that will help (and keep) you motivated all year long and reaching your fitness goals!

#1 FIND A FRIEND AND SET A GOAL

Working with a partner or in a team keeps you focused and accountable in reaching any fitness goal. Nothing like having like-minded people support and motivate you!

#2 JOIN A GROUP CLEANSE

Try a cleanse that will help support your workout routine. Consider eating clean and detox for 2-4 weeks. You will feel amazing and more than likely keep up with a cleaner lifestyle.

#3 TRY SOMETHING DIFFERENT

Think of an activity or workout you’ve always wanted to try, then do it. Make a list of all the things you’ve always wanted to do and have been making excuses why you haven’t done it.


For more motivational tips from other trainers and wellness experts on getting your workout in, check out their full article here.

My Thanksgiving Menu

The countdown has officially begun to Thanksgiving feast. So many are not only prepping to cook meals but also to gorge over 4,000 calories in one day. WHAT!? Crazy but true. But as someone who follows a gluten, dairy, and processed sugar free diet, I don’t let this holiday take over. Don’t get me wrong …I never skip a serving of my mom’s famous stuffing and a few slices (yes…a few!!) of pecan pie but like I always tell my clients “Everything in moderation!”

There are several ways to avoid binging and overeating on this special holiday. Start eating earlier in the day, have smaller portions throughout the day, exercise in between meals, etc. But what I like to do is bring a few healthful dishes so I can enjoy meals without the guilt including my mom’s stuffing and pie.

I’ve collected some great healthy recipes that are amazingly delicious to bring to the table. Check out what’s on my menu this Thanksgiving.

APPETIZERS / SIDES

SWEET POTATO & KALE FRITTERS by Yes, More Please: makes 18-20 mini patties
fritters
Ingredients:
1 large or 2 medium sweet potatoes steamed and pureed 
2 cups cooked quinoa
2 cups kale finely chopped
2 eggs
½ cup panko or any kind of plain bread crumbs (I use almond meal or brown rice flour)
1 teaspoon grated ginger
1 good pinch paprika or smoked paprika
1 teaspoon freshly ground black pepper
1 teaspoon kosher salt
4-6 tablespoons coconut oil
For Dipping Sauce:
¼ cup Greek yogurt
1 teaspoon freshly grated ginger
pinch of salt
pinch of pepper
*In a small cup mix all ingredients and chill.
Instructions:
a. De-vein the kale, make it into a tight roll and chop chiffonade style.
b. In medium size bowl, mix all ingredients well.
c. In a medium size pan heat up about 4-6 tablespoons of coconut oil. Scoop small patties onto the pan and slightly flatten the tops. Cook for about 3-4 minutes on each side or until golden brown.
d. Cool on a rack and serve with a side of dipping sauce.

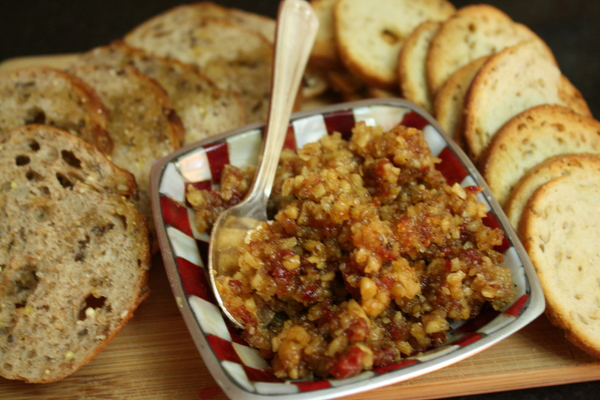
WALNUT PESTO DIP by The Couple’s Kitchen: Serves 10-12 ppl

pesto
Ingredients:
2 cups whole walnuts, lightly toasted
1 cup (heaping) sundried tomatoes, packed in oil, roughly chopped
2 small to medium-sized cloves of garlic, chopped
1 teaspoon fresh thyme leaves, chopped
1 cup parmesan cheese, grated (swap with manchego, nutritional yeast or skip cheese entirely)
Few twists freshly ground black pepper
Pinch kosher salt/sea salt
Good quality extra virgin olive oil, as needed
Instructions:

a. In the bowl of a food processor, add walnuts, sundried tomatoes, garlic, thyme, cheese, black pepper and salt. Pulse several times to combine. Stream in olive oil until the mixture comes together into a coarse, pebble-like texture. Avoid over mixing.
a. Serve with gluten free chips, crackers, or pita chips.


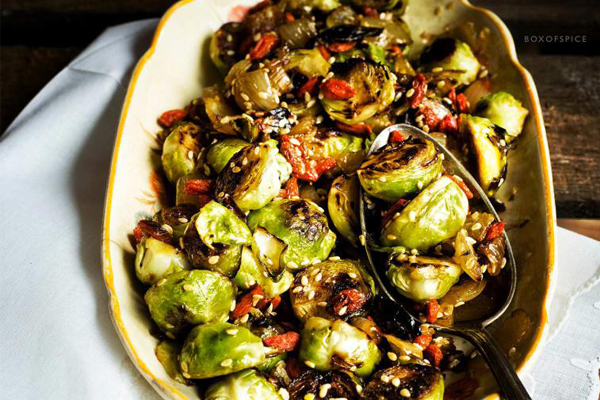
BRUSSELS SPROUTS WITH GOGI BERRIES & SESAME SEEDS by Box of Spice
:
serves 4ppl

sprouts
Ingredients: 
250 grams brussel sprouts
2 medium onions, chopped
1 Tbsp sesame seeds
¼ cup goji berries
4-5 Tbsp olive oil
salt and pepper to taste
Instructions:
a. Wash and half the brussels sprouts. Dry roast the sesame seeds in a non stick pan on medium high heat, for about 3-4 minutes. When you see them brown slightly, immediately remove and put in a bowl.
b. In a large pan, heat one tablespoon of olive oil and fry the onions, till golden brown and nicely caramelized (approx 5-7 min on high heat). Set aside.
c. In the same pan, add remaining olive oil and roast the brussels sprouts face down and then flip. Each side should take about 3-4 minutes on high heat.
d. Once all the brussels sprouts are done, add the onions back in. Add the toasted sesame seeds and add the goji berries last. Toss and stir!

MAIN DISHES:

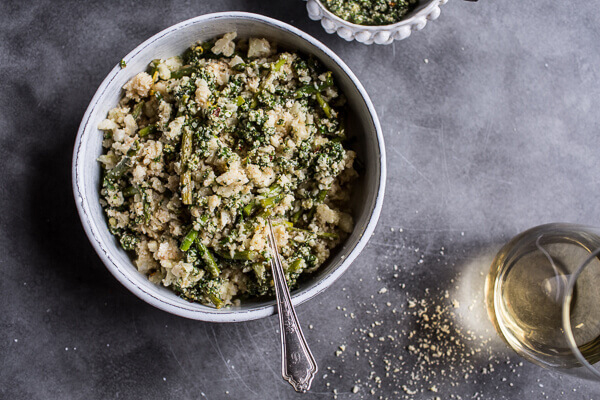
CAULIFLOWER PESTO RISOTTO by Half Baked Harvest: serves 4
caulirissotto
Ingredients:
1/4 cup olive oil
1/2 small onion, finely chopped
1 large or 2 small heads cauliflower, finely grated
2 cloves garlic, minced or grated
1/3 cup white wine
1 small bunch asparagus, cut into 1-2 inch sticks
1/2 cup veggie or chicken broth + more if needed
zest of 1 lemon
1/2 cup full-fat canned coconut milk
1/2-3/4 cup parmesan cheese (I use nutritional yeast)
2 tablespoons fresh parsley, chopped
Cilantro-Basil Hemp Seed Pesto
1 cup fresh cilantro, finely chopped
3/4 cup fresh basil, finely chopped
1/2 cup raw hemp seeds
1/3 cup olive oil
1 tablespoon fresh lemon juice
1 clove garlic, minced or grated
1/3 cup parmesan cheese (or nutritional yeast)
crushed red pepper, to taste
salt and pepper, to taste
Instructions:
Cilantro Basil Hemp Seed Pesto:
a. In a bowl, combine the cilantro, basil, hemp seeds, olive oil, lemon juice, garlic, cheese or alternative, crushed red pepper and a pinch of both salt and pepper.
b. Taste and adjust the seasonings as needed. Add water to thin the pesto if desired.
Risotto:

a. Heat a large, high sided skillet over medium heat and add 2 tablespoons olive oil. Add the onion, season with salt and pepper, and cook until caramelized, about 8 minutes. Then add the cauliflower and the garlic, and season with salt and pepper. Cook for 2 more minutes.
b. Deglaze the pan with white wine and cook, stirring constantly, until the liquid is almost evaporated. Stir in the asparagus. Slowly pour in the veggie broth and coconut milk and bring to a simmer.
c. Cook until the cauliflower and asparagus are tender and “risotto” is nice and creamy, about 6 to 8 minutes.
d. Remove from heat, then add the lemon zest, cheese choice, parsley and a drizzle of olive oil.

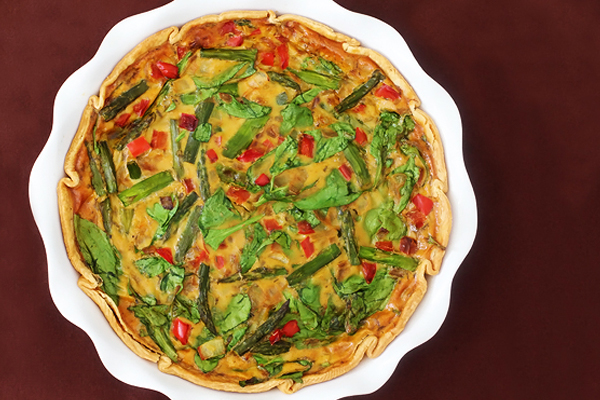
VEGETABLE QUICHE from Gimme Some Oven: serves 8-12 servings
quicheveg
Ingredients:
1 gluten free pie crust
1 Tbsp olive oil
3 handfuls fresh baby spinach, roughly chopped if desired
1 small white or yellow onion, chopped
1 red bell pepper, diced
5-10 asparagus spears, ends trimmed then chopped into 1 inch pieces
6 eggs
3/4 cup unsweetened almond milk (or other non-dairy milk)
3 Tbsp all-purpose flour (I used rice or almond flour)
1/2 tsp baking powder
1/2 tsp salt
1/2 tsp sweet paprika
1/2 tsp dried thyme
1/4 tsp chipotle powder
1/8 tsp black pepper

Instructions: 

a. Pre-heat the oven to 350 degrees F.
b. Use a fork to poke a few holes in the bottom of the crust of unbaked pie crust, and bake it for 10 minutes. Remove and set aside.
c. Meanwhile heat oil in a large saute pan over medium-high heat. Add onions, chopped red peppers, and asparagus, and saute for 5 minutes, or until the onions are translucent and the asparagus is cooked. Remove from heat.
d. In a separate large bowl, whisk together eggs, flour, baking powder, rice or almond milk, salt, paprika, thyme, chipotle powder, and black pepper. Stir in the sauteed vegetables and fresh spinach, and stir until well combined.
e. Pour the egg and vegetable mixture into the pie crust, and use a spoon to even out the top. Place in oven and cook for 45-50 minutes, or until a toothpick inserted comes out clean. Quiche will rise while baking, but should settle back down once you remove it from the oven.
f. Remove from the oven and allow the quiche to set for at least 5 minutes. Then slice and serve immediately.

DESSERT

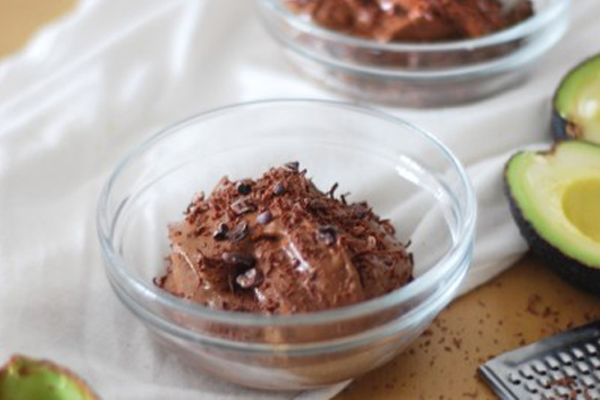
AVOCADO CHOCOLATE MOUSSE by Heart & Bowl: serves 2

choc-mousse

Ingredients:
1 large ripe avocado (or 2 small)
30g raw, unsweetened cocoa powder
60ml coconut milk (or any nut milk of your choice)
2 tbsp honey or maple syrup
1 tbsp coconut oil, melted
1 chunk of bittersweet dark chocolate, grated
2 tsp cocoa nibs (optional)

Instructions: 
a. In a food processor, purée the avocado until smooth.
b. In a jug, combine the cocoa powder and milk until a smooth paste forms.
c. Add the cocoa and milk mixture to the avocado, along with the remaining ingredients.
d. Blend everything together until smooth and well combined.
e. Transfer the mixture into individual bowls and chill in the fridge until ready to serve.
f. Top with grated bittersweet dark chocolate and sprinkle over cocoa nibs.


Feel free to follow the recipes as they are (recipe links in the title) but I made some modifications to fit my gluten/dairy -free diet. These are all delicious and easy recipes to try this holiday. They also make great dishes for every day meals, too. Enjoy your feast in moderation then get to the gym after. HAPPY & HEALTHY THANKSGIVING!! 
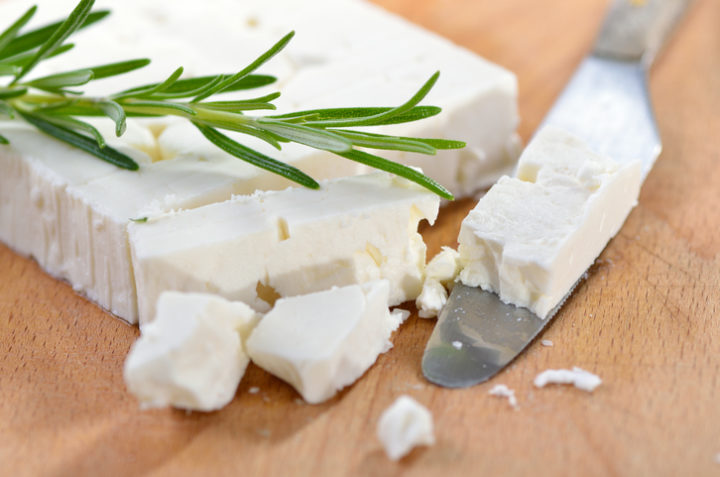
3 Healthier and Delicious Alternatives to Cheese

3-healthier-delicious-alternatives-to-cheese-featured

Inflammation is a natural response our body goes through to heal. However, when there is too much inflammation, our immune system fights too hard and the body becomes susceptible to damage and disease.

Alongside gluten, alcohol and sugar, dairy is one of the most inflammatory foods in our diet. It causes so much inflammation resulting in digestive issues such as bloating, gas, problematic bowls, and can lead to other symptoms such as acne, allergies, and behavioral reactions.

Read my full article featured on Zhou Nutrition!
Workout at Work!

It can be tough to get in your workouts during the summer. Lots of travel plans, temptation of happy hour, or just choosing to bum around at the park, it’s inevitable that our workouts end up being last on our list. I admit that I’ve skipped a few workouts to hit the beach instead. So if your summer schedule is packed and you just can’t find the time…well there is hope!

If you’ve got just 15 minutes at work (and you know you do!), there’s no excuse not to sneak in a quick workout so you can at least maintain and keep your body fit. Try these exercises and stretches and build a mini workout in your office.


WORK IT OUT AT WORK!

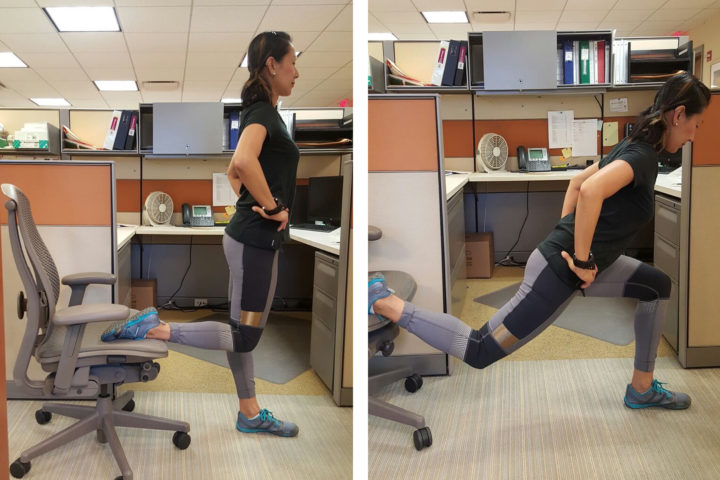
Sliding Split Squat

split squat chair

Stand up straight with one foot on a rolling chair. Start sliding the chair back as you bend the front knee into a right angle. Slightly lean your torso over the front leg but keep your back straight. Slide the chair back to the front leg, repeat, and switch leg. Try 3 sets of 15 repetitions. 


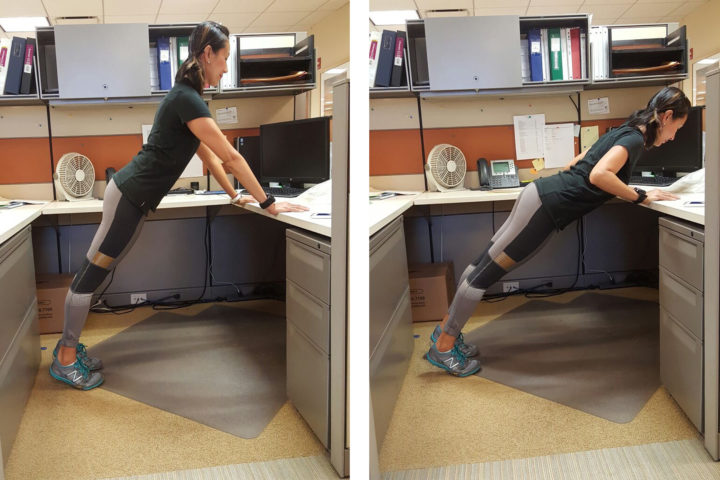
Push Ups

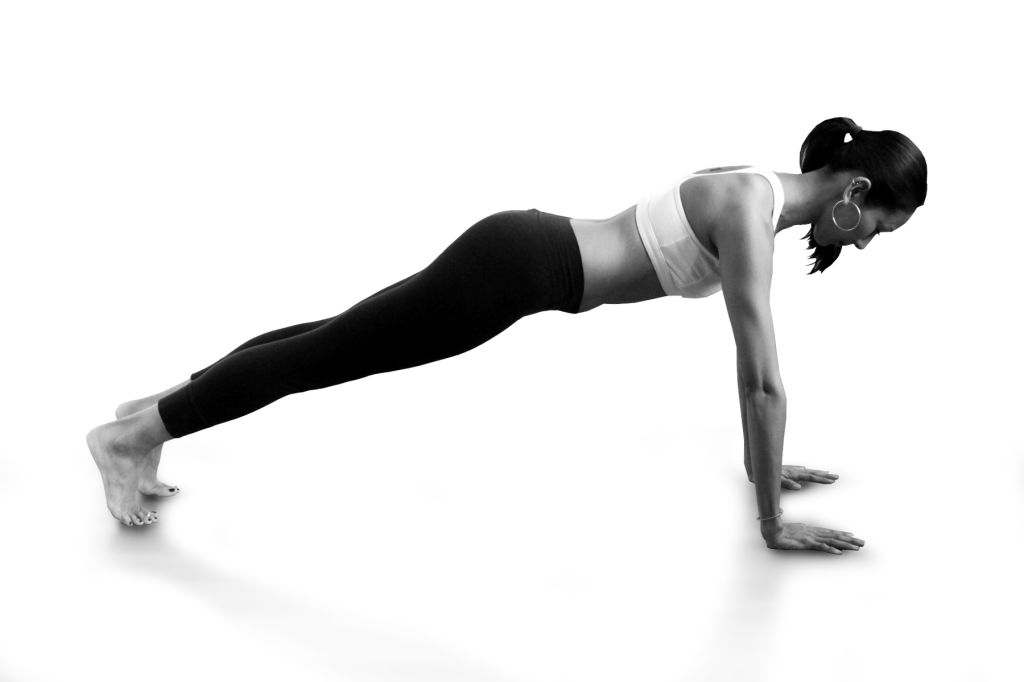
push up

Set your body up in a plank position against your desk with straight arms set shoulder width apart. Bend your elbows into a right angle lowering your body towards your desk, keeping elbows in line with the shoulders, then press yourself back up. Try 3 sets of 20-30 repetitions.


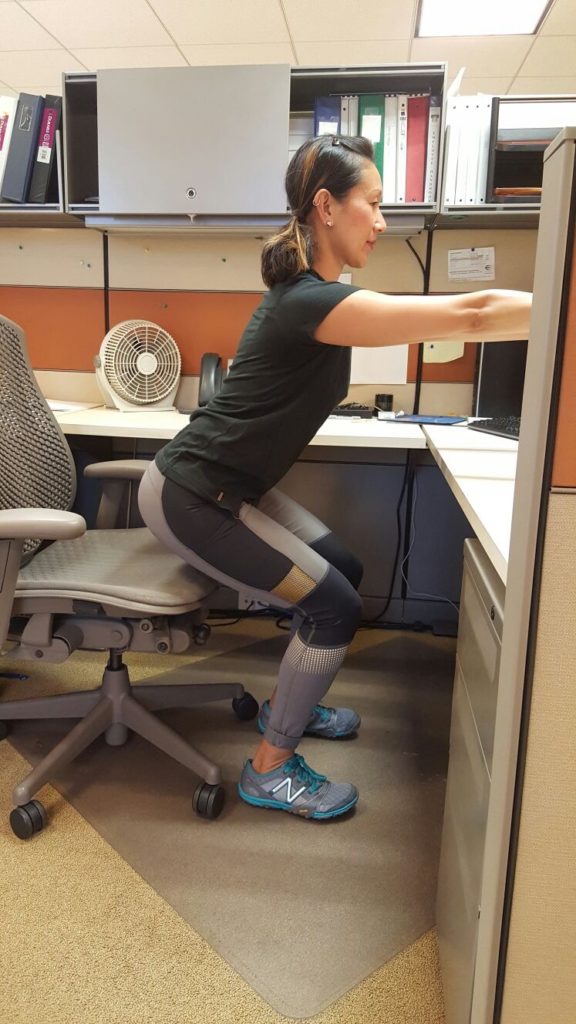
Squats

squat

Place your chair slightly behind you to give yourself a boundary. Set your feet hip width apart, extend your arms straight, and begin to bend your knees moving your hips back towards the chair. Try not to sit fully into the chair instead tap the chair gently and then stand right back up. Make sure to keep your knees in line with your toes and don’t allow them to move past your toes when squatting. Try 3 sets of 20 repetitions.


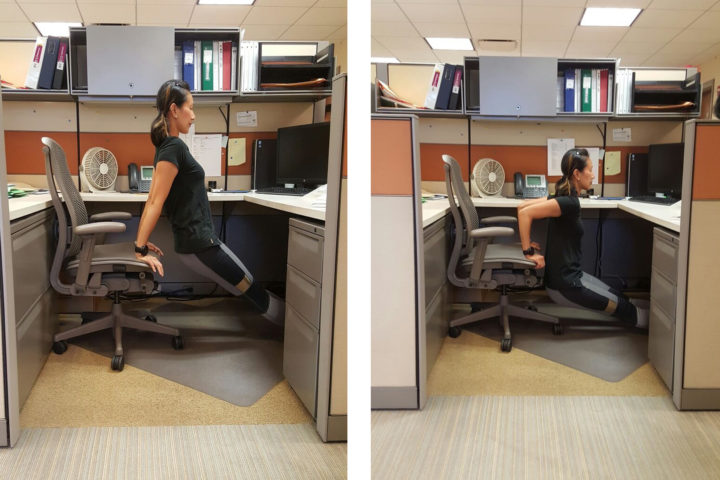
Tricep Dips

tricep dips

Move your chair up against a wall or desk so it doesn’t move. Place your hands on the edge of your chair and extend your legs straight but keep your back close to the edge. Bend your elbows to a right angle, aligning the elbows with your shoudlers, then press yourself back up. To modify, bend your knees and place your feet flat on the ground. Try 3 sets of 15 repetitions. 


Walking Lunges

walking lunge

Take a big step forward bending both knees to a right angle. Then step the back leg forward next to the front leg or into the next lunge step. Make your way down a long hallway or just step forward and back in a smaller space. Make sure your front knee does not go past your toes. Take 40 lunge steps total (can be broken up into 4 sets of 10 steps)


STRETCH IT OUT AT WORK!


Chest Stretch

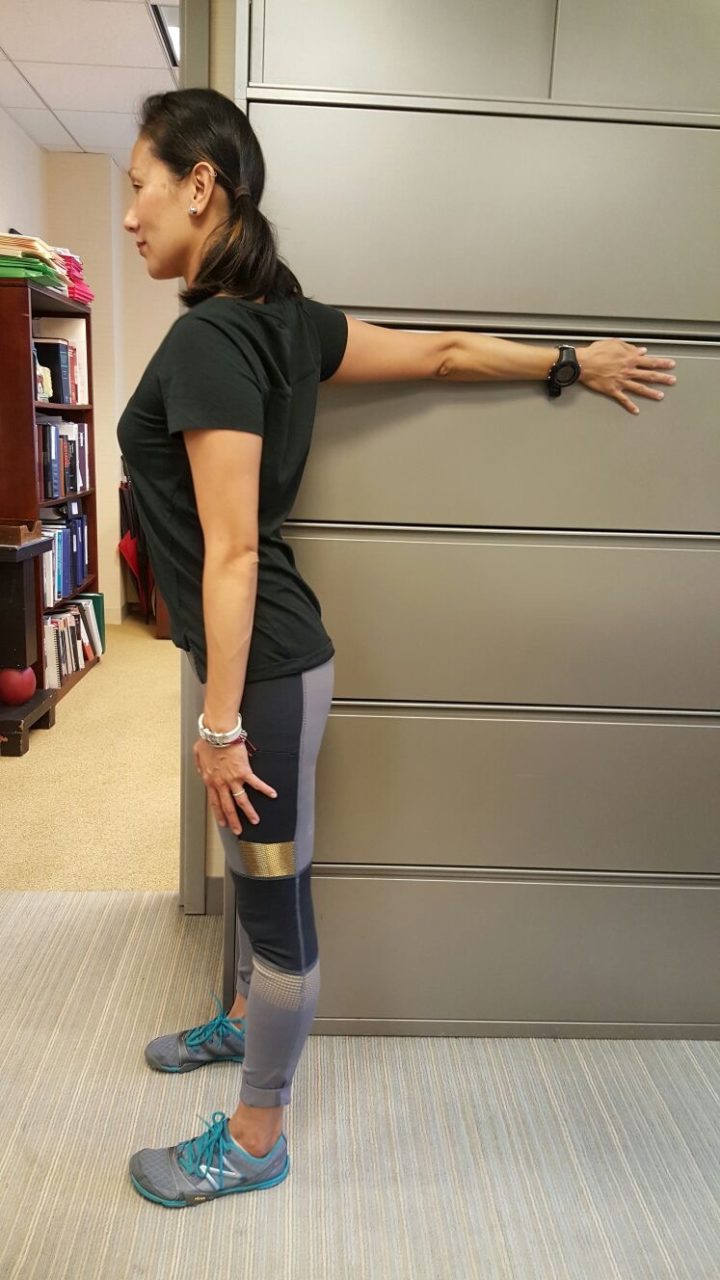
chest stretch

Stand right next to a wall or filing cabinet and raise your arm back and up so your inner arm is resting against the wall. Try to keep your shoulders in line and your arm as straight as possible. Switch arms. Hold for 30-40 seconds. 


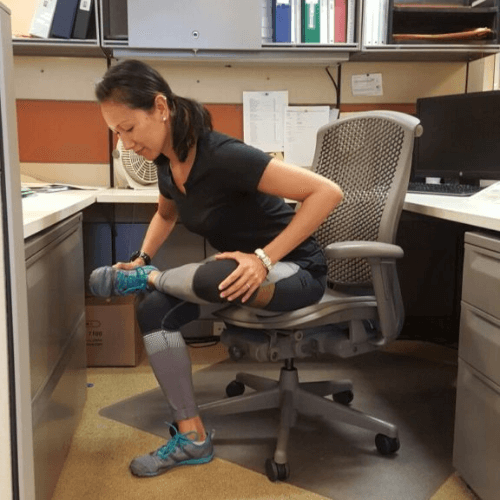
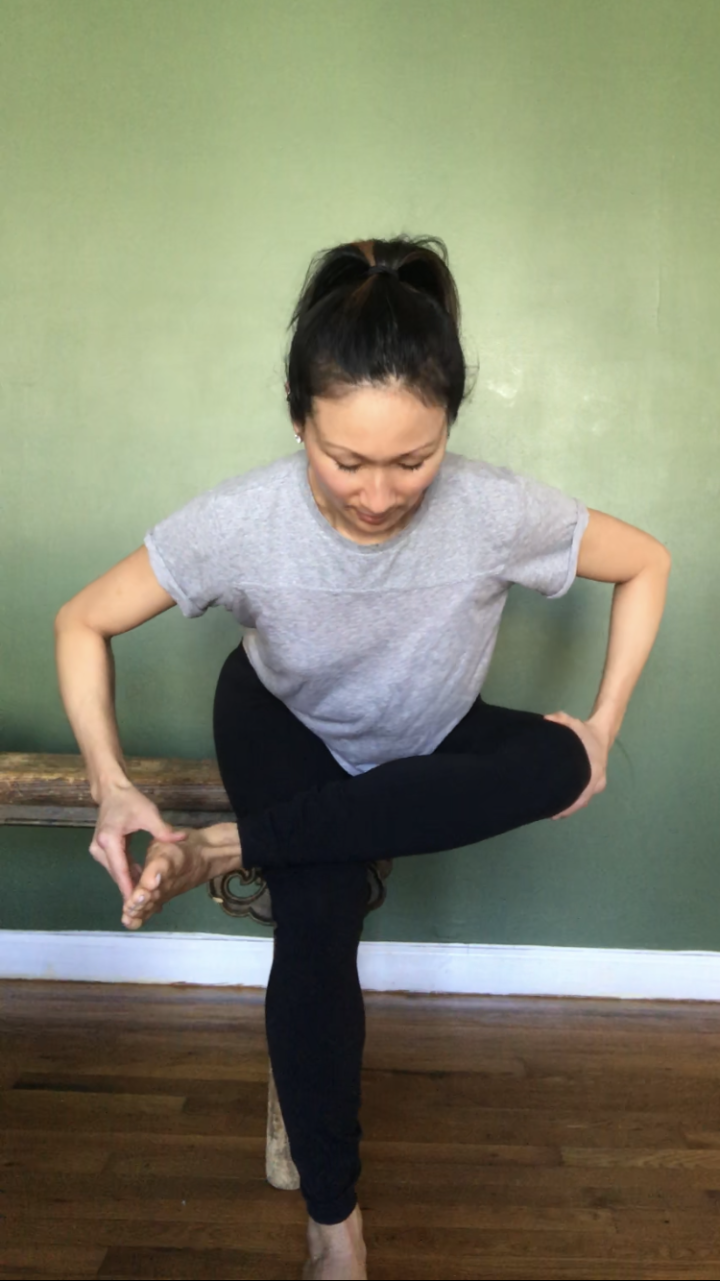
Figure 4 Hip Stretch

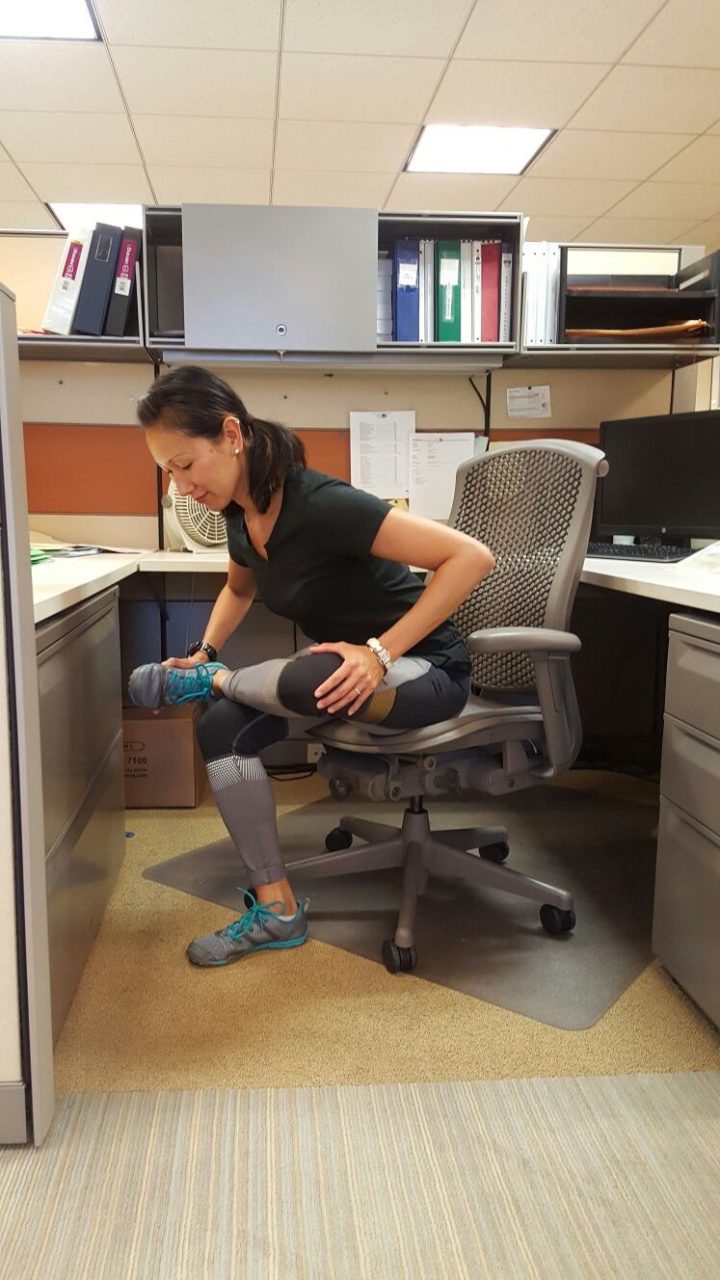
figure 4

Sitting in your chair, bend one knee and place the foot on the other knee. Make sure to flex the foot to stabilize the knee. Lean forward towards the top leg, keeping your spine straight with a slight arch in the lower back. Switch legs. Hold for 60 seconds each leg. 


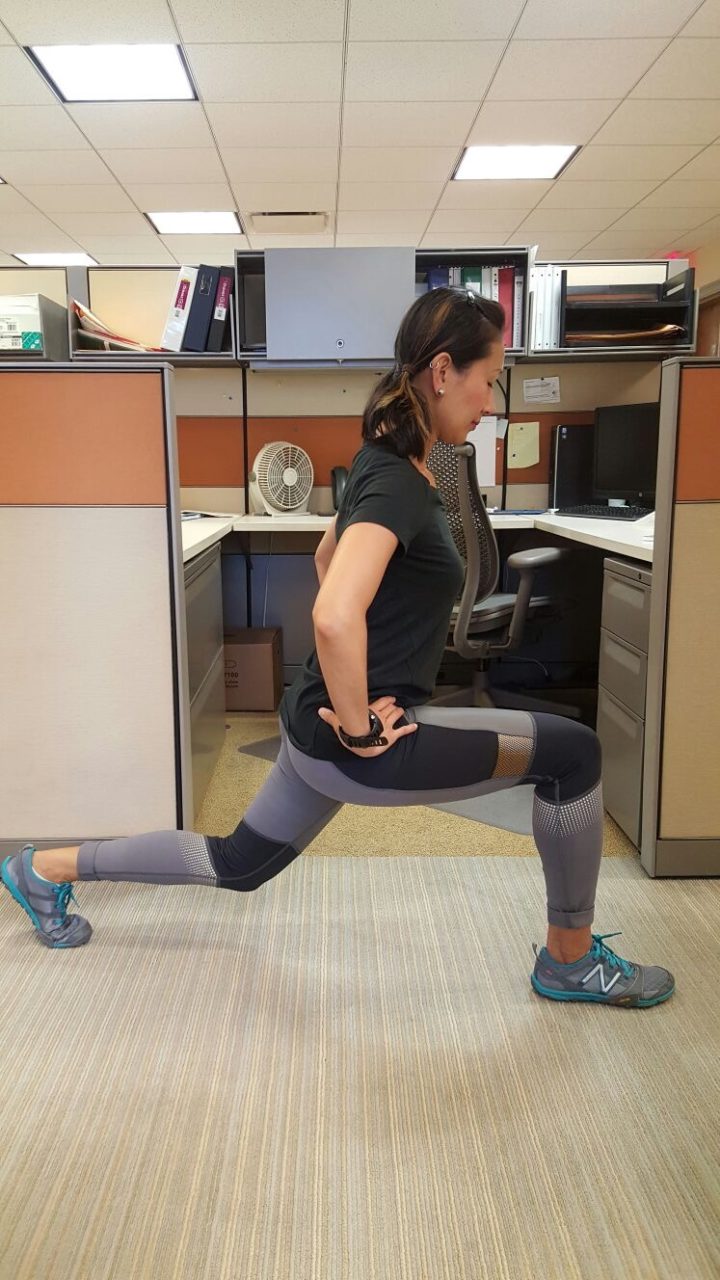
Hip Flexor Stretch

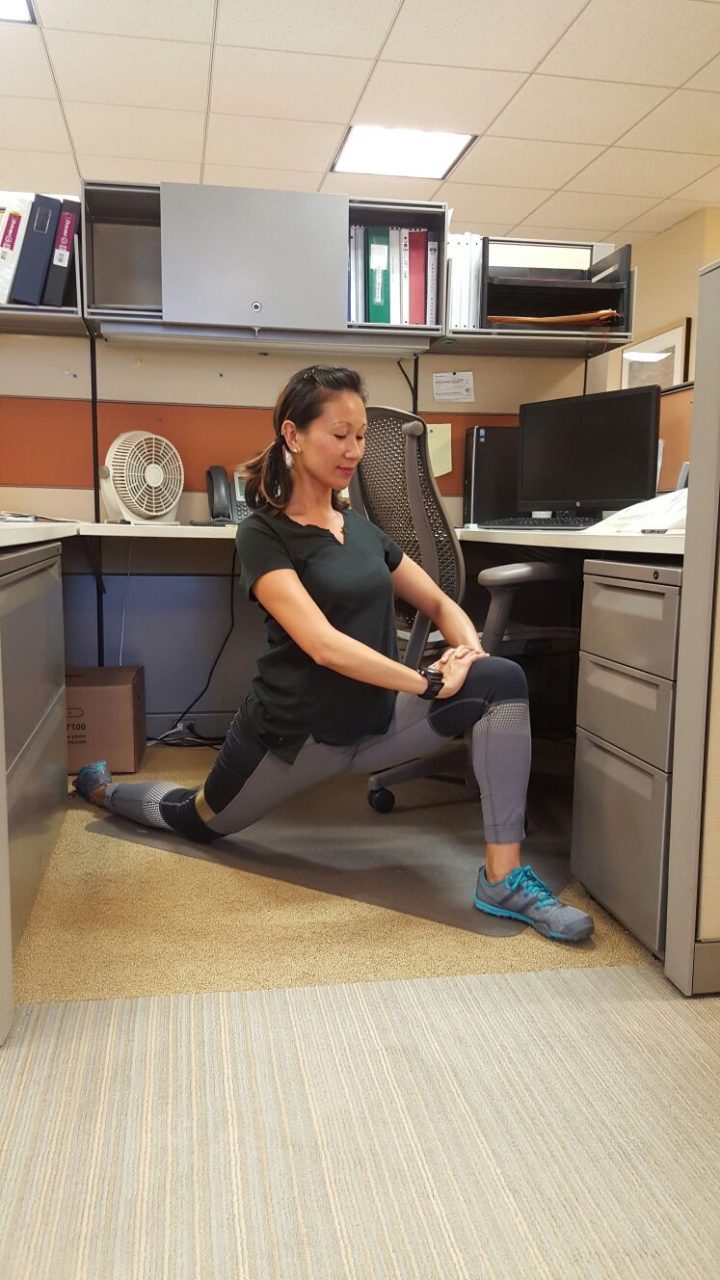
low lunge

Set your legs up in a very long lunge making sure your front knee is right above the ankle and position the back knee as far back as you can while keeping your hips in a straight line. Drop your hips forward as you lift your chest up, placing your hands on your front knee to stabilize and assist with a straight back. Switch legs. Hold for 40-60 seconds each leg. 


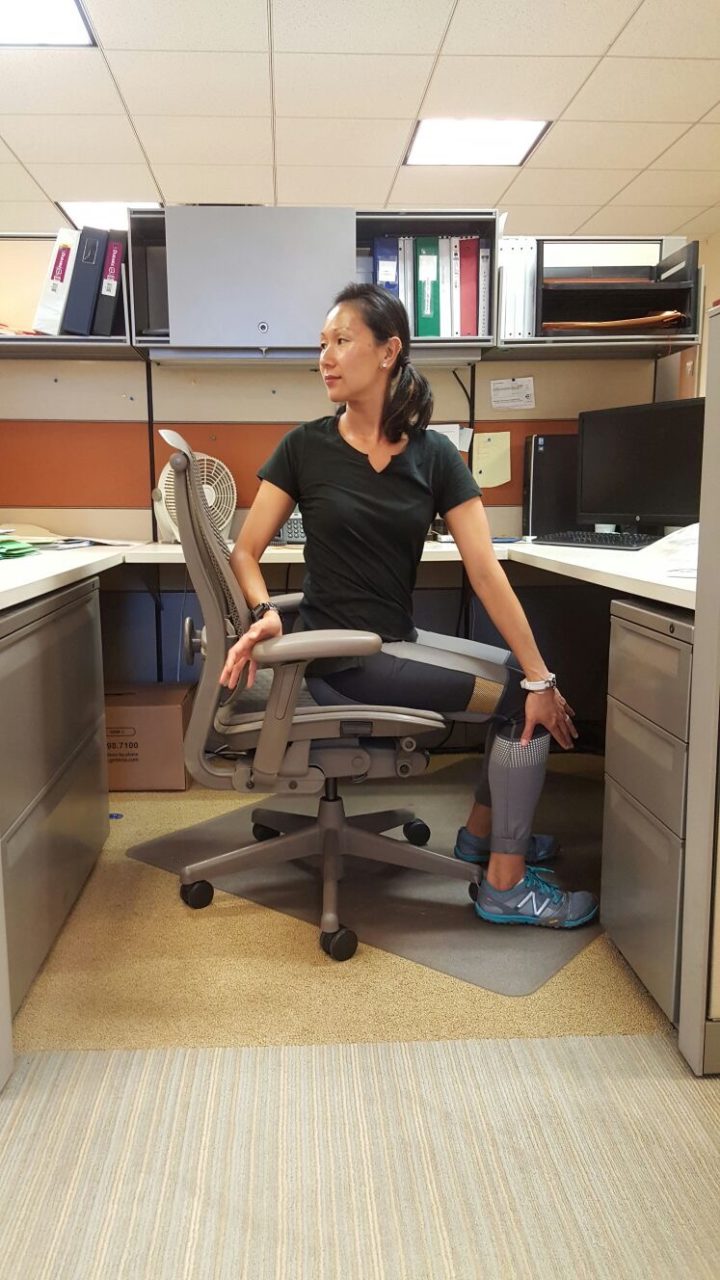
Seated Spinal Twist

spinal twist

Sit up straight in your chair. Turn your torso to the right, keeping your hips anchored and rotating only at the waist. Hold on to the back of the chair and right knee to assist with a deeper twist.  Look over your right shoulder.  Make sure to keep a slight arch in the lower back and your upper back straight. Repeat on the left side. Hold for 30 seconds each side. 


These exercises and stretches can be done as many times as you’d like throughout the day. It doesn’t take any equipment or much space so really…there are no excuses. 🙂 Be desk-smart and use that space and time to the fullest and sneak it in that workout! Then you can hit the beach and all the happy hours you want guilt free! Happy Summer!

8 Minutes to a Stronger Core

Here’s a typical ab routine: 50 sit ups, 50 crunches, hold plank for 1 minute and repeat. A bit boring, redundant, and after some time…ineffective. There’s nothing wrong with those exercises but there is so much more to strengthening your core than crunches and planks.

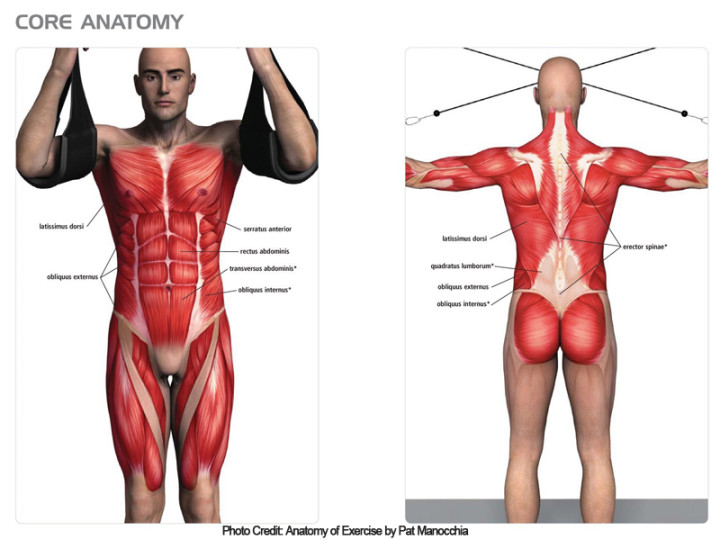
Most equate the “core” with the abdominals, which is the outer most visible layer, of course, that’s when it’s not covered with fat :). But the core muscles extend far beyond the abs. The major core muscles lay deep beneath the exterior musculature that people typically train. These muscles are the pelvic floor, transversus abdominis, erector spinae, multifidus, internal and external obliques, quadratus lumborum and the rectus abdominis. The minor core muscles are the hip flexor muscle group, adductors, hamstrings, latissimus dorsi, gluteus maximus, and the trapezius. Basically, all the muscles that attach to the pelvis work together to functionally move, support, and stabilize the spine.

Core1

The core provides us with three dimensional functional movement which is more than just the lateral exercises most ab/core workouts include. Our daily activities include movements in all three planes: frontal (forward/back), sagittal (side to side), and transverse (rotation). Therefore we should train our core to be stronger while moving in those 3 planes, right? Right! So check out this quick and effective workout that will train your core front, back and around.

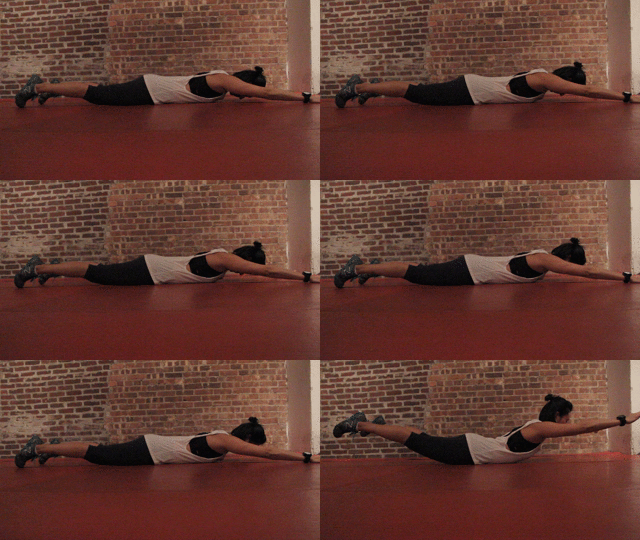
MINUTE #1: SUPERMAN

Superman

Break it down:
– Lay on stomach with arms extended alongside ears.
– Press the pubic bone into the floor to initiate a lift in the chest, arms, and legs.
– Engage back body muscles to lift higher and lower down with control.
– Reach fingers and toes in opposite direction to create length in the spine. Slight squeeze of the glutes and inner thighs to lift the legs up higher.

Targets:
– Erector spinae, quadratus lumborum, hamstrings, adductors, glutes, and trapezius


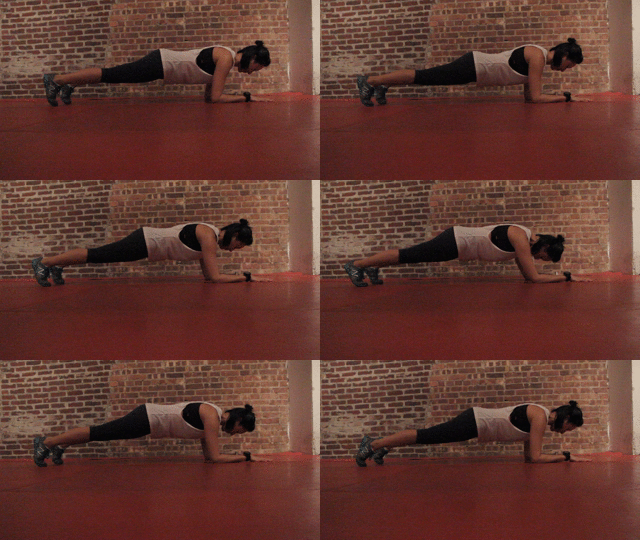
MINUTE #2: GLIDING ELBOW PLANKS

Gliding elbow planks 1

Break it down: 
– Start in elbow plank aligning shoulders directly over the elbows, body parallel to the floor, forearms push against the floor to slightly round upper back, legs engaged, feet flexed.
– Slide shoulders forward so they glide past the elbows. Feet glide forward onto tip toes.
– Slide shoulders back so they move slightly behind elbows. Feet glide back onto the balls or mid foot.

Targets:
– Rectus abdominis, multifidus, transversus abdominis, serratus anterior and posterior, pectorals, and deltoids.


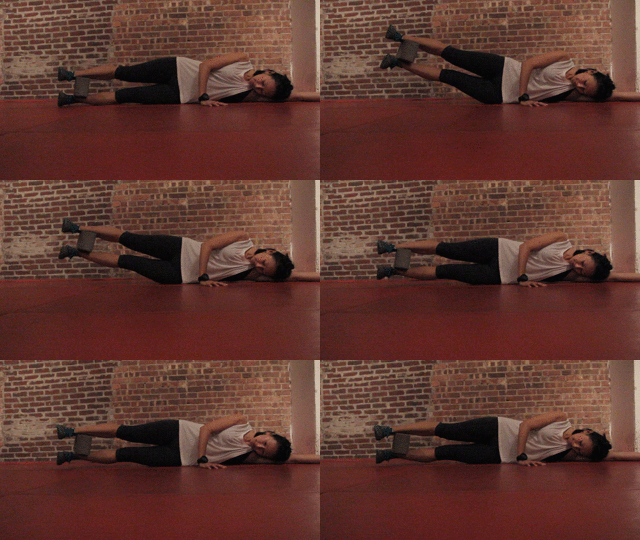
MINUTE #3: SIDE LEG LIFTS

sideleglifts1

Break it down:

– Lay on one side with hips slightly tilted forward. Relax head and neck and place arms under the head.
– Place a block in between the feet to keep adductors (inner thighs) engaged.
– Squeeze the block and engage obliques to lift both legs up. Try to relax upper body.

Targets:
– Transversus abdominis, multifidus, external/internal obliques, and adductors


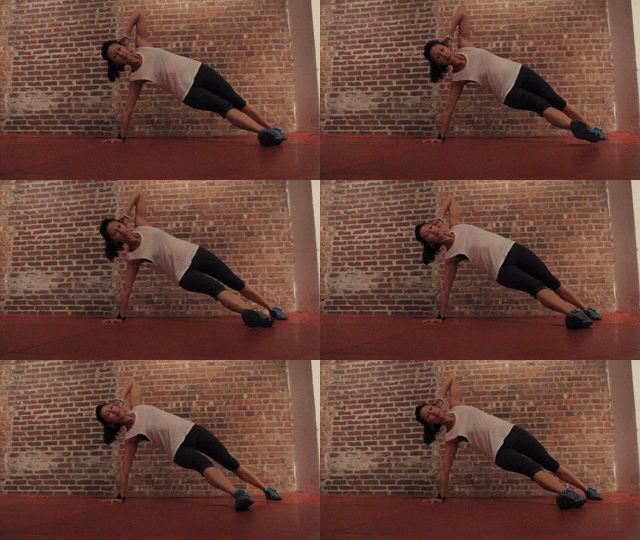
MINUTE #4: SIDE PLANK TWISTS

sideplanktwists

Break it down:
– Set up in side plank on the right side with shoulders directly positioned on top of the hand. Stagger feet so the right foot is in front of the left.
– Bend the left elbow to bring hand behind the head and open the chest.
– Push the floor away with the right hand to stabilize core and slightly lift right leg up towards abdomen.
– Move your left elbow across chest towards the leg so the elbow and knee connect in the middle.
– Release the foot back down while opening the chest.
– Repeat for 30 seconds then switch to the left side.

Targets:
– Rectus abdominis, multifidus, internal/external obliques, quadriceps, deltoids, serratus anterior/posterior, transversus abdominis

PERFORM THESE EXERCISES 2x FOR A TOTAL OF 8 MINUTES! 

Add these exercises to your routine and give your core a three dimensional workout. Targeting the front, back, and sides of your core will help you set up a stronger and more stable foundation. Your core becomes a force transfer center and stabilizer to assist you in all exercises and every day activities. The more you understand the muscles that make up your core, the more they will work. Training your entire core to work efficiently will help with balance and stability, a straighter spine, better posture, injury prevention and a stronger, more powerful you! Win Win! Now get to work! 


5 Stretches For Better Hip Mobility

In a general sense, mobility is the ability to move or be moved freely and easily. In the fitness world, mobility is being able to perform functional movement patterns without restrictions in range of motion (ROM)

The hip joint is the largest and one of the most important joints of the body. It bears our entire body weight when we walk, run, and jump.  Functionally, the hip joint is one of the most flexible joints and allows the greatest range of motion yet it’s also one of the tightest areas of the body and one that creates chronic and reverberating pain. It connects our upper and lower body so the muscles attached above and below the hip are affected by movements supported by this joint system. These movements require work from these muscles that stabilize and support and will place a certain level of force on the hip. The hip joint must accommodate these forces repeatedly. With repetitive motion, tightness occurs which create restrictions in the body. Mobility becomes challenging due to these limitations.

Open hips help to relieve back pain, improve circulation through the legs, increase agility and flexibility of your gait which all equates to better mobility.  The hips are also at the center of your body and alignment so releasing the hips will help to relieve tightness in areas above and below this ball and socket joint. Super important!

Here are 5 stretches to help you increase hip mobility. 

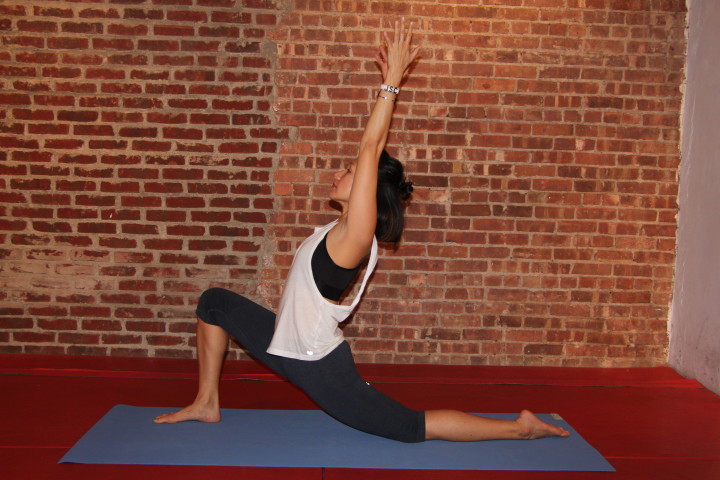
LOW LUNGE

anjaneyasana

GREAT FOR:
– Releasing tightness in the lower back especially for those that experience sciatica and LBP (lower back pain)
– Opening the hip flexors (psoas, rectus femoris, TFL) and the front chain of your body (rectus abdominis, pectoral muscles, side waists)
– Increasing ROM for faster and more agile movements

SOME TIPS:
– Keep the front foot directly under the knee
– Slide back leg as far back as you can so you’re above the knee joint and not directly on the patella (knee bone)
– Try to connect back pinky toe to the floor (slight internal rotation of back leg)
– Draw the abdominals in to protect lower back when leaning back


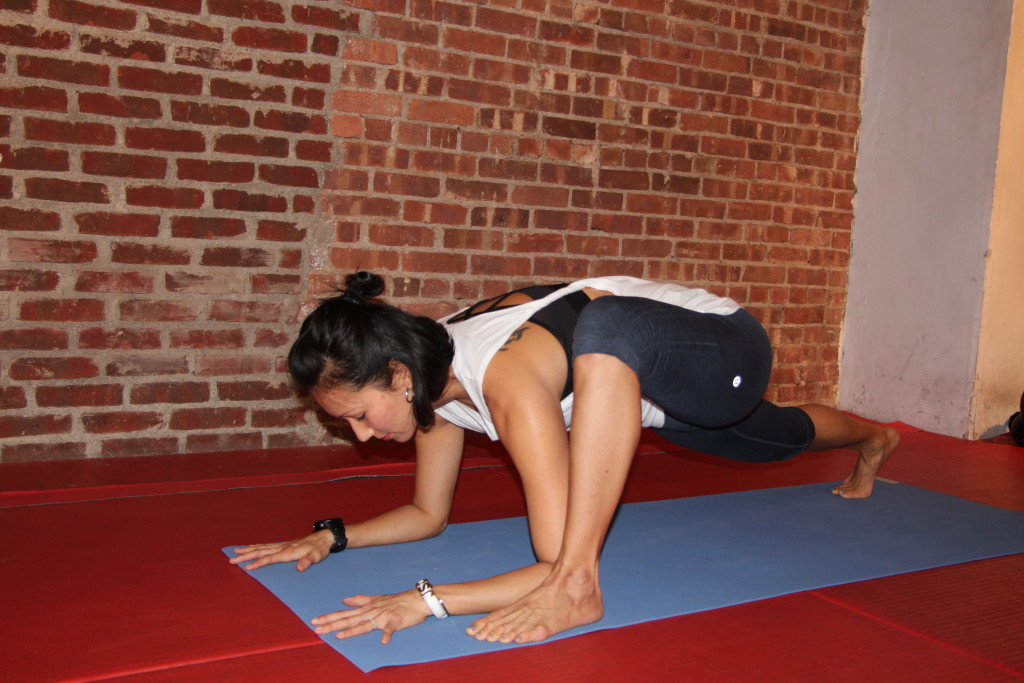
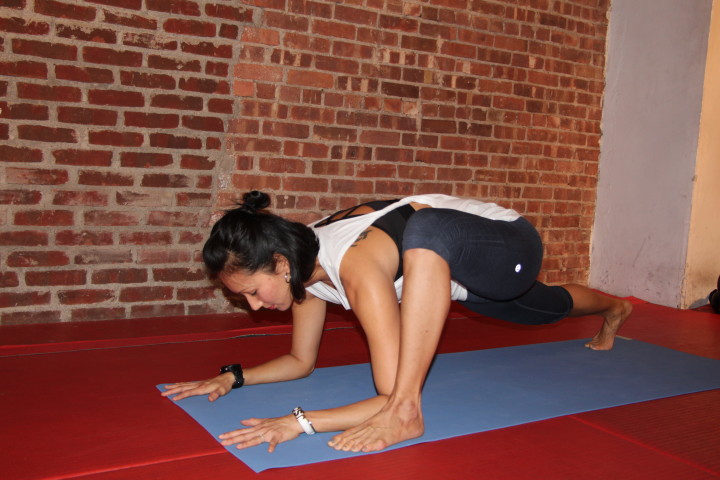
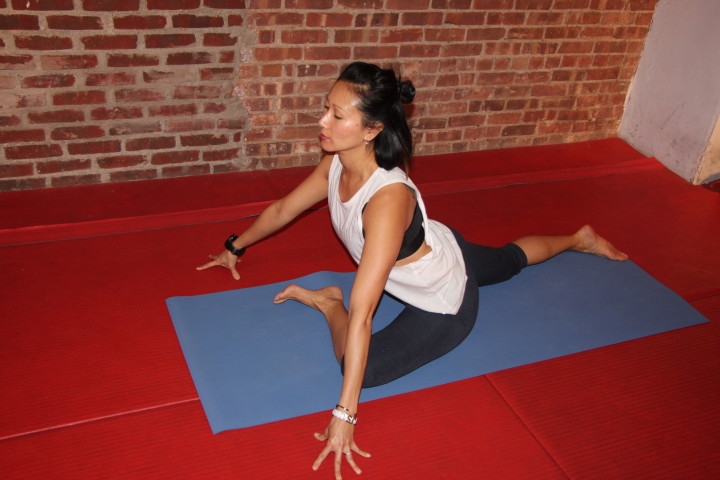
LIZARD POSE

lizard

GREAT FOR:
– Stretching and releasing inner thighs while opening the hip flexors
– Increasing range of motion and gait for longer strides
– Opening the chest and shoulders

SOME TIPS:
– Align the front knee directly above the foot
– Keep back leg as straight as you can. Drop the back knee to the floor to modify
– Keep chest lifted and back as flat as you can (avoid rounding upper back)
– Draw the front knee as close to the shoulder (midline) as you can


PIGEON POSE

pigeon

GREAT FOR:
– Relieving chronic LBP and sciatica
– Opening the hip flexors and inner thighs
– Releasing tension and increase ROM in the hip rotator muscles (glute medius, glute minimus, piriformis, gemellis)
– Increasing circulation through the legs and digestive and reproductive systems

SOME TIPS:
– Keep back leg as straight as you can
– Keep hips squared by placing each hip on its own side of the mat
– Keep front shin parallel to the front of your mat. Modify by propping your seat up with blankets or blocks
– Keep front foot flexed to stabilize the knee joint


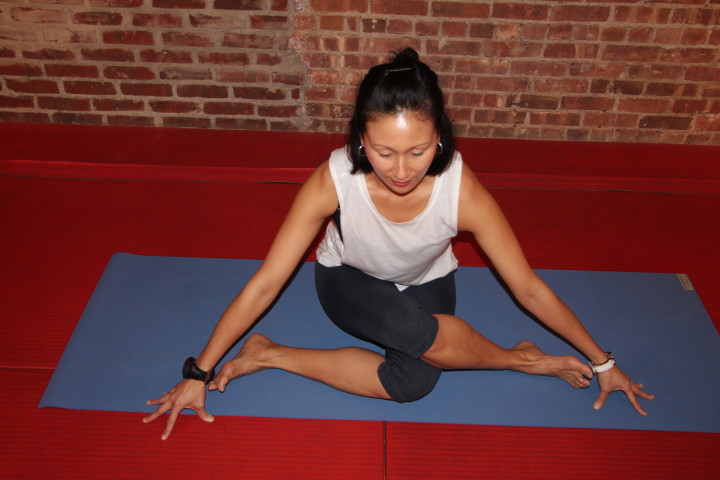
COW FACE POSE

garudasana2

GREAT FOR:
– Releasing tension in the outer hips and lower back
– Opening all hip rotators muscles
– Stretches ankle joints

SOME TIPS:
– Flex both feet to stabilize knees
– Cross legs at the knee joint
– Prop your seat up with blankets or blocks to modify
– Keep a straight back when leaning forward over the legs
– Breathe…this is a very intense hip stretch!


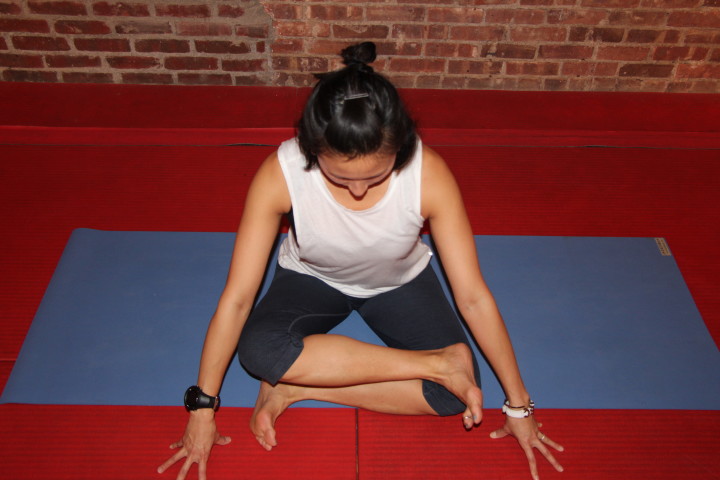
ANKLE TO KNEE

ankletoknee

GREAT FOR:
– Relieving tightness in LBP and sciatic pain
– Releasing hip flexors and rotators
– Increasing ROM for quicker and longer lateral movements

SOME TIPS:
– Align both feet above and below the knees to form a triangle with both legs
– Flex both feet to stabilize knee joint
– Keep lower back slighted arched and back straight when leaning forward

*Hold each stretch for at least 20-30 deep and long breaths. I promise it gets easier, the longer you stay in the stretch.

The muscles and attachments of your hip joint are extremely strong, as they should be to keep this large joint stable. However this also makes stretching it a challenge! For those that sit all day long, your hips are in a constant state of flexion, so working on flexiblity and mobility is not to be overlooked. The tighter the hip, the less you use them. The less you use them, the tighter they get. Vicious cycle! So the more you release and open the hips, the more you can release tension and prevent restrictions…all leading to better mobility. We can all agree that we want to move without limitations and more importantly without pain. So the more mobile our bodies are, the faster we can move and feel good doing so.


3 Back Exercises You Should Be Doing!

At least once a day, I hear someone complain about pain in their lower back. Slipped or bulging discs, pinched nerves, back spasms, tightness, chronic pain…to name a few. With all the sitting, twisting, bending, and pounding we do on a daily basis, it’s hard to have a healthy and happy back. I can see how 3 out of 4 people have experienced some form of back pain, making it 90% of Americans with LBP (lower back pain).

The muscles of the back are very complex but yet divisible as each layer serves a specific purpose in movement.

  • Superficial Layer: attaches and moves the upper extremities
    • Trapezius
    • Latissimus Dorsi
    • Levator Scapulae
    • Rhomboid Group
  • Intermediate Layer: in charge of breathing and expansion as they are connected to the ribs
    • Serratus Posterior Group
  • Deep Layer: moves the trunk and supports the entire back
    • Spinalis
    • Multifidus
    • Longissimus
    • Iliocostalis
    • Splenius group

Due to high stress in our lives and the hours of sitting, it’s inevitable that our backs will start to change shape and adapt to the environment that we expose it to. Poor posture, weakness, tightness, and compensations are the common sides effect of poor functioning in the back. The importance of keeping your back strong and posture in alignment will absolutely help with your quality of life along with performing basic everyday movements and activities, particularly in exercise and sport.

Some great back exercises are the more common ones you will see at the gym.

  • Seated row
  • One arm row
  • Pull ups/ chin ups
  • Lat pulldowns

These exercises are definitely a part of my routine. But the 3 back exercises below target so much more than just the superficial layer of the back. They tap into all the layers and give your legs and core a workout and stretch, too.


#1 DEADLIFTS: Not only the quintessential weightlifting exercise but also an exercise that mimics a real life lift. Picking up your baby, a heavy box, luggage, a table, all should be in the form of a deadlift.

Deadlift2

Important Form to Keep:

– Feet are set up hip width apart
– Slight natural arch in the lower back
– Chest up to avoid lower back rounding
– Hips go back first and then knees bend


#2 BENT OVER BARBELL ROWS: a full body compound exercise that works the upper and lower back, abs, hips, and arms. This exercise isolates these muscles to build a stronger and more muscular back.

NewRow

Important Form to Keep: 

– Keep knees slightly bent
– Natural arch in the lower back
– Keep head neutral in line with your spine
– Keep your torso parallel to the floor. If need to, come up a few inches when pulling the back to the chest.
– Avoid thrusting hips forward when pulling heavier weight.


#3 SLIDING COBRA (BACK EXTENSIONS): a Pilates twist to the typical back extensions you see on the Roman Chair/Hyperextension bench. Use glides or small towels under each hand for easy sliding. Looks pretty easy and graceful until your third or fourth rep. 🙂 Works the upper and lower back plus the glutes, abs, obliques, hamstring, triceps while stretching and opening the chest. Sweet!

Extensions2

Important Form to Keep:
– Relax your shoulders and trapezius so there’s lots of space between your ears and shoulders
– Press your hips into the floor to initiate the lift
– Avoid squeezing glutes
– Squeeze shoulder blades together to keep chest open
– Keep head neutral in line with spine

Our back muscles are layered and multi-functional and most of them attach to our spine. Which is why they control so much of how we stand and why we experience LBP. We use these muscles daily and often demand more from them than they can handle. So build a strong back so the spine is in its proper and optimal position. This will also enable your body to move in a full range of motion through a strong foundation so restrictions won’t prevent you from doing a certain exercise, lifting a heavy object, or just moving throughout your day.  So if you don’t already incorporate these back exercises into your routine, now is the time!

Strong Backs = Better Postures! Get to it! 🙂 

Are You Doing These Right?…4 Yoga Twists Often Done Wrong

Twists are a favorite among many yoga practitioners. These poses can be advanced and have several health benefits.

Rotating and twisting your upper body releases tightness in the lower back to promote spinal neutralization and better rotation and aids in detoxification and digestion. However most who attempt these twists are often doing them incorrectly. Jamming their bodies into a position they’re not ready for or not fully understanding the alignment of the pose are the common reasons yoga twists are often done wrong. The end result of incorrect twisting are over stretched muscles in the hips and lower back which in time will create instability and injuries.

Here are 4 twisting poses, their common mistakes, and how to fix them!

1.REVOLVED TRIANGE POSE (PARIVRTTA TRIKONASANA)

Revolved Triange

Common Mistakes:
– Bending front knee too much
– Hips are tilting to one side
– Yanking the top arm back

Fix it:
– Use a block so the front knee straightens completely.
– Keep your hips in a straight line by moving the hip of the front leg back and the opposite hip forward.
– Twist more at the waist, rotate your chest up and bring your gaze to the ceiling.

2. BOUND REVOLVED SIDE ANGLE POSE (PARIVRTTA BADDHA PARSVAKONASANA)

Revolved Side Angle

Common Mistakes:
– Back leg bends
– Hip tilts to one side
– Upper body rests on the front leg so chest collapses and top shoulder falls forward

Fix it:
– Completely straighten the back leg to help stabilize and balance. It’s really hard but so helpful.
– Move the hip of the front leg back to align the hips.
– Use the arm to knee connection to elevate the chest, twist more at the waist, and bring your gaze up.

3. REVOLVED CHAIR (PARIVRTTA UTKATASANA)

Revolved Chair

Common Mistakes:
– Shoulders collapse and chest falls forward
– Rounding in the lower back
– Knees and hips are not in a straight line

Fix it:
– Press the arm into the knee and the knee back into the arm to help you twist more at the waist instead of the hips. Press the hands firmly together to widen the collarbones and open the chest.
– Stick your butt out to arch the lower back. This will help to increase the range of motion in your twists.
– If one knee is in front of the other, slide that same side hip back and that will align both your hips and knees.

4. SEATED SPINAL TWIST (ARDHA MATSYENDRASANA)

Seated Twist

Common Mistakes:
– One hip is lifted
– Too much leaning forward and chest collapses

Fix it:
– Ground through both sitz bones so hips are aligned before twisting. Placement of the top foot can be adjusted to help with hip alignment.
– Lean back pulling the top leg towards you and use it to twist the torso, lift the chest up, and straighten the spine.

Many people compromise safe alignment so they can get into these twists. You should be able to breathe deeply and feel length in the poses, not congestion and pain. If you’re attempting these twisting poses and struggling to hold them, a modification is a must. Opt to drop the knee down, use props and break down the pose into steps. Little by little, you’ll inch your way into a deep, effortless, and detoxifying twist.

Not The Typical Healthy Resolutions You Should Consider

As we wrap up 2015, we reflect on the good, bad, what ifs, should and shouldn’t haves, and realize that changes need to be made for the New Year. So come January, we all begin the tradition of performing acts of self improvement. We go full force with the same ol’ resolutions year after year.

“Hit the gym every day!”
“I need to lose 15lbs!”
“I want to get big beefy arms!”
“I want a bubble butt!”

“I vow to stop eating carbs!”
“No more meat for me!”
“I give up on desserts!”
“I will allow myself only 1 glass of wine a week!”
etc…

But as usual, by month 3, we lose steam, get frustrated, and end up forgetting what we’re trying to achieve. So consider the not-so-typical resolutions. A resolution you can integrate and make part of your day to day. One so you’re not suffering every waking hour. One that you can experience a progression rather than failure. And maybe one that’s not so measurable so you can stick to it.

Here are some healthy resolutions you probably haven’t thought of but should definitely consider.

#1  START A JOURNAL
How appropriate, huh? Now you can write your resolutions in this journal so you won’t forget them. I actually find this really hard to keep up so I start small. Instead of daily journaling, I set one or two days to write everything I’m feeling at that moment. It could be absolutely nothing and I’m bored out my mind or it can be chock full of aggression and frustration or happiness and love. Whichever it is, it feels pretty amazing to put pen to paper instead of taking it out on my hubby. Huffington Posts breaks down some great benefits from journaling.

#2  TRY ONE NEW FOOD A WEEK
I am a creature of habit and literally eat kale and wild rice every day..and order the same take out every week…and eat the same snacks…and go to the same restaurants to order the same favorite meal. It’s annoying. Why? Because I fear bad food experiences. Why try something new when you can have your usual that’s always good? Well that’s why. Because it’s always good so why not explore something better? And if not better, at least you tried and now you know! So allow yourself to get out of your comfort food zone. Go to your favorite restaurant and choose a different entree. Research a new recipe. Go to the market and buy a fruit or veggie you rarely enjoy. Crave for something out of the norm, find it, and EAT IT!

#3  DO WHAT KIDS DO
When I was a kid growing up in Brooklyn, I was obsessed with double dutch and punch ball. I’m not thinking to run outside now to do both but try an activity that you’ve always wanted to do as a little kid or used to do. Some great activities would be: handstand, jump roping, play in the mud, hide and go seek, roller skate, skateboarding. It’s a great way to re-connect with your inner child and try something new while being active, too!

#4  DO LESS WORK
My brother will probably kill me for this resolution because he’s one of the hardest working people I know but I feel pretty passionate about this one. As I get older, I’m realizing how much time is lost from moments of peace and quiet and downtime. For as long as I can remember, I’ve always had 2-3 jobs, basically working my ass off and around the clock. Having started my own business last year, I find myself working even harder and longer hours. If you’re one of the same, join me and consider setting some boundaries. Allow yourself to shut down after a certain time. Turn off your phone, computer, tablet and enjoy some QT with the people that you love or simply being on your own. Manage and maximize your time carefully so to be more efficient when working. This will help you find more time to relax and enjoy life (definitely apply this to your workouts, too).


You’re probably surprised that, as a personal trainer and yoga teacher, I’m not asking you to set weight loss goals or take more yoga classes. Through my years in the fitness industry, I see the motivation every new year followed by frustration months after. It’s disheartening to see people get discouraged because they’ve set goals that are too challenging to achieve simply because they don’t have all the tools. So when making your 2016 New Year’s resolutions, be realistic and kind to yourself. Consider one that you can actually stick to and make a part of your life…for the rest of your life! Or try one of my past year’s resolutions or these wacky resolutions. Hahah!

HAVE A SAFE AND HAPPY 2016!