A great combo of tart and tropical. Zesty lime with coconut and the warm flavors of cardamom give this smoothie a unique flavor. Using frozen blueberries give it a slightly thicker and creamy texture making this a nutritious and refreshing frozen treat that kickstarts my day.
An important part of my self-care routine and one of the steps in my sleep ritual, I apply this homemade shea body butter after a shower to deeply nourish my skin. I followed a simple recipe from Homemade for Elle with a few personalized tweaks using jojoba oil and one of my favorite combination of pure essential oils. This does take some prep time but steps are simple and the end result is worth it. A little goes a long way, too! Enjoy!
*Feel free to use your favourite essential oils. Just make sure they are a pure grade. I also love the scent of frankincense and eucalyptus.
DIRECTIONS:
1. In a double boiler, melt shea butter and coconut oil in a glass container.
2. Once melted, allow mixture to cool for 30 minutes.
3. Add jojoba oil and essential oils, stir gently and place in freezer until it solidifies (approximately 30 minutes).
4. Using a large spoon, break up the frozen mixture by stirring and mashing until soft and creates a whip-like texture. You can also use a hand mixer for ease.
5. Transfer the shea butter to a container and enjoy after a shower or anytime you need extra moisture.
Can you imagine life without movement? – the most basic human movements such as getting out of bed, brushing your teeth, walking your dog, going to your favorite coffee shop, commuting to work, sitting down to a dinner, taking a walk around the block, playing with your kids. These simple movements are done every day without thinking twice: completely patterned, involuntary, and programmed. Once we think about every single moment we make daily, each one is tied to the 7 Human Fundamental Movement Patterns.
This week, we’ll talk about the importance of the 3 lower body focused movement patterns: squat, hinge and lunge. All three movement patterns involve a hip hinge. The squat and lunge is a form of a hip hinge but in different angles and positioning however all requiring similar movement patterns and muscle recruitment.
What is a hip hinge and what muscles are involved?
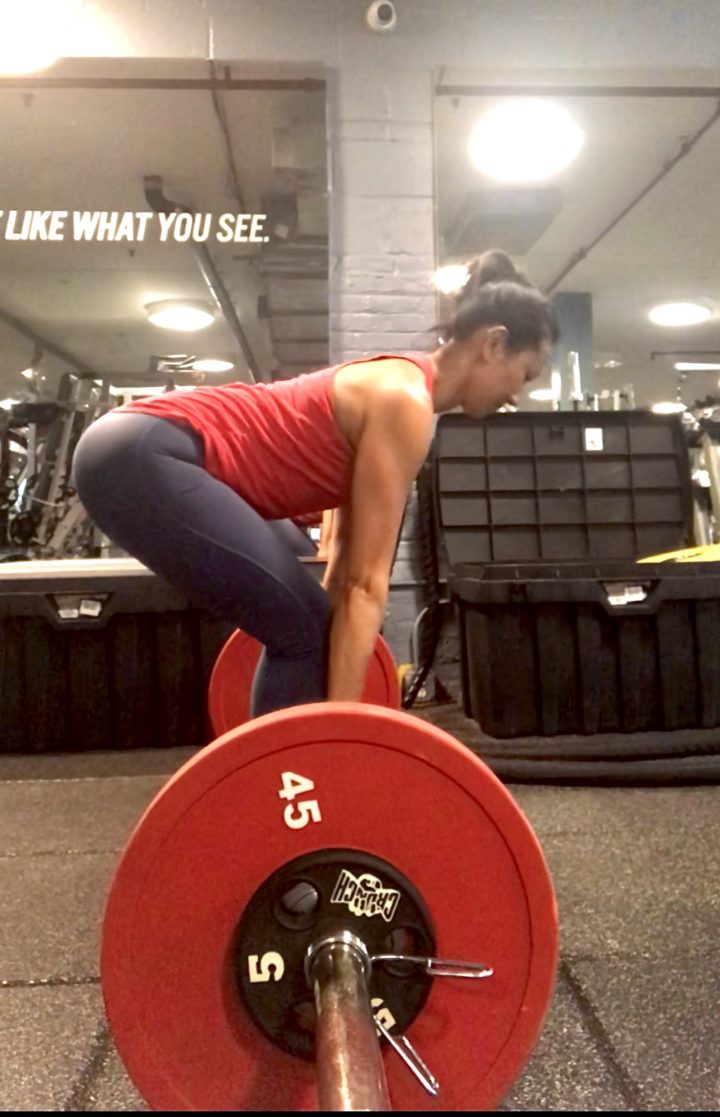
In general, a hip hinge is a flexion and extension originating at the hip that focus on the posterior chain (backside). The primary muscles targeted are the glutes, hamstrings, and erector spinae (back muscles). The adductors, quadriceps and abdominals also help in the movement. It’s very important to keep a neutral spine when hinging to avoid injury especially when picking up heavy loads. One of the most common mistakes is using the lower back to hinge. So when people “throw their backs out”, it’s usually because the hinge was not set up properly and the load was picked up using the lower back instead of the primary muscles.
Common exercises that require a deep hip hinge are deadlifts (pictured above) and squats. If you’re not performing the basic hip hinge properly, more than likely you are not performing those movements correctly and that is an injury waiting to happen.
Daily activities that require you to hinge:
Picking things up from the ground
To take a closer look at something
Putting shoes on
Exercises to master the hinge:
Dowel hinge: place a dowel behind your back vertically (right hand behind neck and left hand behind small of back) with feet hip width apart. Make sure dowel is touching the back of your head, upper back, and sacrum. With knees slightly bent, shift your weight back and push hips as you begin to hinge your torso forward, making sure dowel is connected to your body at those same three points. Once you reach mid way between vertical and parallel to the floor, contract the glutes, push the hips forward and come back up to vertical. Repeat using left hand on top.
Wall hinge: a modified variation of the dowel hinge. Stand 3-4 inches away with your back facing the wall. In keeping a neutral spine and flat back, stick your butt out, and hinge your hips back until the butt meets the wall, then stand back up.
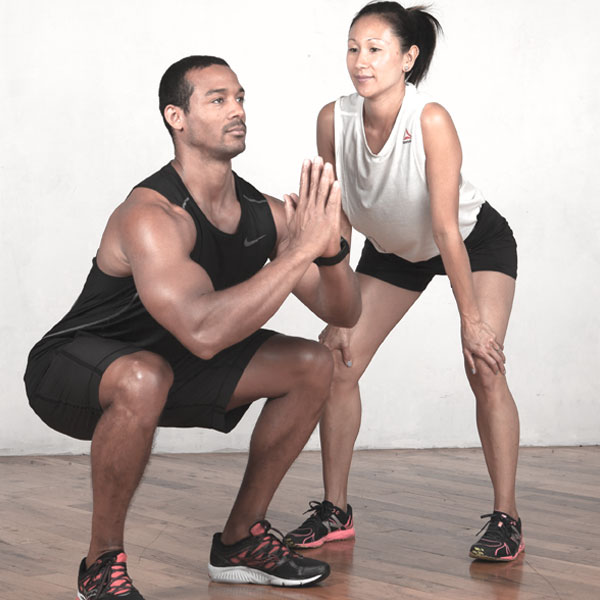
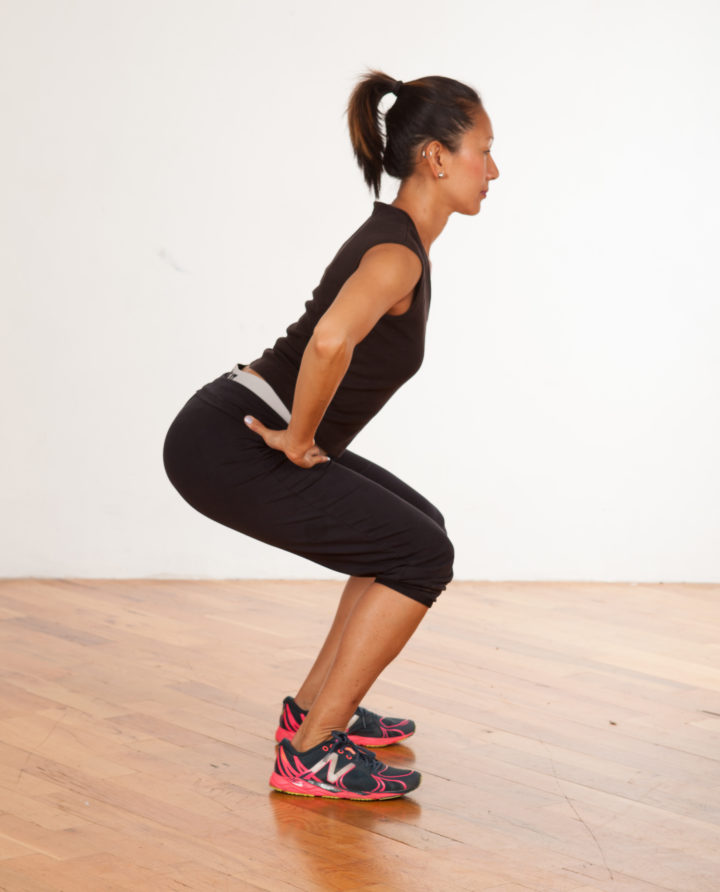
What is a squat and what muscles are involved?
A squat is an exercise where the hips are lowered into a sitting position and then raised back up to standing. During the lowering of the squat, the hip and knee joint are in flexion while the ankle joint dorsiflexes. As you come up from the squat, the hip and knee joint extends and the ankle plantarflexes. The primary muscles involved are the quadriceps, adductors and the glutes. Isometrically, the erector spinae (back muscles) and abdominal muscles play a huge role. The squat test is commonly used to test one’s compensations, tightness, strengths and weaknesses as it targets and challenges so many muscles. Because of this, it is often done incorrectly. So if there is tightness in the hips, lower back, and calves, the form is compromised. If there is heavy load added to the squat, the knees and the lower back will take the grunt of the movement as opposed to the primary muscles. This is definitely one of the human movement patterns that should be performed correctly and often.
Daily activities that require you to squat:
picking up your toddler or heavy bags
sitting/standing in a chair
picking something up from the ground
Exercises to strengthen your squat:
Wall sits: lean up against the wall with your back and position feet hip width apart. Lower down so knees are at a right angle and hold for 30 seconds to a minute. Gradually increase the time and add weight when you feel stronger.
Physio ball squats: lean back up against a physio ball with feet slightly in front of your hips. Bend knees and push back into the ball as you lower down into a squat. Push into feet to stand back up and squeeze glutes.
Elbow plank: Lay on belly with elbows positioned directly under shoulders. Lift hips up so only forearms and toes are on the floor. Make sure your body is parallel to the floor, glutes are squeezed and abdominals engaged. Hold for 30 seconds to a minute and longer once you feel stronger.
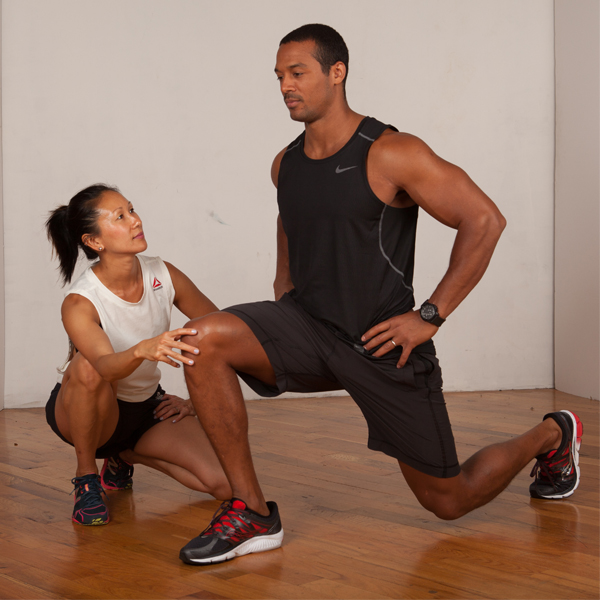
What is a lunge and what muscles are involved?
A lunge is a single leg exercise where one foot is forward and flat and the other is positioned behind you. The primary muscles are the quadriceps, glutes, and hamstrings. The stabilizing muscles are the abdominals and the erector spinae (back muscles). There are several variations of lunges (lateral, yoga, curtsy, reverse) but the movement patterns and primary muscles are all the same.
Daily activities that require you to lunge:
Kneeling down to pick something up or tying your shoes
Getting up off the floor
Walking up and down stairs
Exercises to strengthen your lunge:
Kneeling lunges: Start on both knees. Step one foot forward into lunge position then stand up so both feet are together. Use the same foot to step back and lower knee down to bring knees back together. Repeat on other side.
Stationary lunges: Start in lunge position with both knees set up in right angles. Extend legs so both are straight, then lower back leg down to the floor. Repeat for several reps then switch to other leg.
Forward + Reverse lunges: Once the kneeling and stationary lunges are done properly and with ease, progress to forward and reverse lunges. Forward lunges require one foot to step forward followed by the back foot stepping forward to meet the front foot, moving in a forward direction. Reverse lunges require one foot to step back and back knee to bend and lower, use abdominals to stabilize, then front foot pushes back to meet back foot, moving in a backward direction.
Hip hinges, squats, and lunges are done all day every day. These compound movements recruit muscles from the upper and lower body so any imbalances or weakness will alter the form leading to misalignment and injury. These movements are essential to every day living. The most basic functional movements like getting up from the floor, picking things up from the ground, walking up and down stairs should be done with ease and pain free. If not, then working on the strength exercises are a MUST. Practicing the hinge/squat/lunge exercises will help to build strength but what is most important is that you can move through your day-to-day activities without hurting yourself AND…for many many many years to come.
Just last week at a client’s residential gym, I met a man that had been waiting by the door for someone to let him in because he didn’t have the strength to pull the door open. I was shocked and saddened by this. I can’t imagine not being able to perform the most basic tasks that help me get through the day, such as opening a door. Which brings me to discuss two of the 7 Fundamental Human Movement Patterns: pushing and pulling.
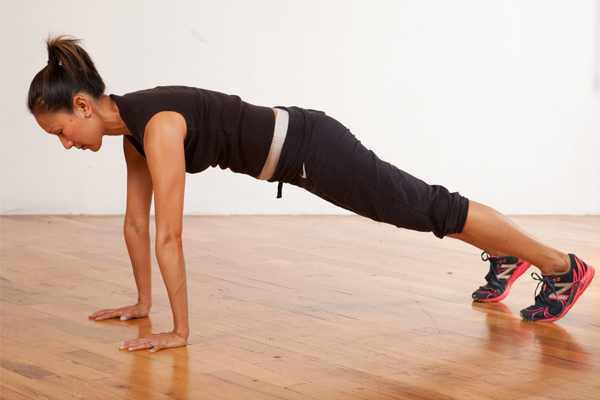
Without using a strength meter dynamometer (device that evaluates different forms of strength), a general strength test of a push/pull would be performing push ups and pull ups in good form and without pain. If you struggle with both, assess why and focus on exercises to strengthen and support your muscles to perform these movements properly.
But first, let’s break down the biomechanics of push/pull, its importance, and what exercises can help strengthen them.
What is a PUSH movement and what muscles are involved? Pushing is exerting force to move an external weight away from your body or your center of mass away from the ground. The pectorals, deltoids, triceps are the primary movers in pushing. The serratus anterior, abdominals and the lower body (quadricep and glutes) are just as involved to help stabilize the movement.
Daily activities that require you to PUSH:
– pushing a door
– getting out of bed or off the floor
– placing heavy objects above your head
– moving objects out of your way
Great exercises to help you strengthen your PUSH:
– push ups (modify with knees down if challenging)
– overhead press (barbell or dumbells)
– plank pose
What is a PULL movement? Opposite of pushing, pulling is moving an external weight towards you or your center of mass toward an object. The muscles used for pulling are predominantly in the posterior (back) chain of the body. The lats, rhomboids, trapezius, glutes, hamstrings are the primary muscles. The abdominals, obliques, biceps and posterior deltoids also play a big part.
Daily activities that require you to PULL:
– reaching and pulling an object from the back of a cabinet
– pulling a door open
– picking up heavy grocery bags or luggage
– pulling yourself up from the ground
Great exercises to help you strengthen your PULL:
– pull ups (use a resistance band to help)
– rows and pull downs (with dumbbells, barbell or machine)
– deadlifts
*check out these back exercises, too.
Both movements are incredibly important in day-to-day functioning. Weakness, injury, and limitations in your push/pull will make moving through your day challenging – just like that man waiting by the door . Especially as we age, the ability to push/pull becomes much more of a necessity in the most basic and important movement in life…getting yourself out of bed. So let’s get to work and practice those push/pulls up. I’m always here to help and cheer you on!
There are certain things you do that come naturally. You don’t even have to think about it. Your mind and body instinctively functions with ease and confidence. Your actions are involuntarily, like second nature. So what happens when you are challenged with something that you are just not good at? You struggle, get easily frustrated, your brain shuts off, become mentally drained, and more than likely you give up and never attempt it again.
Here are 3 things that I suck at but I keep striving to be better.
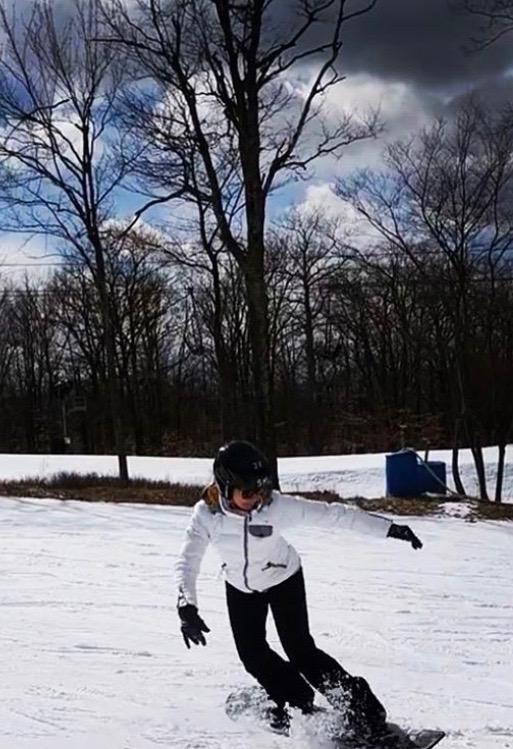
#1 SNOWBOARDING
Every year, my family plans a winter trip that I dread. I adore my family and, to me, nothing is better than family time. But I know that I would have to get on a snowboard, ride the lift, and make my way down (repeatedly). I start feeling the frustration days before the trip and already have negative feelings about the whole experience. I’ve got a crap attitude about it from the minute I get there through the whole gearing up process. It’s a lose-lose for me, right? WRONG! Every single time I go, I remember the feeling of being on the board so my body is at ease quicker than the year before. I automatically acclimate to the instability of the board and understand how to fall and land softly. I learn just a little bit more about my body and the sport. So this year’s trip wasn’t so bad. I did walk in with a negative attitude and my brother and I always get into a little argument (as he so sweetly is trying to teach me) but eventually, I was up and down the slopes on my own and felt much more confident. My brother and sister-in-law are snowboard fanatics so this trip will happen every winter…it’s inevitable. But I am determined to get better every year instead of just giving up and sitting in the hot tub. 😉
#2 DANCE CLASS
I LOVE LOVE LOVE to dance and am actually a pretty good dancer on the dance floor. But throw me in a class where the steps are choreographed and timed…I’m the one 5 steps behind. There is a major mental block in my head when it comes to choreography. I still can’t explain what it is but I fight tooth and nail to do better. I have been taking dance classes every week for almost 2 years and still struggle through a class but am doing 100x better than my very first class. Just like training your muscles, training the brain is just as (if not, more) important. New brain cells form, stronger connections between them, and better mental activity. Challenging your brain to different tasks and thought patterns, in the long run, help with better brain function and reduce the risk of cognitive decline. Especially as you age, putting your brain through these tests daily is crucial. The frustration and insecurity I used to feel has been replaced with a bit more confidence and a feeling of “just not giving a crap” because I’m having so much fun. I am so grateful for my client, Amita, for encouraging me to go to Broadway Dance Center. It started my love and motivation to succeed in dance class.
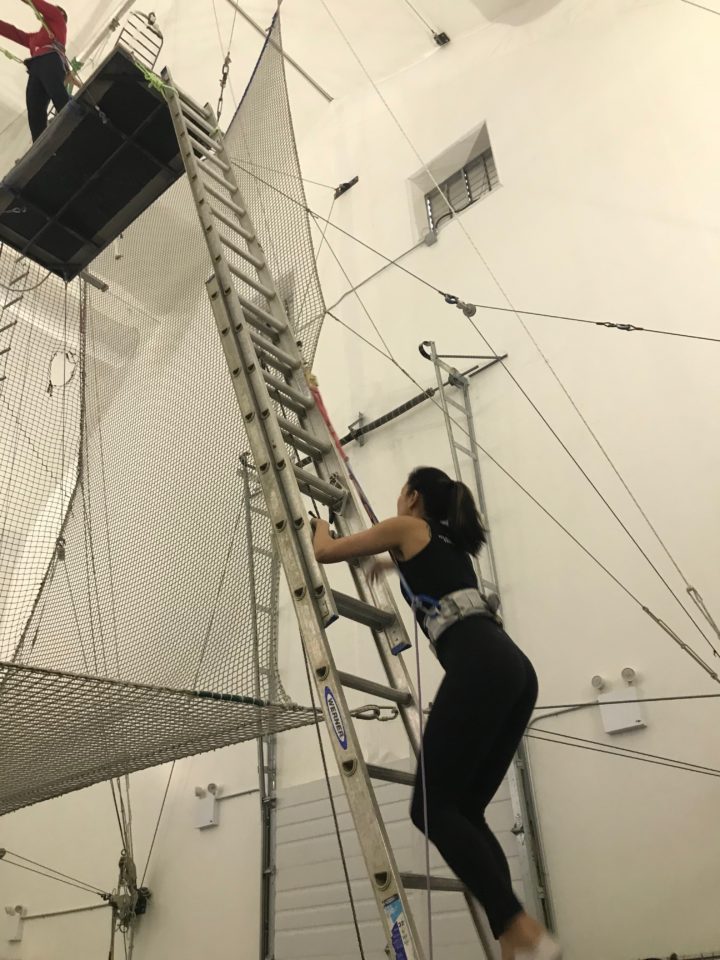
#3 TRAPEZE SCHOOL
Have you ever climbed up a ladder or looked over an edge and feel your legs quiver and the sensation of falling? That was me every single time I was challenged with height. I hated the feeling and it was sometimes debilitating. My phobia of heights was unbearable and worse part was I had no control over it. So when I came across Trapeze School of NY, I knew I had to take a class. There was just no escaping my fear. A harness is attached to my waist so no reason to fear falling to injury but I still had to climb up a ladder taking me to a platform approximately 50 feet from the ground. Once on the platform, I jump off it and swing back and forth from a trapeze bar. It was nerve racking and so stressful the first 3 attempts but the more I did it, my body adjusted and the less panicky I became. The body is amazing and can acclimate to anything when exposed to repetition. The stress receptors fired up in my brain, kicked me into survival mode and made me stronger with every “fly” (trapeze lingo). I learned to adapt to the climb and the pull of gravity as I leaped off the platform. Slowly, I was able to detach from my fear and feel my body go through the motions. I gained a sense of awareness and began to control my body and mind to perform. I have taken 4 classes so far (and just booked my 5th) and every time I fly I feel more confident. Climbing the ladder is now a piece of cake however jumping off the platform still needs work. But I absolutely love it and have definitely overcome my fear of heights.
You may ask…What’s the point? Why should I put myself in such a vulnerable position? Is it worth it? Who cares? Why start at the bottom? What if I never get better?
My ONE answer to you is WHY NOT??? The feeling of accomplishment alone makes it all worth it. Tackle a challenge, supersede expectations, break down insecurity, and manage the self talk and frustration are all reasons to do something you’re not good at. Not to mention the brain gains! Choose ONE thing you’re not good at or something you have always wanted to do but afraid to fail at…and JUST DO IT!!If you put your mind to it, you will achieve it. I would love to hear about your journey so don’t hesitate to email me and let me know. HAVE FUN doing something you suck at! I’ll be cheering you on!!
Warmer weather is on the horizon and vacations are approaching us. I just returned from an amazing trip to Nicaragua but after 2 full days of traveling, in and out of airports and on connecting flights, my body was aching with tightness and tension. Long haul flights are really tough on the body. Cramped seats, limited movement for hours, terrible posture, and poor circulation all lead to creaky joints and body aches and pains.
Here are 5 EASY MOVEMENTS to do before, after, or during your flight to increase blood flow and keep you loose so you can step off the plane pain free!
#1 SEATED FIGURE 4 (Hold for 20 deep breaths per leg)
Tips: (1) Flex the foot of the leg in figure 4. (2) Keep chest up and moving forward. (3) Make sure hips are even on the seat.
Focus: Relieves tightness in the glutes, posterior and abductor muscle groups of the hips.
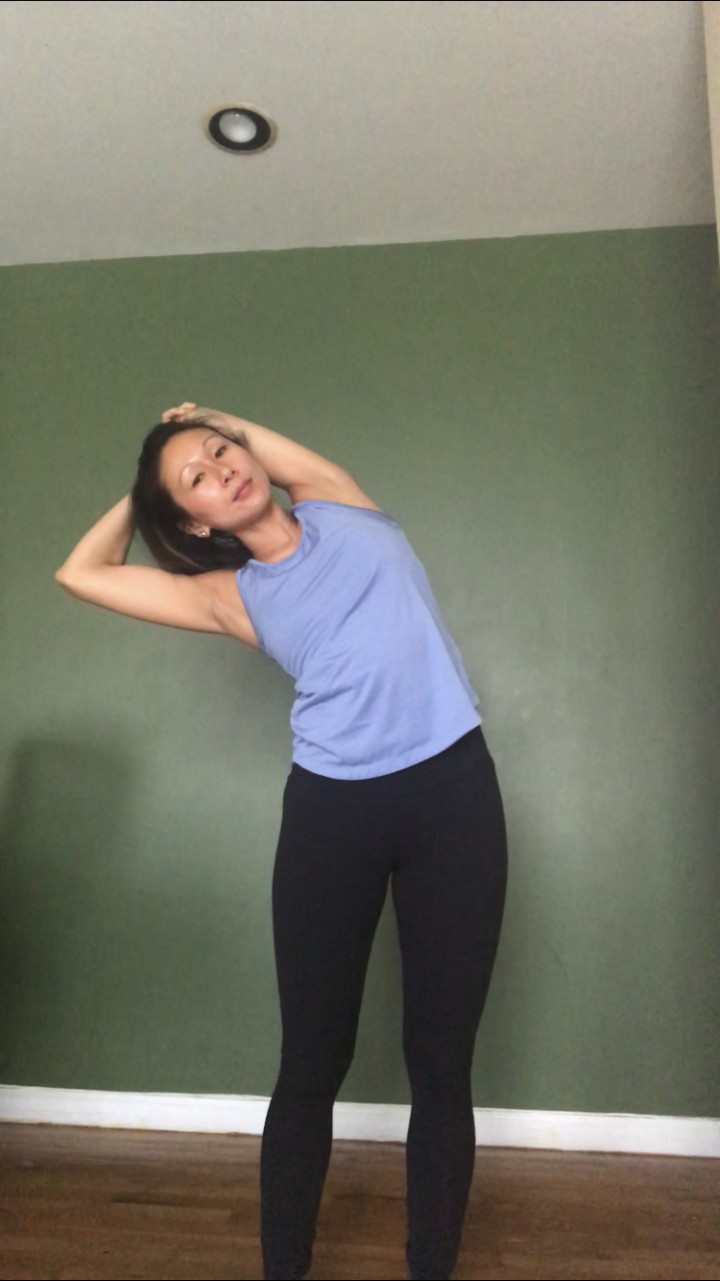
#2 SIDE WAIST & TRICEP STRETCH (Hold for 10 deep breaths per side)
Tips: (1) Place forearm behind the head and keep chin up so arm doesn’t push head forward. (2) Stand up straight and make sure to not rotate the chest. Lean laterally to the side.
Focus: Stretches side waist into outer hip and down side of the leg. Opens shoulder joint and backs of the arms. Increases length throughout the side body.
#3 FOOT ROLL (Roll 2 minutes per foot)
Tips: (1) Use a tennis ball or TP Therapy trigger point ball. For more intensity, try a lacrosse or golf ball. (2) Roll feet while seated for less pressure. Stand for more intensity. (3) Find a tender spot and stay on that spot. That’s the good stuff you want rolled out.
Focus: Myofascial release of all muscles and tendons of the feet. Reduces foot pain and helps with plantar fasciitis and calf tightness. Helps to increase circulation throughout the foot and lower leg.
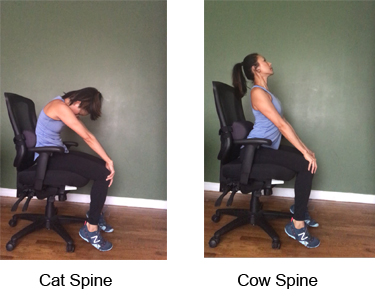
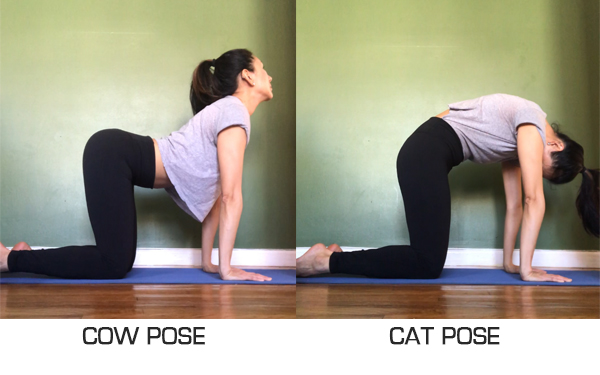
#4 SEATED CAT & COW (Stay for 20 breaths)
Tips: (1) Start the movement from your pelvis (tucking and arching). (2) Breathe with every movement (inhale with cow, exhale with cat or vice versa).
Focus: Increases flexibility of the neck, shoulders, and spine. Also stretches hips, back, abdomen and chest. Movement helps to destress and promote circulation throughout the body.
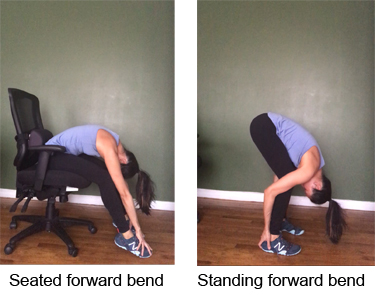
#5 STANDING OR SEATED FORWARD BEND (Stay for 20 breaths)
Tips:
Seated: (1) Bend the knees and keep chest on the legs. (2) Relax your head and neck and stretch arms forward and down.
Standing: (1) Bend the knees and keep chest on the legs while pulling yourself forward and down to toes. (2) Shift weight into mid-foot or balls of the feet (3) Use arms to help pull yourself down the legs.
Focus: Stretches posterior muscles of the body (entire back, glutes, calves, hamstrings, and neck).
Whether you’re traveling for work or on a vacation, the more time you spend on an airplane, the tighter your body will get. For those longer flights, try to get up every hour or so to stretch the legs out, perform these movements and bring circulation back to the body. Your body will thank you for it!
Today the average office worker sits at their desk for 8-10 hours a day! And that doesn’t count the time at home on the couch so that can be over 12 hours of sitting in one day. That is an insane amount of time sitting on your butt, more than likely in poor posture and limited movement for hours at a time.
When sitting for a prolonged period of time, a chain of physical problems happen.
Neck and back muscles tense up from holding the upper body up right.
Spine stiffens from the base of the neck to the tailbone that will eventually lead to an inflexible spine. All muscles surrounding and supporting the spine will tighten up, too. Bad all around.
Hip flexors contract and shorten causing stress and pain in lower back.
Tremendous pressure is applied to lower back discs causing compression and possible nerve damage.
Blood pools in areas not being moved and poor circulation or numbness can occur.
Weak and saggy glutes causes instability through the hips leading to shooting pain and less power in every day walking and movement.
You’re probably sitting right now reading this blog post as I’m sitting writing it. If you are, then stand up, reach your arms up to the ceiling and take a deep breath in. And let’s do these 3 quick stretches to reset your body.
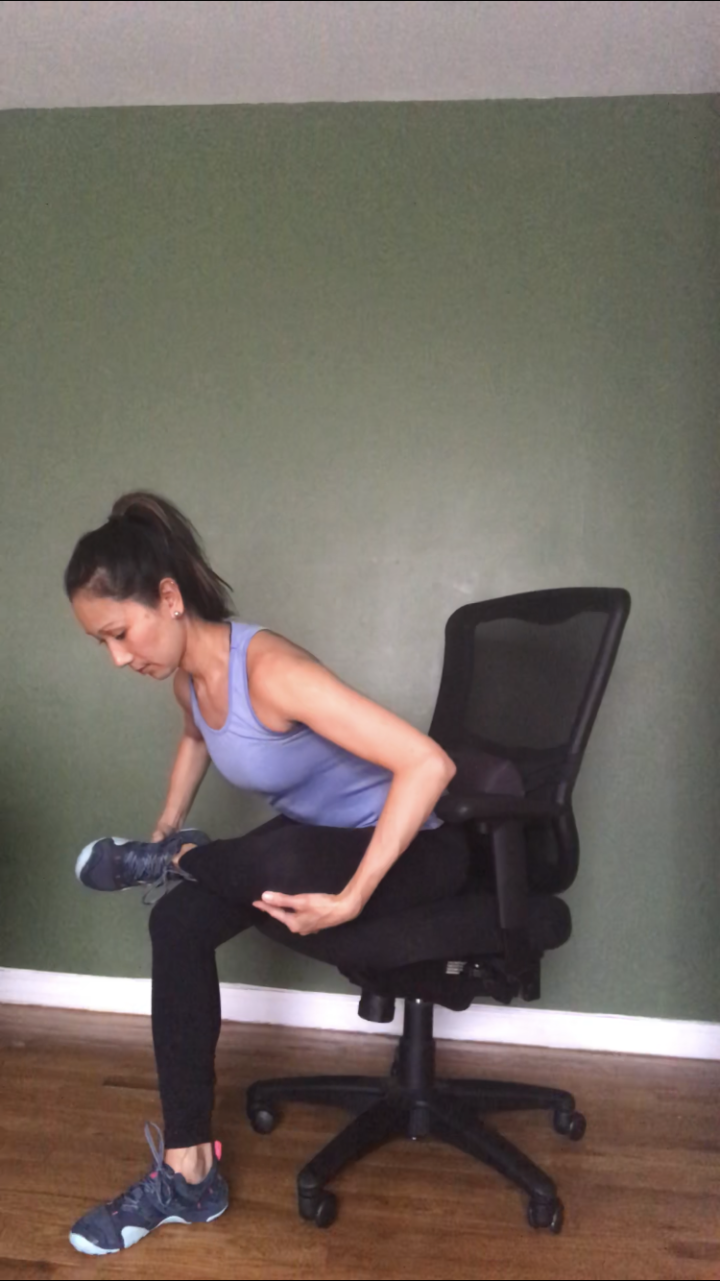
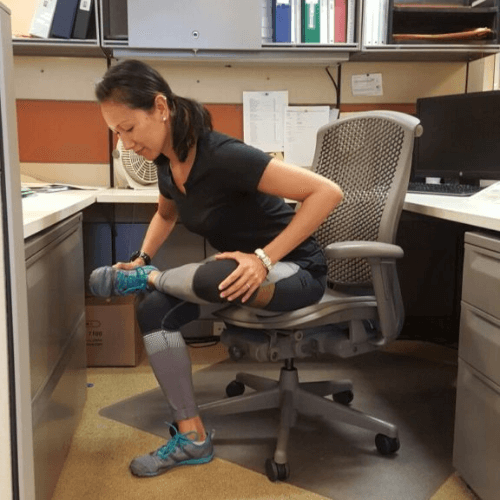
#1 FIGURE 4 HIP STRETCH (Hold for 15 breaths per leg)
TIPS:
Flex the foot on the leg to stabilize the knee.
Lean forward with a flat back and keep gaze forward.
Sit behind your tailbone so the lower back is not rounded.
#2 CAT & COW (Perform for 1 minute)
TIPS:
Make sure to breathe during each movement.
Position hands directly under shoulders and knees under hips.
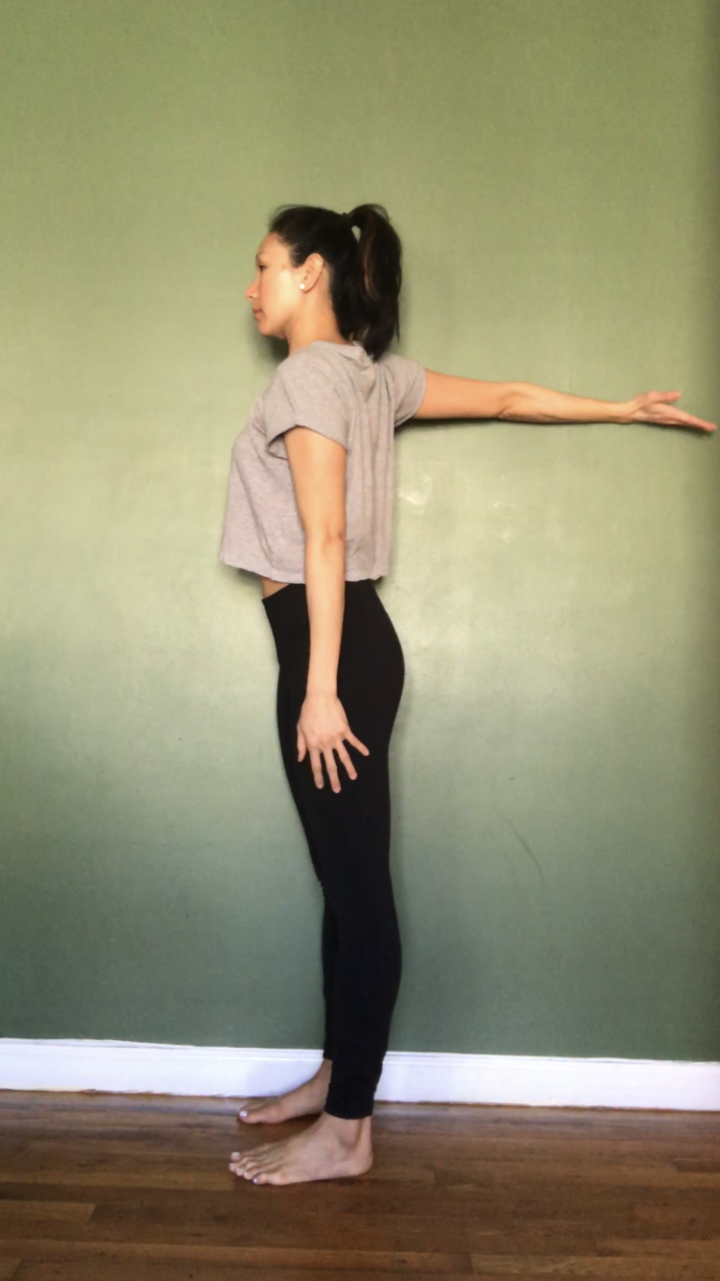
#3 CHEST OPENER (Hold for 15 breaths per side)
TIPS:
Keep hand in line with shoulder.
Stand as close to the wall as possible and keep turning to face forward.
Guaranteed this will make you feel so much better. And if done throughout the day, it can be a short meditation to reset your mind, too. Set an alarm on your phone for every 90 minutes to stop your work, get up from your seat and take this stretch break with me. It will prevent possible health risks and physical ailments, which is always a WIN WIN!
It can be tough to get in your workouts during the summer. Lots of travel plans, temptation of happy hour, or just choosing to bum around at the park, it’s inevitable that our workouts end up being last on our list. I admit that I’ve skipped a few workouts to hit the beach instead. So if your summer schedule is packed and you just can’t find the time…well there is hope!
If you’ve got just 15 minutes at work (and you know you do!), there’s no excuse not to sneak in a quick workout so you can at least maintain and keep your body fit. Try these exercises and stretches and build a mini workout in your office.
WORK IT OUT AT WORK!
Sliding Split Squat
Stand up straight with one foot on a rolling chair. Start sliding the chair back as you bend the front knee into a right angle. Slightly lean your torso over the front leg but keep your back straight. Slide the chair back to the front leg, repeat, and switch leg. Try 3 sets of 15 repetitions.
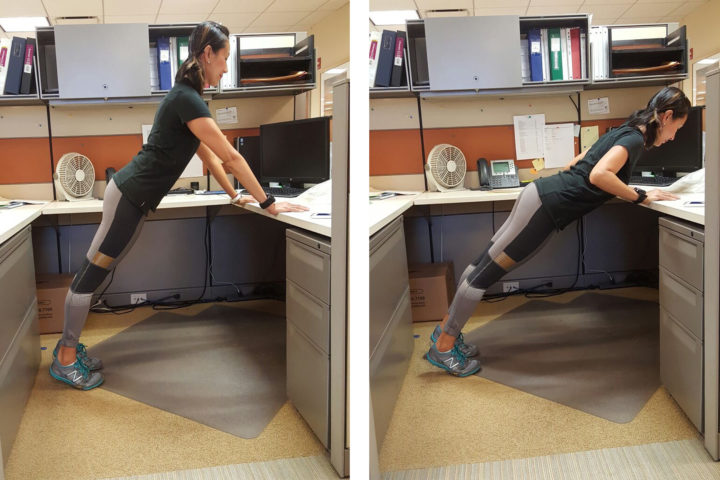
Push Ups
Set your body up in a plank position against your desk with straight arms set shoulder width apart. Bend your elbows into a right angle lowering your body towards your desk, keeping elbows in line with the shoulders, then press yourself back up. Try 3 sets of 20-30 repetitions.
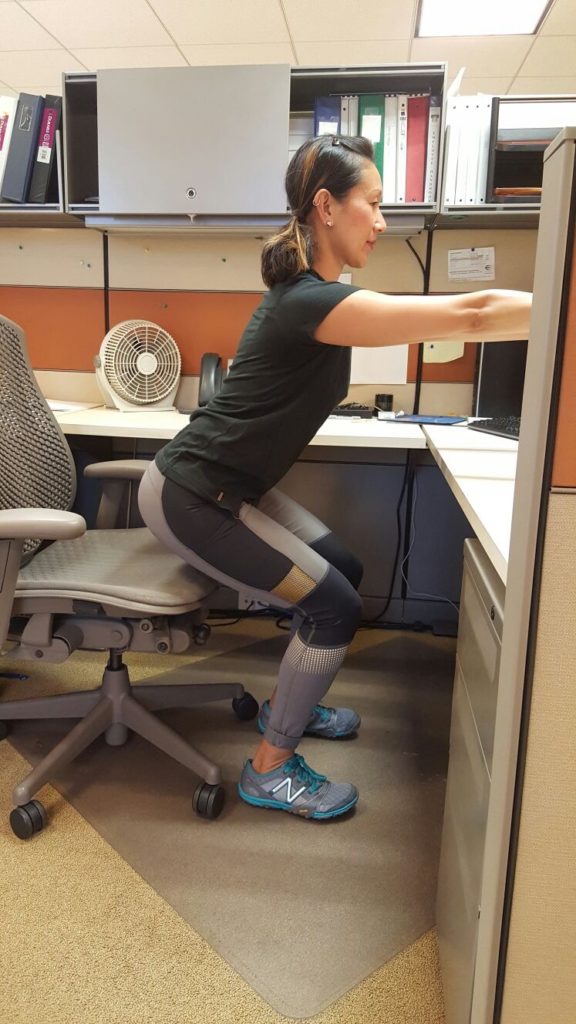
Squats
Place your chair slightly behind you to give yourself a boundary. Set your feet hip width apart, extend your arms straight, and begin to bend your knees moving your hips back towards the chair. Try not to sit fully into the chair instead tap the chair gently and then stand right back up. Make sure to keep your knees in line with your toes and don’t allow them to move past your toes when squatting. Try 3 sets of 20 repetitions.
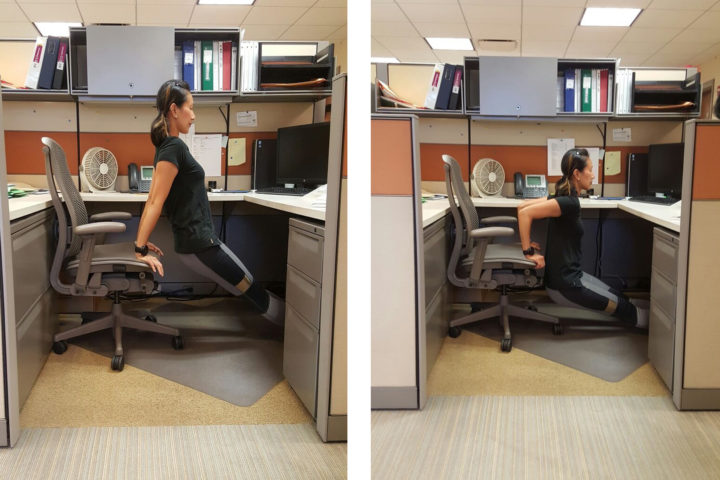
Tricep Dips
Move your chair up against a wall or desk so it doesn’t move. Place your hands on the edge of your chair and extend your legs straight but keep your back close to the edge. Bend your elbows to a right angle, aligning the elbows with your shoudlers, then press yourself back up. To modify, bend your knees and place your feet flat on the ground. Try 3 sets of 15 repetitions.
Walking Lunges
Take a big step forward bending both knees to a right angle. Then step the back leg forward next to the front leg or into the next lunge step. Make your way down a long hallway or just step forward and back in a smaller space. Make sure your front knee does not go past your toes. Take 40 lunge steps total (can be broken up into 4 sets of 10 steps)
STRETCH IT OUT AT WORK!
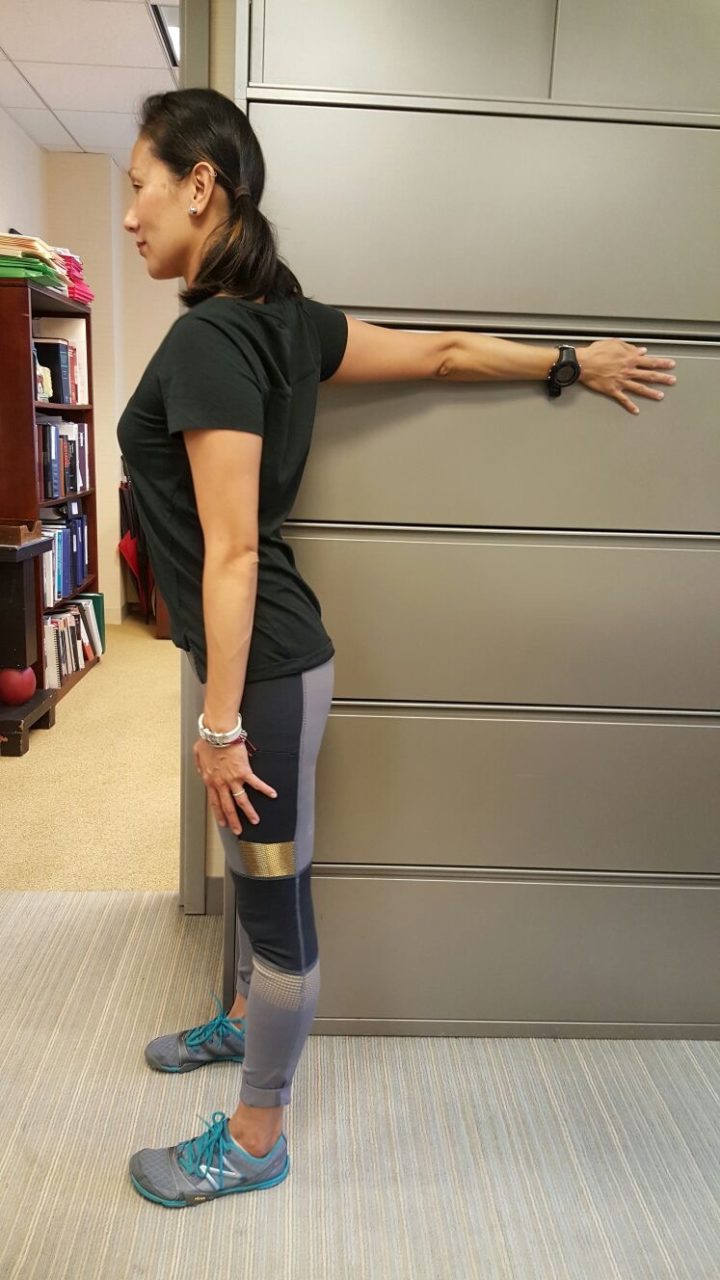
Chest Stretch
Stand right next to a wall or filing cabinet and raise your arm back and up so your inner arm is resting against the wall. Try to keep your shoulders in line and your arm as straight as possible. Switch arms. Hold for 30-40 seconds.
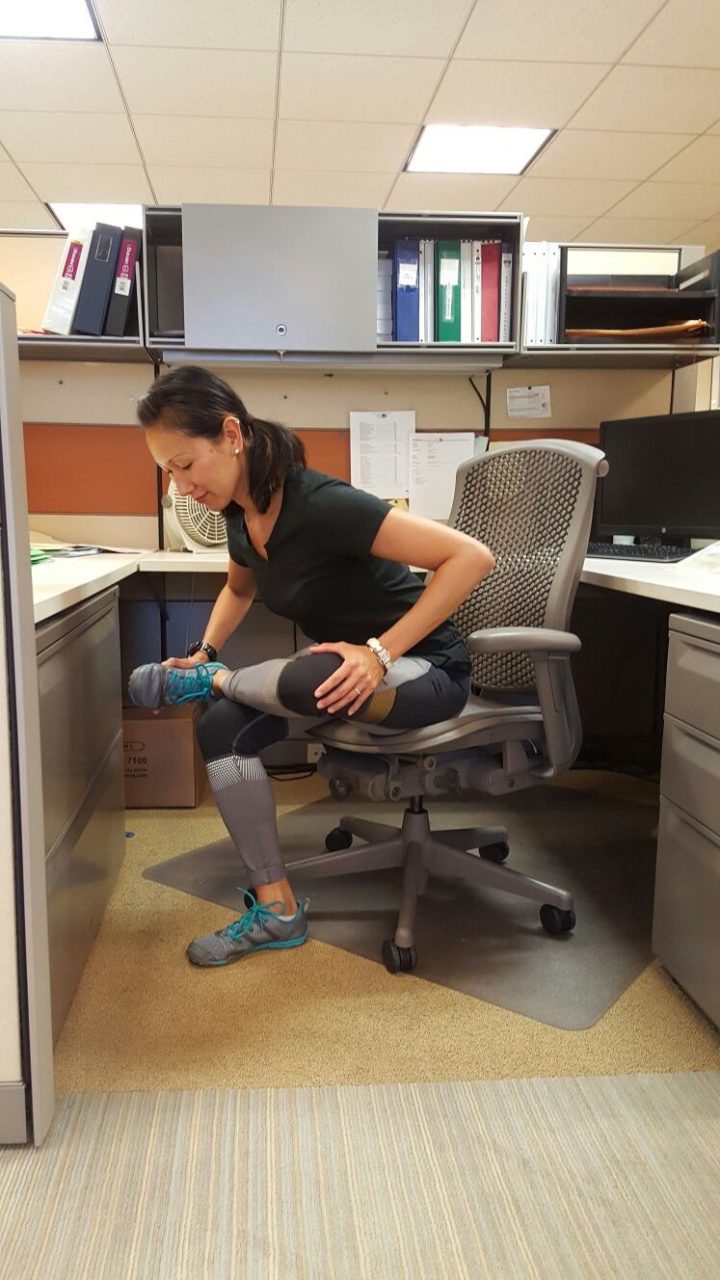
Figure 4 Hip Stretch
Sitting in your chair, bend one knee and place the foot on the other knee. Make sure to flex the foot to stabilize the knee. Lean forward towards the top leg, keeping your spine straight with a slight arch in the lower back. Switch legs. Hold for 60 seconds each leg.
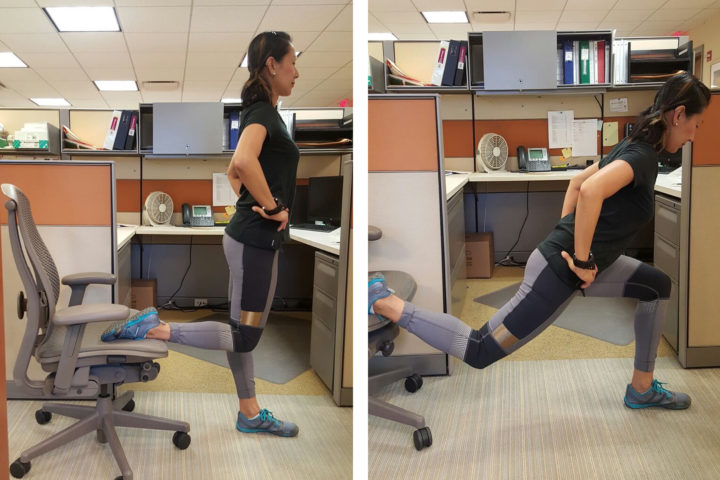
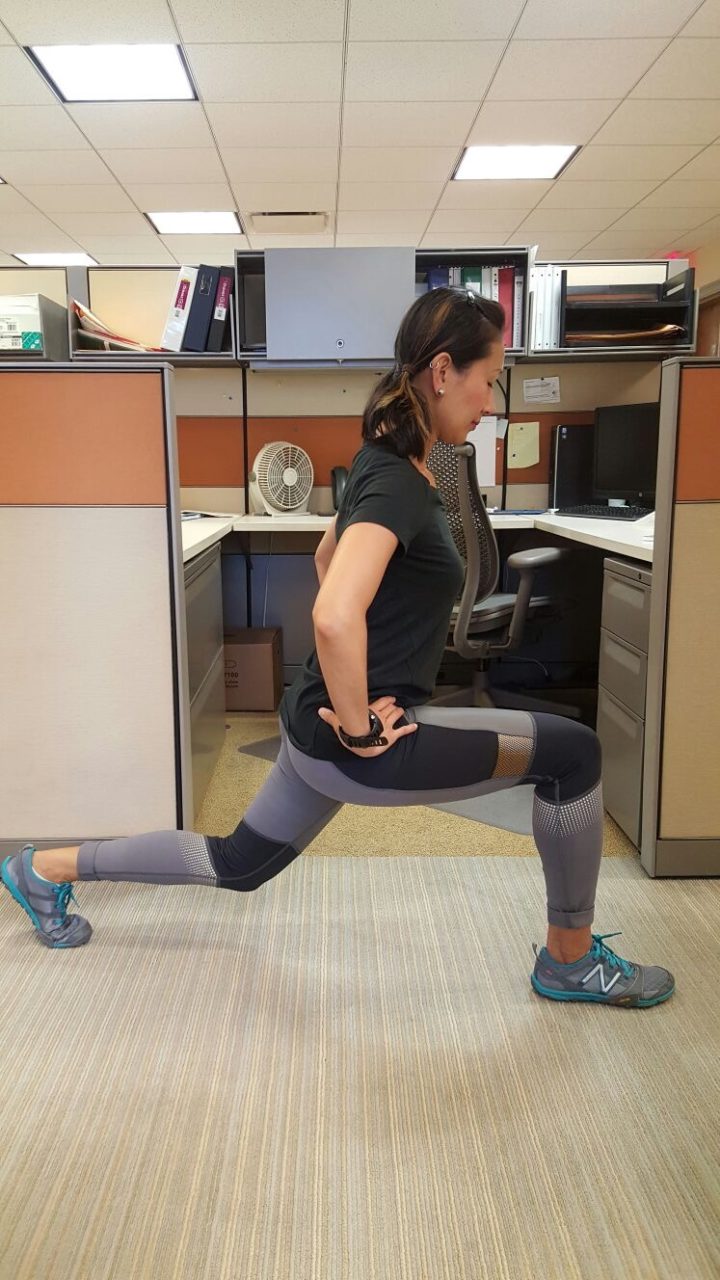
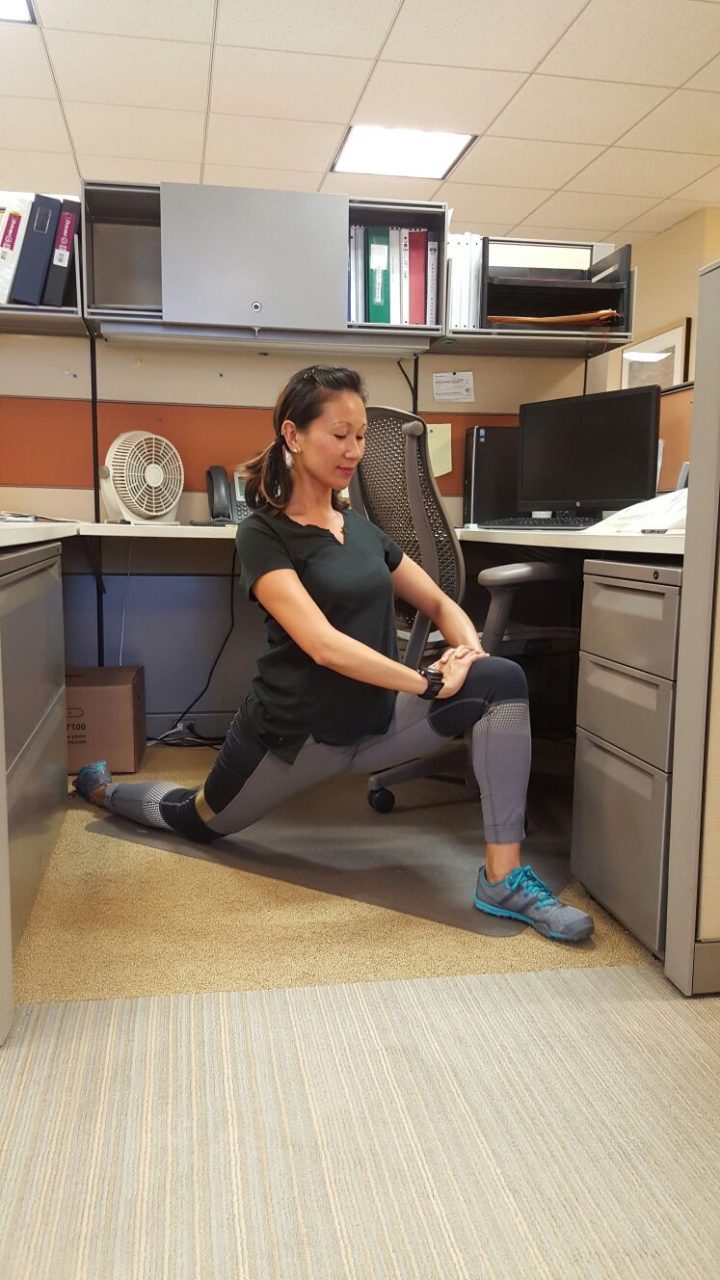
Hip Flexor Stretch
Set your legs up in a very long lunge making sure your front knee is right above the ankle and position the back knee as far back as you can while keeping your hips in a straight line. Drop your hips forward as you lift your chest up, placing your hands on your front knee to stabilize and assist with a straight back. Switch legs. Hold for 40-60 seconds each leg.
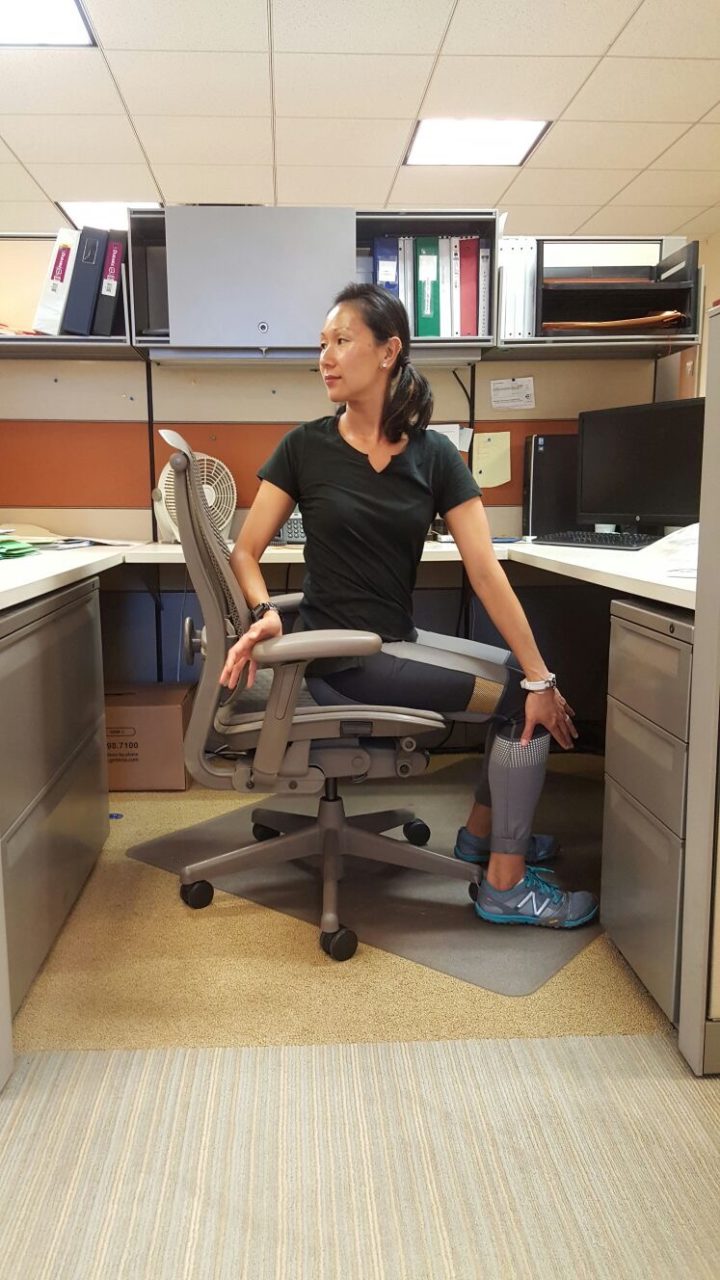
Seated Spinal Twist
Sit up straight in your chair. Turn your torso to the right, keeping your hips anchored and rotating only at the waist. Hold on to the back of the chair and right knee to assist with a deeper twist. Look over your right shoulder. Make sure to keep a slight arch in the lower back and your upper back straight. Repeat on the left side. Hold for 30 seconds each side.
These exercises and stretches can be done as many times as you’d like throughout the day. It doesn’t take any equipment or much space so really…there are no excuses. 🙂 Be desk-smart and use that space and time to the fullest and sneak it in that workout! Then you can hit the beach and all the happy hours you want guilt free! Happy Summer!
Here’s a typical ab routine: 50 sit ups, 50 crunches, hold plank for 1 minute and repeat. A bit boring, redundant, and after some time…ineffective. There’s nothing wrong with those exercises but there is so much more to strengthening your core than crunches and planks.
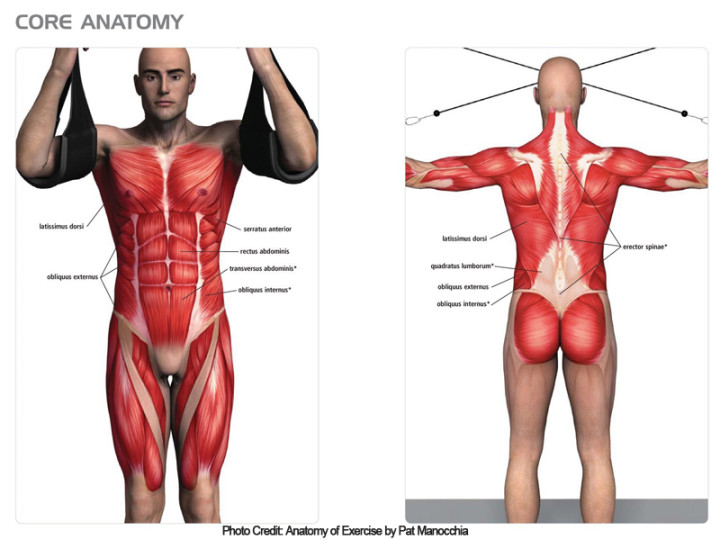
Most equate the “core” with the abdominals, which is the outer most visible layer, of course, that’s when it’s not covered with fat :). But the core muscles extend far beyond the abs. The major core muscles lay deep beneath the exterior musculature that people typically train. These muscles are the pelvic floor, transversus abdominis, erector spinae, multifidus, internal and external obliques, quadratus lumborum and the rectus abdominis. The minor core muscles are the hip flexor muscle group, adductors, hamstrings, latissimus dorsi, gluteus maximus, and the trapezius. Basically, all the muscles that attach to the pelvis work together to functionally move, support, and stabilize the spine.
The core provides us with three dimensional functional movement which is more than just the lateral exercises most ab/core workouts include. Our daily activities include movements in all three planes: frontal (forward/back), sagittal (side to side), and transverse (rotation). Therefore we should train our core to be stronger while moving in those 3 planes, right? Right! So check out this quick and effective workout that will train your core front, back and around.
MINUTE #1: SUPERMAN
Break it down:
– Lay on stomach with arms extended alongside ears.
– Press the pubic bone into the floor to initiate a lift in the chest, arms, and legs.
– Engage back body muscles to lift higher and lower down with control.
– Reach fingers and toes in opposite direction to create length in the spine. Slight squeeze of the glutes and inner thighs to lift the legs up higher.
Break it down:
– Start in elbow plank aligning shoulders directly over the elbows, body parallel to the floor, forearms push against the floor to slightly round upper back, legs engaged, feet flexed.
– Slide shoulders forward so they glide past the elbows. Feet glide forward onto tip toes.
– Slide shoulders back so they move slightly behind elbows. Feet glide back onto the balls or mid foot.
Targets:
– Rectus abdominis, multifidus, transversus abdominis, serratus anterior and posterior, pectorals, and deltoids.
MINUTE #3: SIDE LEG LIFTS
Break it down:
– Lay on one side with hips slightly tilted forward. Relax head and neck and place arms under the head.
– Place a block in between the feet to keep adductors (inner thighs) engaged.
– Squeeze the block and engage obliques to lift both legs up. Try to relax upper body.
Targets:
– Transversus abdominis, multifidus, external/internal obliques, and adductors
MINUTE #4: SIDE PLANK TWISTS
Break it down:
– Set up in side plank on the right side with shoulders directly positioned on top of the hand. Stagger feet so the right foot is in front of the left.
– Bend the left elbow to bring hand behind the head and open the chest.
– Push the floor away with the right hand to stabilize core and slightly lift right leg up towards abdomen.
– Move your left elbow across chest towards the leg so the elbow and knee connect in the middle.
– Release the foot back down while opening the chest.
– Repeat for 30 seconds then switch to the left side.
PERFORM THESE EXERCISES 2x FOR A TOTAL OF 8 MINUTES!
Add these exercises to your routine and give your core a three dimensional workout. Targeting the front, back, and sides of your core will help you set up a stronger and more stable foundation. Your core becomes a force transfer center and stabilizer to assist you in all exercises and every day activities. The more you understand the muscles that make up your core, the more they will work. Training your entire core to work efficiently will help with balance and stability, a straighter spine, better posture, injury prevention and a stronger, more powerful you! Win Win! Now get to work!
In a general sense, mobility is the ability to move or be moved freely and easily. In the fitness world, mobility is being able to perform functional movement patterns without restrictions in range of motion (ROM).
The hip joint is the largest and one of the most important joints of the body. It bears our entire body weight when we walk, run, and jump. Functionally, the hip joint is one of the most flexible joints and allows the greatest range of motion yet it’s also one of the tightest areas of the body and one that creates chronic and reverberating pain. It connects our upper and lower body so the muscles attached above and below the hip are affected by movements supported by this joint system. These movements require work from these muscles that stabilize and support and will place a certain level of force on the hip. The hip joint must accommodate these forces repeatedly. With repetitive motion, tightness occurs which create restrictions in the body. Mobility becomes challenging due to these limitations.
Open hips help to relieve back pain, improve circulation through the legs, increase agility and flexibility of your gait which all equates to better mobility. The hips are also at the center of your body and alignment so releasing the hips will help to relieve tightness in areas above and below this ball and socket joint. Super important!
Here are 5 stretches to help you increase hip mobility.
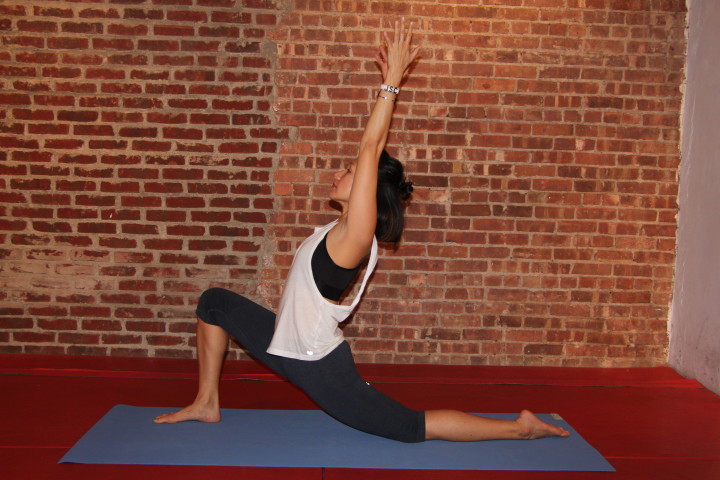
LOW LUNGE
GREAT FOR:
– Releasing tightness in the lower back especially for those that experience sciatica and LBP (lower back pain)
– Opening the hip flexors (psoas, rectus femoris, TFL) and the front chain of your body (rectus abdominis, pectoral muscles, side waists)
– Increasing ROM for faster and more agile movements
SOME TIPS:
– Keep the front foot directly under the knee
– Slide back leg as far back as you can so you’re above the knee joint and not directly on the patella (knee bone)
– Try to connect back pinky toe to the floor (slight internal rotation of back leg)
– Draw the abdominals in to protect lower back when leaning back
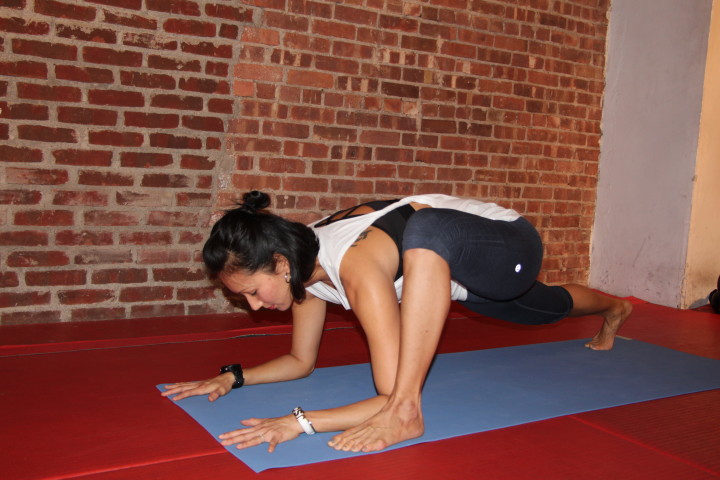
LIZARD POSE
GREAT FOR:
– Stretching and releasing inner thighs while opening the hip flexors
– Increasing range of motion and gait for longer strides
– Opening the chest and shoulders
SOME TIPS:
– Align the front knee directly above the foot
– Keep back leg as straight as you can. Drop the back knee to the floor to modify
– Keep chest lifted and back as flat as you can (avoid rounding upper back)
– Draw the front knee as close to the shoulder (midline) as you can
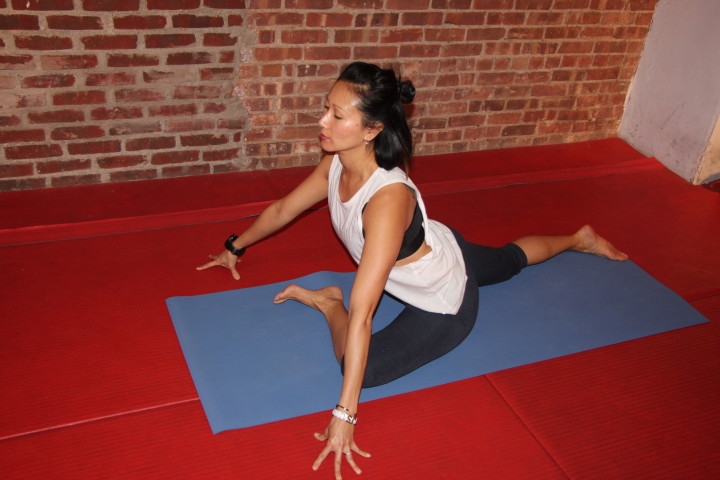
PIGEON POSE
GREAT FOR:
– Relieving chronic LBP and sciatica
– Opening the hip flexors and inner thighs
– Releasing tension and increase ROM in the hip rotator muscles (glute medius, glute minimus, piriformis, gemellis)
– Increasing circulation through the legs and digestive and reproductive systems
SOME TIPS:
– Keep back leg as straight as you can
– Keep hips squared by placing each hip on its own side of the mat
– Keep front shin parallel to the front of your mat. Modify by propping your seat up with blankets or blocks
– Keep front foot flexed to stabilize the knee joint
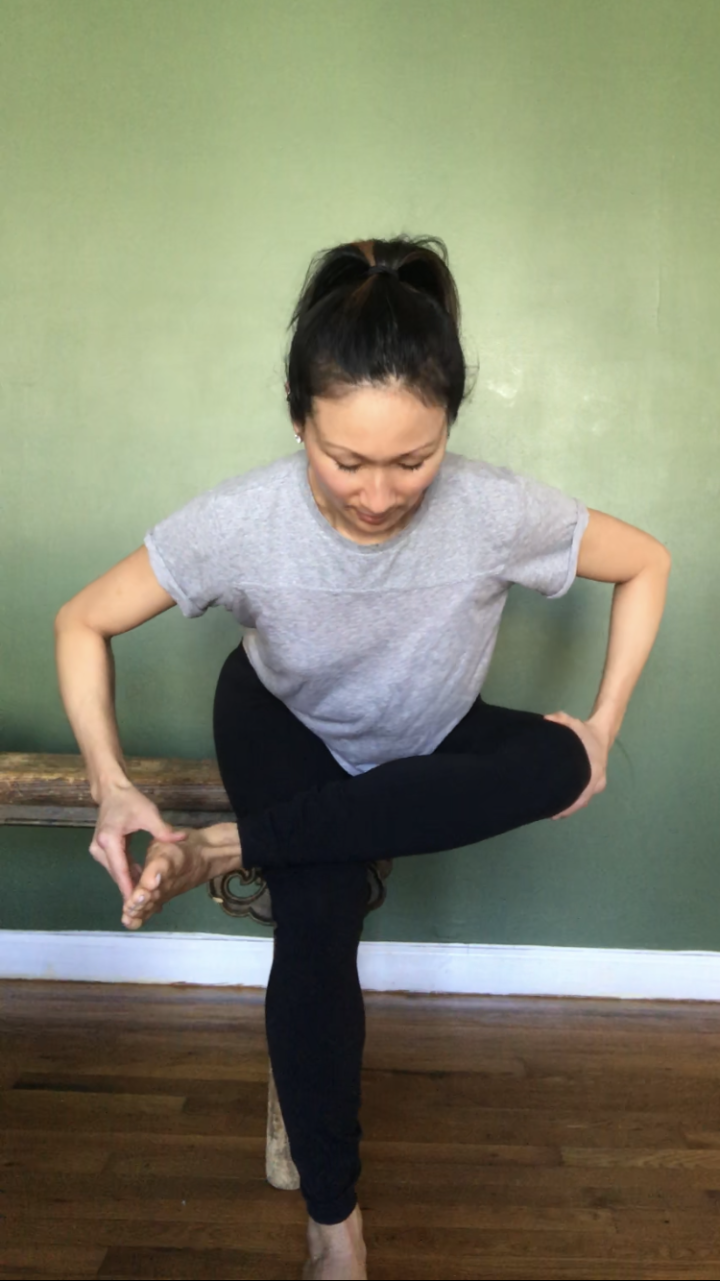
COW FACE POSE
GREAT FOR:
– Releasing tension in the outer hips and lower back
– Opening all hip rotators muscles
– Stretches ankle joints
SOME TIPS:
– Flex both feet to stabilize knees
– Cross legs at the knee joint
– Prop your seat up with blankets or blocks to modify
– Keep a straight back when leaning forward over the legs
– Breathe…this is a very intense hip stretch!
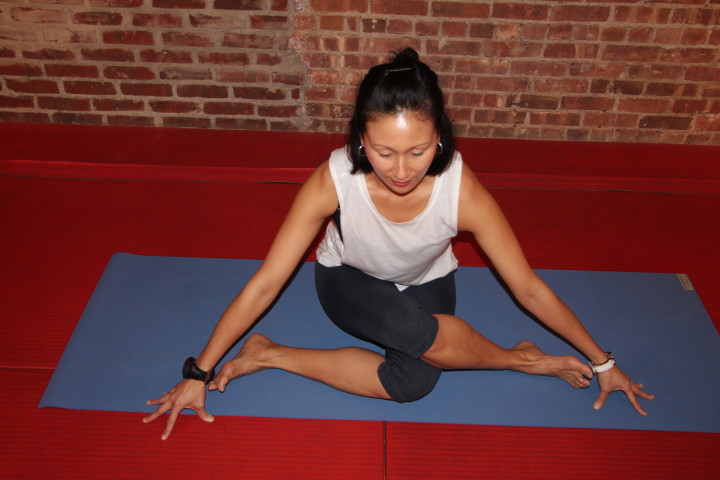
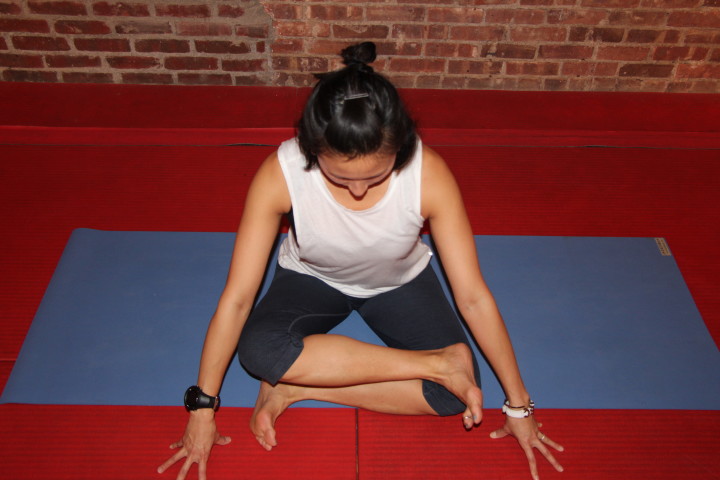
ANKLE TO KNEE
GREAT FOR:
– Relieving tightness in LBP and sciatic pain
– Releasing hip flexors and rotators
– Increasing ROM for quicker and longer lateral movements
SOME TIPS:
– Align both feet above and below the knees to form a triangle with both legs
– Flex both feet to stabilize knee joint
– Keep lower back slighted arched and back straight when leaning forward
*Hold each stretch for at least 20-30 deep and long breaths. I promise it gets easier, the longer you stay in the stretch.
The muscles and attachments of your hip joint are extremely strong, as they should be to keep this large joint stable. However this also makes stretching it a challenge! For those that sit all day long, your hips are in a constant state of flexion, so working on flexiblity and mobility is not to be overlooked. The tighter the hip, the less you use them. The less you use them, the tighter they get. Vicious cycle! So the more you release and open the hips, the more you can release tension and prevent restrictions…all leading to better mobility. We can all agree that we want to move without limitations and more importantly without pain. So the more mobile our bodies are, the faster we can move and feel good doing so.