Exercises + Tips

3 Back Exercises You Should Be Doing!

At least once a day, I hear someone complain about pain in their lower back. Slipped or bulging discs, pinched nerves, back spasms, tightness, chronic pain…to name a few. With all the sitting, twisting, bending, and pounding we do on a daily basis, it’s hard to have a healthy and happy back. I can see how 3 out of 4 people have experienced some form of back pain, making it 90% of Americans with LBP (lower back pain).

The muscles of the back are very complex but yet divisible as each layer serves a specific purpose in movement.

  • Superficial Layer: attaches and moves the upper extremities
    • Trapezius
    • Latissimus Dorsi
    • Levator Scapulae
    • Rhomboid Group
  • Intermediate Layer: in charge of breathing and expansion as they are connected to the ribs
    • Serratus Posterior Group
  • Deep Layer: moves the trunk and supports the entire back
    • Spinalis
    • Multifidus
    • Longissimus
    • Iliocostalis
    • Splenius group

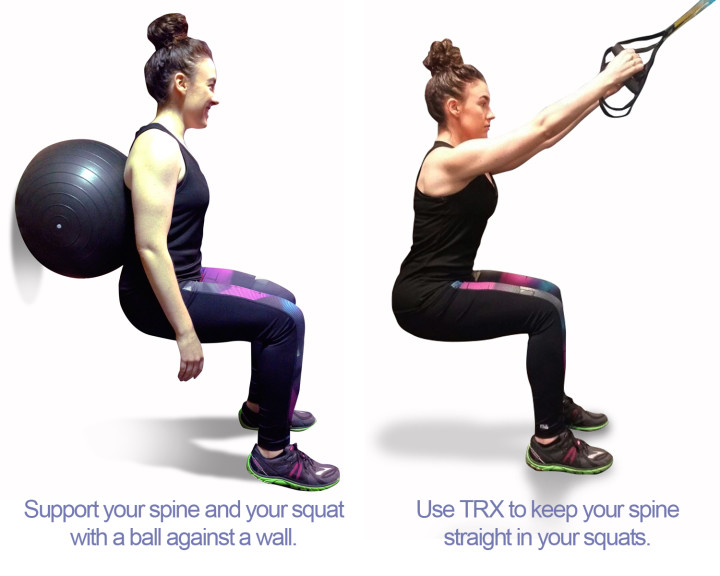
Due to high stress in our lives and the hours of sitting, it’s inevitable that our backs will start to change shape and adapt to the environment that we expose it to. Poor posture, weakness, tightness, and compensations are the common sides effect of poor functioning in the back. The importance of keeping your back strong and posture in alignment will absolutely help with your quality of life along with performing basic everyday movements and activities, particularly in exercise and sport.

Some great back exercises are the more common ones you will see at the gym.

  • Seated row
  • One arm row
  • Pull ups/ chin ups
  • Lat pulldowns

These exercises are definitely a part of my routine. But the 3 back exercises below target so much more than just the superficial layer of the back. They tap into all the layers and give your legs and core a workout and stretch, too.


#1 DEADLIFTS: Not only the quintessential weightlifting exercise but also an exercise that mimics a real life lift. Picking up your baby, a heavy box, luggage, a table, all should be in the form of a deadlift.

Deadlift2

Important Form to Keep:

– Feet are set up hip width apart
– Slight natural arch in the lower back
– Chest up to avoid lower back rounding
– Hips go back first and then knees bend


#2 BENT OVER BARBELL ROWS: a full body compound exercise that works the upper and lower back, abs, hips, and arms. This exercise isolates these muscles to build a stronger and more muscular back.

NewRow

Important Form to Keep: 

– Keep knees slightly bent
– Natural arch in the lower back
– Keep head neutral in line with your spine
– Keep your torso parallel to the floor. If need to, come up a few inches when pulling the back to the chest.
– Avoid thrusting hips forward when pulling heavier weight.


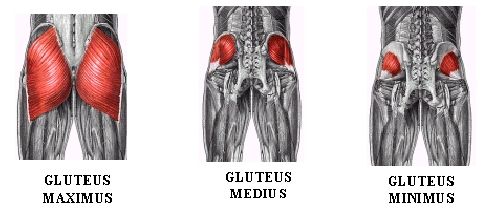
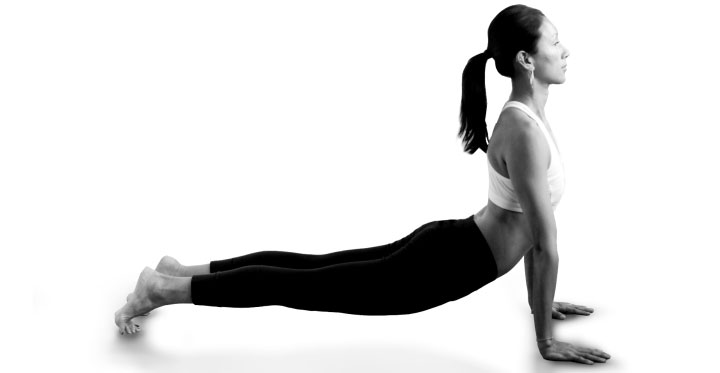
#3 SLIDING COBRA (BACK EXTENSIONS): a Pilates twist to the typical back extensions you see on the Roman Chair/Hyperextension bench. Use glides or small towels under each hand for easy sliding. Looks pretty easy and graceful until your third or fourth rep. 🙂 Works the upper and lower back plus the glutes, abs, obliques, hamstring, triceps while stretching and opening the chest. Sweet!

Extensions2

Important Form to Keep:
– Relax your shoulders and trapezius so there’s lots of space between your ears and shoulders
– Press your hips into the floor to initiate the lift
– Avoid squeezing glutes
– Squeeze shoulder blades together to keep chest open
– Keep head neutral in line with spine

Our back muscles are layered and multi-functional and most of them attach to our spine. Which is why they control so much of how we stand and why we experience LBP. We use these muscles daily and often demand more from them than they can handle. So build a strong back so the spine is in its proper and optimal position. This will also enable your body to move in a full range of motion through a strong foundation so restrictions won’t prevent you from doing a certain exercise, lifting a heavy object, or just moving throughout your day.  So if you don’t already incorporate these back exercises into your routine, now is the time!

Strong Backs = Better Postures! Get to it! 🙂 

A THANKSGIVING WORKOUT YOU MUST DO

I (heart) Thanksgiving! A day of the year where we gather with family and friends and do absolutely nothing but eat, drink and lounge around the house. As a personal trainer, this is my busiest time of the year. My classes are packed and my clients squeeze in an extra session because they know what is to come on this joyous day of feasting!

Personally, I make sure I get in a workout the day of and after Thanksgiving. And guess what… you should too!
Here’s a pre and post Thanksgiving workout that will burn lots of calories so you can justify the 3 extra servings of turkey and pie. 🙂

Go Up & Go Fast (12 minute treadmill work) – YES this is all you need!
1 min     4.0 speed / 5.0 incline
1 min     5.5 speed / 8.0 incline
2 min     6.0 – 8.0 speed / 3.0 incline
2 min     Sprint! 7.0 – 11.0 speed / 1.0 incline
1 min     6.0 speed / 8.0 incline
2 min     Sprint! 8.0 -11.0 speed / 3.0 incline
1 min     6.0 – 9.0 speed / 5.0 incline
1 min     Sprint! 8.0 – 11.0 speed / 1.0 incline
1 min     4.0 speed / 5.0 incline

Modify the incline or speed but try to keep to the minute. I included a sprint range so to accommodate all fitness levels. Not a fan of the treadmill?? You can take this run outside and find landmarks to sprint to. For ex: from one lamp post or bench to another for sprint range. Use hills for sprints instead of distance.

Heart Rate Up / Keep it Up! (In this order for 3 sets)
1. Elbow to hand plank with push ups: 5 each arm / 10 push ups total
Start in hand plank, lower right arm into elbow plank, press up with right hand to hand plank then add push up. Repeat with left arm.

2. Kettlebell Swings: 20 swings (with at least 20lb+ kettlebell)
Set your feet hip width apart and arms straight holding kettlebell. Thrust hips forward to raise kettlebell up and no higher than shoulder height. Make sure to keep your back straight and chest up. Be safe and check out these tips first. 

3. Split Squats (option to add weights): 15 reps each leg
One leg rests on a bench with the other leg in front. Bend both knees into a right angle keeping your upper body weight forward into the front leg. Check out a demo here.

4. Jump squats (option to hold weight at your chest): 15 jumps
Bend knees to squat deep and then jump as high as you can landing back into a deep squat. Make sure to land softly and with bent knees.

5. Mountain climbers: 1 minute
Start in plank position with a towel or glide under each foot. Keep your shoulders aligned with your wrists and slide one knee in towards your chest and slide back. Repeat on other leg and switch. Check out a demo here. 

This workout targets your entire body and will kick your butt in less than 45 minutes. Your goal is to get your heart rate up and keep it up so try to do each exercise back to back with minimal rest in between each set. Check out last year’s workout to add more core work and extra time on the treadmill.

Now go have an amazing time with your family and friends and enjoy an extra slice of pecan pie (you know I will!).
Happy Thanksgiving!! 

Never Underestimate the Booty!

Everywhere I look – fitness sites to social media to marketing campaigns – having a booty is ubiquitous and desirable. This was not always the case. A big butt was not something one would aspire for. It was actually quite the opposite. Especially women, they wanted narrow hips and a small butt. Well the trend has taken a turn. The era of skinny is over and a more curvaceous and healthy physique is in.

Several reasons to want and work for a great butt. #1 Serves as an accessory to a pair of jeans #2 Makes women biologically attractive #3 Streamline the body’s silhouette and increase curvature. The list goes on. Obviously these are all aesthetic reasons and legitimate (I should add!) but do we really know what having strong and round glutes does for our bodies biomechanically? Probably not...so let me explain!

– THE ANTIGRAVITY MUSCLE –
The butt (gluteal muscles) is the biggest and most powerful muscle in the body yet it’s often the weakest. This muscle group is made up of 3 muscles: gluteus maximus, gluteus medius, and gluteus minimus. All work together to keep your torso erect and to hold your upper body up when in motion. If not for the glutes, we’d be slumped over and crooked.

Glute-muscles

– BETTER POSTURE –
If you’re like 86% of American workers, you are sitting all day long at your job. Add to that the number of hours one sits reading, watching tv, playing games, surfing the net, this can total up to 13 hours a day of flattening your butt in a seat. It’s been labeled the “sitting disease” and can be more harmful to our health than you think. Because of prolonged sitting, the hip flexors become very short and tight making it difficult for one to stand up straight. However if the glutes are strong, they help to lengthen your hip flexors and keep your body in alignment. That in turn helps to relieve the chronic low back pain 80% of the population experiences and prevents you from looking like a hunchback.

– INJURY PREVENTION –
The gluteal muscles are prime mover muscles responsible for extension, abduction, and internal/external rotation. These motions are critical in performing basic exercises such as walking, running, stepping to more dynamic movements like sprinting, jumping, and power lifting. So when the glutes are weak to initiate these movements, other muscles will chip in and take on some of the workload. This is called syngergistic dominance. As this pattern continues, these helper muscles become overactive, overloaded, and susceptible to problems. Muscles do not engage properly, joint motions alter, alignment will change, and injuries occur. The most common muscle groups that suffer from weak glutes are the hamstrings and hip complex – basically all muscles attached to the pelvis and knees. Some common injuries are runner’s knee, IT band syndrome, Achilles tendinitis, and hamstring tears. The stronger the glutes the less the helper muscles will have to work. The right muscles will do their job so the body can move efficiently and safely.

– BIGGER GLUTES = MORE POWER –
For those that are into sport specific training, strength training and body building know how important the glutes are in primary exercises like squats, dead lifts, lunges, jumps, and sprints. Performing these exercises with weak glutes will force your body to compensate (again using those helper muscles) and will cease to gain strength, move faster, and more powerful in these movements. This makes progressive training stagnant and really frustrating especially when a competition or sport is involved.

Now that you know how important it is to strengthen your glutes, let’s get to work. There are dozens of glute focused exercises but here are the most effective (and my fave)!

#1 SINGLE LEG BRIDGE & KICKS

bridges

Single Leg Bridges & Kicks

Maintain proper form:
– Keep hip points at the same height through the set
– Drive the heel firmly into the floor to engage glutes and hamstrings and to execute lift of the hips
– Flex the foot when lowering leg down and point the toe when leg lifts up
– For single leg glute lifts, keep knees together by squeezing inner thighs together to stabilize the hip

#2 WEIGHTED BRIDGES

weighted bridges

Weighted Bridges

Maintain proper form:
– Align feet directly under the knees
– Drive the heels down to elevate hips and squeeze glutes at the top
– Draw abdominals in to protect lower back
– Lift hips up in a controlled motion engaging glutes, quads, and hamstrings
– Use a balance bad or cushion under bar to protect boney hip points

#3 DEEP SQUATS

squat

Deep Squats

Maintain proper form:
– Engage the abdominals to straighten spine and keep chest up
– Set feet hip width apart (slightly turn toes out)
– Lower your seat down past the knees
– Avoid knees moving too far forward beyond toes

#4 SPLIT SQUATS

lunges

Split Squats

Maintain proper form:
– Relax the foot on the bench and completely disengage the back leg
– Shift upper body weight to the front leg
– Bend knee into right angle making sure knee does not go beyond toes
– Keep abdominals engaged to protect lower back and keep spine straight

#5 SINGLE LEG DEADLIFTS

deadlift

Single Leg Deadlifts

Maintain proper form:
– Slightly bend the standing leg
– Engage abdominals and back muscles to keep upper body in full extension
– Activate and extend back leg so it becomes an extension of your upper body
– Avoid gripping toes for balance
– Squeeze glutes when standing straight up

#6 HIP HITCH

glute medius

Hip Hitch

Maintain proper form:
– Slightly bend standing leg
– Keep abdominals engaged to keep chest up and spine straight
– Shift the active hip as far to its own side to get a deep stretch followed by strong contraction when hitching hip up


Sure the aesthetic of a great butt may be enough for some to work on these exercises. But don’t sell your booty short. It can be more powerful than you think. Shoot for strong glutes and your body will thank you for it!

SERRATUS EXERCISES = STRONGER CORE

Since my last blog post on the “secret core muscle” and why it’s so important in our workouts, I’ve been obsessed with teaching my students how to target and strengthen the serratus anterior muscles. I want them to understand and feel the recruitment of these muscles and how they help increase upper body strength and develop a stronger, more efficient core.

Here are the exercises and tips that I’ve been teaching to strengthen and tap into the power of the Serratus Anterior.

SERRATUS PUSH UPS
I heart this exercise and love to challenge my yoga students by adding them to the sequencing. Not only does it help with deep breathing but it creates a drawing in effect that will instantaneously make you feel lighter.


ktszs

Targeting Tips:

#1 Stack shoulders directly above the elbows and keep body weight forward.
#2 Initiate the movement from the shoulder blades to isolate the upper body only.
#3 Press the forearms into the mat to round the upper back as much as possible.
#4 Avoid lifting or dropping the hips. Engaging the abdominals, glutes and legs will help.


CABLE  CHEST PRESS

The primary muscles worked are the pectorals (chest) and secondary muscles are triceps and shoulders. Simply adding scapula protraction and retraction is a great way to get the serratus anterior to engage making this upper body exercise a core workout, too.

cable pull down

Targeting Tips:

#1 Step one foot forward and engage the abdominals to maintain a forward lean.
#2 Begin to extend the arms ending in protraction (rounding) of the shoulders. Squeeze the shoulder blades together when releasing the arms to stretch the chest.
#3 Refrain from moving the hips. Keep movement in the upper body only.
#4 Exhale and round the upper back to fully engage the serratus and abdominals.


KNEELING CABLE CRUNCH

This effective exercise recruits the help of several muscles. Your entire upper body and hips help to stabilize and support the movement while the rectus abdominis and serratus are the target and synergistic muscles.

Pulldowns

Targeting Tips:

#1 Focus on articulating the movement from a flat back to a rounded back. Bring the elbows to the legs by curling the upper body down to the lower body.
#2 Keep back and abdominal muscles engaged when allowing the resistance to lift your torso.  This will help to avoid a swinging motion.
#3 Hips and neck remain neutral and stationary through the exercise.

TRY THIS!
3 sets of 15-20 reps of each exercise. Add weight or resistance to develop more strength and power.
Add to any upper body workout and get the core working. Add to a yoga sequence to discover deeper breathing and a drawing-in effect when coming up to inversions.

We’ve all heard it before “…working muscles that we never thought we had”. The Serratus Anterior are one of those muscles.  Focusing and strengthening this secret core muscle will create mind-body awareness and help you harness an untapped resource.  HAVE FUN!


Stretch with TRX

Total Body Resistance Exercise (TRX) is a suspension training program that’s known for its strength workouts. The exercises are functional, effective and all dynamically challenge your core by leveraging gravity and your bodyweight as resistance. Here is a great TRX exercise that gets the heart rate up while tapping into your core.

As much as TRX is known for its intensity, it also serves as a great tool to assist in exercises so one can develop better and stronger form. I love using TRX for my workouts but more recently discovered its assistance for getting deeper into yoga poses. Check out these great yoga stretches to try with TRX!

UPWARD FACING DOG
This pose is a back bend and requires strength in the abdominals, legs and upper body to hold the pose. Using the TRX will allow the hips to drop lower giving a better stretch in the abdominal wall and chest. Shifting the weight forward into upward facing dog can be challenging so be sure to engage the core and press firmly through the arms to help stabilize when moving.
Keep in mind! (1) Set up so that the straps are directly under the anchor point (2) Lengthening the straps will deepen the stretch but will also require more core strength (3) Press hands into the handles to push back to standing

updog

fur1w

LOW LUNGE TO STANDING SPLIT
One of my favorite hip openers is Anjaneyasana (Low Lunge). This pose stretches the hip flexors particularly rectus femoris and tensor fasciae latae (TFL) which are both very tight muscles due to prolonged sitting or overuse in exercise. Standing split is a balancing pose that challenges the core and leg strength while stretching the hamstrings. So combining the two poses is not only a great warm up but a great way to open up two very commonly tight areas (hip flexor and hamstrings). The release in both will immediately alleviate lower back pain and tension.
Keep in mind! (1) Twist the handles together so they make one big handle/one strap and line up directly under the anchor point (2) Keep the back leg in strap straight when in low lunge pose (3) Keep the front knee slightly bent when in standing split (4) Make sure to keep a flat back and chest up when in low lunge

Lunge

lowlunge

HALF ANKLE TO KNEE (PREP FOR TIP TOE POSE)
A very challenging hip opener as it requires flexibility in so many areas. All muscles in the LPHC (lumbo-pelvic-hip complex) must be open to sit in the full Tip Toe Pose. However modifying with half ankle to knee helps to release tension in the glutes and hip external rotators. The TRX straps will help with balance so that you can sit as low as you can while keeping a straight spine. Moving from seated to standing position will warm up the hip but also strengthen the quadriceps of the standing leg. This stretch will also help deepen your Pigeon Pose and Seated Ankle to Knee.
Keep in mind! (1) Keep your back straight and chest up (2) Very important to flex the foot placed on the knee to protect the joint (3) Move hips back (as if sitting in a chair) when bending the knee (4) Don’t be afraid to use the arms to help pull up to standing

ankleknee

Stretching is an essential part of being fit. Without full of range of motion, your body is restricted to complete any exercise or pose in its proper and ideal form. Find time to incorporate stretching and/or a yoga practice into your weekly fitness routine. Using fitness props such as TRX straps, blocks, yoga straps, bolsters will aid tremendously on modifying and assisting so the body is aligned and working safely, efficiently and pain free. Now…Go Stretch!

Workout Before (& After) You Pig Out!

Thanksgiving is my favorite holiday. It’s when I really take the day off, hang with my family, laugh, play games, and relax. I know most of us love all of the above but let’s face it…we’re more excited about gorging our faces with multiple servings of turkey, stuffing, potatoes, and pie. I’m not for pigging out but I know how delicious the dishes are on this holiday (my mom makes the most amazing stuffing…hands down!). So if you plan on stuffing face all day long and consuming, what the news has reported, well over 3,000 calories in one sitting, then working out is a MUST!

Here’s a quick and effective workout to do before and after your feasting marathon:

Blast the Calories with Cardio: 20 minute treadmill workout

3 min     5.0 – 6.0 speed at 5.0 incline
2 min     6.0 – 6.5 speed at 8.0 incline
1 min     6.0 speed at 3.0 incline
2 min     7.0 – 11.0 speed at 3.0 incline
1 min     4.5 – 5.0 speed at 3.0 incline
2 min     5.0 – 6.0 speed at 6.0 incline
2 min     6.0 – 7.0 speed at 8.0 incline
1 min     6.5 – 7.0 speed at 1.0 incline
1 min     7.5 – 11.0 speed at 1.0 incline
1 min     3.5 – 4.5 speed at 1.0 incline
2 min     6.0 – 7.5 speed at 3.0 incline
1 min     5.5 – 6.5 speed at 1.0 incline
1 min     4.0 speed at 1.0 incline
*Please modify by decreasing speed only when needed.

Blast the Belly with Core Work: 3 sets back to back

1. Elbow Plank to Hand Plank: 1 minute total
Stay in elbow plank for the first 30 seconds then press up into hand plank for another 30 seconds.

2. TRX Mountain Climbing: check out my post for instructions. Can also be performed without TRX.

3. Alternate leg raises: 20 reps on each leg
Support your neck with your hands then press your lower back into the floor to lift your shoulders up. Lower one leg down then switch legs. 

4. Elbow to side plank: 10x each side
Start in elbow plank. Shift your weight onto your right side, stacking your feet into side plank. Then go back to elbow plank and switch to the left side.

5. Hand plank reverse crunch on stability ball: 15 reps
Set up in hand plank with your shins on a stability ball. Perform a reverse crunch by rolling the ball towards your chest while keeping your shoulders on top of the wrists. Extend your legs and repeat.

Let’s get to work! Work hard, burn those calories, and enjoy your Thanksgiving meal…guilt free! Have a happy one!


Burpees, Push Ups, Squats…OH MY!

I’m a one-on-one trainer at heart but I’ve been leading more classes lately to expose myself to groups and to tap into a different side of my teaching. One of the main reasons I stick to personalized fitness training is because I can focus on teaching form and technique to make sure my students move safely and in alignment. But as of late, I’ve struggled with coaching several people performing exercises in ‘eh’ form and most in terrible form. I cringe when I teach these classes and I have to force myself from stopping the class so I can show the proper form. Instead I try to emphasize what muscles to use and the importance of correct form. But I’m losing this battle and I’ve come to terms that I can’t force people (or their bodies) to cooperate in these classes.

The three exercises that are most commonly performed in poor form are burpees, push ups, and squats. And that’s not only in a class setting but also on the gym floor and in training sessions. They’re all challenging exercises that require full body strength and range of motion so it makes sense why they are often done incorrectly. Let me explain the proper form for each with the help of my student, Nadia, in the video clips and images below.

BURPEES: A dynamic and full body exercise that requires strength and cardio endurance. A burpee should only be done by someone who has already developed a foundation in strength and balance and can understand how the body should land and exert force.
Most common mistake: Jumping back and landing in plank. There is too much compression in the spine when jumping back into a plank pose. Repeated jump backs into plank can create lower back pain and possible spinal disc injury.
Fix it! Once you jump back into plank, quickly jump forward again. In the advanced version, once your feet are off the ground to jump back, bend your elbows right away to land your chest to the floor.

Modified Burpee

Modified Burpee

Advancedburpee

Advanced Burpee

PUSH UPS: A calisthenic exercise that requires a pressing up of the entire body weight in plank pose. The muscles in the upper body and core are essential for strength and stability. Another exercise that requires full body strength.
Most common mistakes: Those not strong enough to perform a push up will usually (a) sink their lower back which shows minimal or no core engagement (b) less than 45 degree bend in the arms which shows weakness in the upper body (c) bobbling of the head which shows they’re not moving from a solid foundation and just trying to get through the exercise.
Fix it! Nadia shows us a perfect push up below. If your upper body is not quite strong enough, drop your knees to modify. Another great alternative is to elevate your platform which will decrease the load you have to press up.

Perfect push up

Perfect push up

Pushup_platform

SQUATS: A compound, full body exercise that requires strength primarily from the lower body and isometrically from the entire body especially the core and upper body. I was always under the impression that squats were only for the legs and glutes. But this exercise requires full body engagement and is used as a great assessment to show strengths and weaknesses in the body.
Most common mistakes: If the body is not fully engaged, you will most often see (a) knees collapsing towards each other (b) deep lower back arch (c) heels lifting up and knees falling forward past toes.
Fix it! There is no shame in using a stability ball for support in perfecting your squat. Place the ball against the wall and position your back against the ball. Align your feet hip distance, bend your knees to lower down into your squat. Make sure your knees don’t go past your shoe laces and your lower back keeps its natural arch and rolls against the curve of the ball. Using TRX is also a great way to work on your squats. The TRX straps assists to keep your spine erect while your lower body can focus on proper form. Using these modifications are great ways to build strength so eventually you won’t need them.

Squatversions

It’s not anyone’s fault that they can’t perform these 3 exercises in perfect form.  They’re all really tough exercises.  Most people don’t have enough knowledge or information on how to do so. Or more than likely, their bodies may not be able to move that way that day. So modify, move with consciousness and effectively. This will ensure a safe workout so you can continue your workouts…pain free!

Kettlebell 1-2-3

#1 SAFETY FIRST
Kettlebells should only be used by and/or with someone certified to work with them. First things first, find a space that gives you enough room to swing without any contact to surface or people. Second, make sure that you hold on tight to the kettlebell. I’ve seen them fall through wood floors and crashing into mirrors. Not fun! Third, make sure that your body is physically prepared and trained to lift the weight. Avoid injury to you and others is top priority!

#2 ALL ABOUT THE CORE
Kettlebell exercises are dynamic and require the whole body to participate. To lift and control a kettlebell, one has to focus on the entire body, especially the core, to contract as a group. When lifting or swinging a kettlebell, make sure to engage your core (abdominals, back and glutes) through the entire set. This will not only provide more strength and stability in your moves but will also help to support your joints and protect your lower back.

#3 TECHNIQUE TRUMPS QUANTITY
They are odd shaped, heavy and the moves are not your conventional push/pull exercises. Kettlebell workouts require a full range of motion, power and momentum. It works several muscles simultaneously through ballistic movements. If the technique is not there, your form will suffer and eventually injury will follow. Start with a lighter weight (15- 20lbs) and make sure your posture, mobility and form is on point. Perform the exercises correctly in each set before you begin to add more reps or weight. The better the form the more you will benefit from this amazing workout.

I heart kettlebells! They provide a total body workout that targets cardio, strength, and flexibility.  I use them with most of my students and they love it. But even I am cautious when I teach them.  It only takes one bad move to result an injury. As the same with all workouts, move from a strong and safe foundation and your body will thank you for it. Now go pick up a cannonball!

A Week in the Life of My Workouts

A question that all my students ask me is “What do you do for your workouts?” I answer vaguely so to not take up too much of their time talking about me. So I’d like to finally break down the week in the life of my workouts!

Header_blog


MONDAY: Most dread Mondays but I get excited for it because I get to run with my dog, Drogo. Weather permitting, I start the day off with a brisk walk to the park and once I get to Bridle Path in Central Park, it’s full speed ahead. I get bored easily so I mix things up with variations of running (sprints, skips, tip toes, backwards) and always add shuffles (regular and criss cross). I also find an area where I can do some resistance training. Some great exercises that can be done on a park bench: push ups, step ups, tricep dips, leg raises, mountain climbers, planks, and side planks. I add in walking lunges, squats/jump squats, frog squats and side lunges to make it a full body workout.

TUESDAY: This is my HIIT (High-Intensity Interval Training) day. I have very little time so I make sure every minute counts. My warm up is 20 minutes on the Stairclimber (with rotating steps). This helps get the heart rate up, warm up my legs, and gets me pumped for what’s to come. I love kettle bells and TRX so I make sure I incorporate both. Here is an example of a routine that I’ll work on.
– 30 walking lunge steps with kettle bell or free weights
– 15 TRX single leg lunges (each leg)
– 20 kettle bell swings
– 15 single arm rows with kettle bell
– 20 TRX Jump Squats
– 15 close grip push ups
– 10 single-leg plank to arm core exercise (each side)
– 25 leg raises
– 1 minute plank to side plank
– Forearm stand
– 5 minute jump roping
REPEAT! I’m in and out in an hour!

WEDNESDAY: This is a dual workout day that gets both the fire and water side in me. I train with my friend and professional boxer, Emmanuelle Brujan at Work Train Fight Gym and punch his mitts senseless for an hour. Not only is this a great cardio and strength workout but he keeps me on my toes and teaches me how to react quickly to defend myself. Later on in the day, I find time to work on my own yoga practice. I use this self practice as a way to tune in, give my body a break, and create some clever sequencing and techniques to teach my students for the week.

THURSDAY: This is my day to focus on strength training. I’ll warm up with either the stair master, a run in the park, or some TRX squats with some dynamic stretching. I focus on the larger muscle groups and work on developing them with more weight, less reps and with super sets or drop sets. I’ll do a sequence of 5-6 exercises back to back then jump on the treadmill for a 3 minute sprint and then rest/stretch for a minute before I start again. Most sequences are done in 3 successions and then I’ll move on to another muscle group. I usually hit legs, back, core, and arms for this workout. I walk out feeling like She-Ra but am sore for days after.

FRIDAY: This is probably my fave day of the week. Friday class at Katonah Yoga with Phillip Askew closes my week. It’s anything but restorative or easy but it’s necessary after all the lifting, pushing, and pounding I do all week. I get to stretch, lengthen, and practice my inversions with the “Inversion King”. I leave class feeling long, lean, and accomplished.

I like to rest over the weekend but if up to it, I’ll sneak in a quick run in the park. My weeks don’t always pan out as planned but the workouts do remain the same. I may throw in a class here there (I love Barry’s Bootcamp and BollyX) and try to explore other fitness studios (Brick’s BX class is next on my list). Variety in your workouts are important not only to challenge your body but to keep you interested and sticking to a routine. A combination of power/strength workouts with stretching and lengthening sessions work for me. So whatever floats your boat, always listen to your body and be sure to rest. It will only make you better for next week’s workout.

The Power of Barefoot Workouts

Since Christopher McDougall’s “Born To Run” launched and Vibram’s “Five Fingers” hit the stores, fitness workouts have evolved into what is now a trend. It may seem as if we’re going back in time, before the technology of footwear with all the bells and whistles of sneakers, where all you need is simply your two feet.

The fitness science of being barefoot is that the foundation of your entire body’s alignment starts with your feet. How your foot lands and connects to the ground shifts placement of the muscles up. For example, pronation of your feet (your arches rolling in) will slightly turn your knees in. Your hip flexors will begin to follow creating a pelvic tilt. That will lead to a slight tug in your lower back. Should this misalignment continue, back pain will begin and more than likely become a chronic issue. Who would have thought your two little feet could be so problematic?

The concept of barefoot training is forcing your feet to work out. Sport stores carry an array of sneakers all geared for specific reasons (pronation, stability, high arch, flat feet and so on) but what they all have in common is that they prevent your feet from moving so the rest of your body does all the work. The job of your feet is to provide balance and absorb some of the shock so that your knees and hips don’t have to. So the stronger your feet, the more they can help keep your body safe and pain free.

Here are some reasons you should consider going barefoot in your workouts:

  1. Stronger feet = better yoga practice

Once your feet start to work, you will find how crucial they are in your yoga practice. Notice how often yoga instructors will instruct you to ground your feet, spread your toes, and connect to the 4 corners. Consciously think about your feet and press firmly into them and you’ll see that Tree Pose can be a breeze!

  1. Lift your arches = tighter booty

I am certified to teach EBFS BARE, which is an entire workout barefoot. This workout is not a piece of cake! Simply pressing into your big toe will lift your arches, forcing you to use the deep rotator muscles in your hip and firing up your Glute muscles. Keep that up during your workouts and you’ll have a tighter booty and stable hips. Woohoo!

  1. Stable ankles to prevent sprains.

I can’t tell you how many times I’ve turned my ankles because of cute wedge sandals or a night out in stilettos. Training your feet will help to build strength and stability in your ankles helping you bounce back from those sprains or prevent them all together.

  1. A runner’s must!

If you’re a runner and wear those heavily supported sneakers, you are just pounding into your knees and hips. Consider a lighter shoe so your feet can start to absorb some shock. Your feet will also help keep the rest of your body in alignment and force the muscles in your legs to work more. You will see a difference not only in your strides but your overall strength and definition in your legs.


There are so many opportunities for you to try barefoot training through classes (Pilates, Barre classes, BARE) or just purchasing the right shoe (I love New Balance’s Minimus). Remember when you introduce something new to your body, take it slow, and observe how your body responds to this change. Definitely seek the help of professionals or research the information before you fully jump into it. But this is a change well worth it! Have fun!